A while ago, I wrote a blog post about how I do blogging. That was over a year ago. Times have changed, tools have evolved and processes have gotten better, at least for me. I still believe that how your blog or write is extremely personal in nature and what may work for me, might not for others. I would, however, like to offer some “best practices” that I use that I have found provide efficiencies for me.
To quickly outline how I write an article or blog post, here is a high-level process and the free tools I use. However, I’m going to go into a bit more details with the Evernote and DropBox steps as these are 2 items that I find to be core to my process. Oh, and you might want to take a look at my “10 Strategies for Finding Quality Time to Produce Content” for some tips on content writing.
So, here’s how I currently do my blog writing:
- Concept – save a title for an article (Evernote)
- Start Writing – get your ideas down (Evernote)
- Create Media Content – take pictures and photos (Picasa, DropBox)
- Consolidate – move it all to your blogging software (Live Writer)
- Review/Editing – edit it all, print out and read (PAPER!)
- Post & Promote – get your article live & share it (WordPress, Twitter, Facebook)
Those are pretty much the 6 easy steps that I use as well as the free tools that I use for each step. Let’s take a closer look at each of these steps and how I uses the various tools.
Concept
Conceptualizing a subject for an interesting article is always hard. Your inspiration may come at the oddest times so you need to be ready to get that idea down quickly. Sometimes, I simply send myself an email or jot down a written or digital note. But one thing that I have recently started doing is simply creating a new note within Evernote. I have professed my love of Evernote in the past and frequently recommend it to my friends and co-workers. It’s a way to quickly get writing into a digital format in the form of notes within notebooks that you can write or access via a variety of devices (mobile, PC, Mac or web). The core thing about Evernote is, is that once you write something, Evernote automatically syncs it to other devices that you have connected to it (obviously you need an internet connection for this to happen).
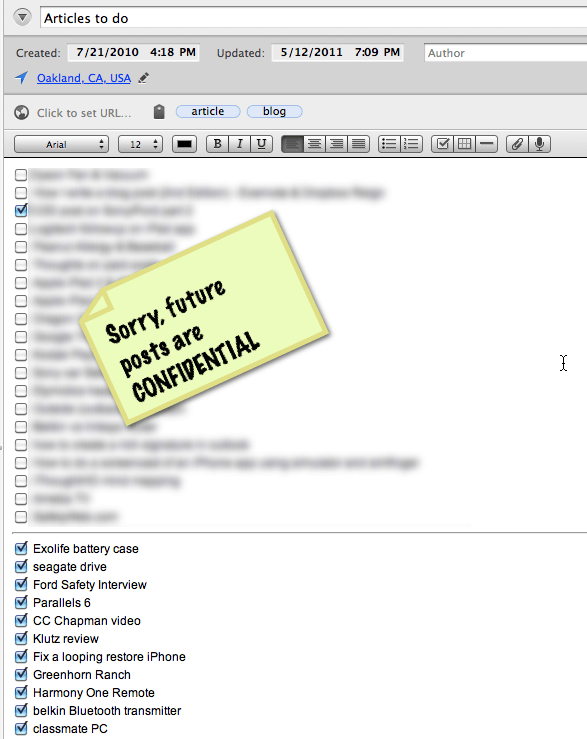
What I now do in Evernote, apart from starting a new note with the title being the title of my blog post, is also have a single note within Evernote that is a listing of ideas or posts that I want to do. In the computer versions of Evernote, there is a check box item that I use to track what articles I have or haven’t written. While you can only add the check box in the PC/Mac versions, you can check off things on your mobile device.
Also, another great thing that you can do if you are struck with inspiration while you are driving is to SAFELY launch Evernote on your mobile device and simply record a voice note. You can later go back and convert that into text.
Writing
My writing process has evolved from when I first wrote my “how I blog” article. In the past, I would create a text file and save that file to DropBox, another great product that lets you synchronize files across devices and computers (see my review of DropBox). I have now made this process even more efficient by using Evernote for all of my article writing. In fact, I’m writing this post on my train commute on my Mac, and will later edit it on a PC tonight, all using Evernote. And, I know that I will always have my latest version on any of my devices and you can pick up right where you left off. Great, no?
I have a couple of quick ideas here for Evernote…sort of a wish list. For starters, I wish that Evernote on the iOS devices would support some sort of rich text editing. As it stands currently, if you start a note on your Mac or PC and add formatting, you have two options when you try to edit or add to it on an iOS device: Append or Copy. I wish that I could have just some simple formatting as well as be able to preserve my original formatting. The second idea is more appropriate in the Post and Promote section so look for it there.
I realize that people do things differently when it comes to writing. Some people use Word, others compose in a blogging software, and some even do their writing within their blog editor online. I have actually found that Evernote offers enough formatting options to allow me to do the “blogging essentials,” that is bold, underline and italicize text, change fonts, add tables, but do it within a familiar environment with a metaphor that makes sense, that of notes and notebooks. The nice thing about the notebook metaphor is that you can actually organize your writing into various categories (e.g., “notebooks) and add tags to your notes.
Create Media Content
I’m not really going to go into much detail here as this is extremely subjective and depends also on your content. I try to keep things pretty simple though. I snap photos which I import into either iPhoto or Picasa or I film video and use iMovie for editing and production. That is if I want to create content. If I’m talking about things that I can’t really take pictures of, I resort to clip art within Microsoft Office. Usually you can find a useful image there. Remember, it is not very legal to use photos you find on the Internet. If you do, ask the author/producer for permission and be sure that you either link back to them or provide an image source listing. Don’t steal other people’s creations!
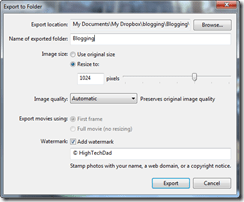
Personally, I really like Picasa for quick image management and editing. It provide all of the essentials to make your image look good and can help you manage image catalogs as well. Some of the nice things about Picasa are the fundamental editing “fixes” like crop, straighten, remove redeye, auto contrast, auto color, retouching, adding text and adjusting the fill light. You can also tune your images more precisely with fill light, highlights, shadows and color temperatures. Lastly, it is easy to add effects to your images like sharpen, sepia, b&w, warmify, film grain, tint, saturation, soft focus, glow, filtered b&w, focal b&w and graduated tint. That’s a lot of basic things that will do amazing things to your photos and best of all, it’s free. But one of the other things like I like is the export options from Picasa:
Here you can see some quick tweaks that I did on a image to make it a bit more unique using Picasa (and I love the watermark option!):
Remember I mentioned DropBox before? While I did away with it in my new process for the writing part, it is still an integral part of my media content creation and management. Within DropBox, I set up folders specific to the article I’m writing. Then as I take pictures or grab screenshots of things, I save them to that folder on DropBox. This means that I have my media on whatever computer or device that I’m on. If I take pictures of something with my iPhone, I can use the DropBox app to upload them directly to the folder that is for a particular article. By the time I get to my computer, those photos are there. No need to import them into my computer (and, you can have Picasa index your DropBox folders as well to keep track of all of your media).
Consolidate
The nice thing about the steps I described above is that your files automatically “consolidate” on the device of your choosing. Your article writing is synced in Evernote and your media is synced via DropBox. Now all that you have to do is put it together into one “document”. For me, that is my blogging software. For blogging, despite being a heavy Mac user, I actually turn to my PC to use Microsoft Live Writer which does everything that I need it to. Live Writer is free, but it is only for Windows. If you use Microsoft Word, then Live Writer is incredibly easy to understand and use. It also has some nice image management capabilities and lets you preview your post within your blog’s template if you want, and if you need to edit the raw HTML, you can do that as well. I’m still praying that Microsoft will port Live Writer over to the Mac…
So, my next step is to cut and paste my article from Evernote into Live Writer. Much of the formatting will transfer (you might have to go into the HTML to strip out any oddities in terms of formatting). Then, you simply place all of your images and photos from your folder in DropBox. All of your content is there for you right when you need it!
Of course, if you don’t have access to Live Writer, most of the blogging platforms has fairly robust online editors. I use WordPress as my blogging platform and posts are automatically saved as you write it. While each blogging platform is different, they fundamentally behave in the same way. It’s really a personal preference. I don’t usually do this unless I don’t have access to one of my computers.
Review & Edit
Some people can read and edit their work right on a screen. For me, I like printing it out and grabbing a red pen and physically marking the document up. There is something traditional about that. While everything else is done digitally, this editing and reviewing process seems to make it all tangible and real. Holding a piece of paper proves that you are actually producing something and that it is not just bits and bytes.
I usually only edit once because I could spend hours editing again and again, and I like just getting done with the work and getting it out for consumption by my audience. This, too, is a personal preference. Some people like to edit a lot and some people will just do it once on the screen. But the “free” tool here is that of paper and pen.
Post & Promote
Once you post your article, your content creation is done and alive for consumption. But you need to be sure that people know about it. There are many free social media tools that you can use for this like Twitter, Facebook, Digg, StumbleUpon, Reddit, LinkedIn, Google Buzz, and countless others. The best thing that you can do is to get some of these sharing buttons on your site within your article. If you are reading this on my site, HighTechDad.com, take a look to the left and you can see a vertical bar that has a bunch of these sharing tools. (Oh, and go ahead and share this article, I know that others might appreciate some of the content…and thanks for sharing!)
Here is an idea that might make the integration between the posting process even better, and actually part of it could be put in the Consolidate section. Recently, Evernote release the ability to “share” notes via Twitter or Facebook. I think there should be an option to “share” it with your WordPress blog. Users could configure their blog settings and then simply be able to post their note directly to their blog. If the editing were enhanced enough to produce good HTML (and give the ability to edit that HTML), then Evernote could quickly become a blogging tool. Think about it, many of the basic elements are there including Categories (Notebooks) and Tags. I really hope that is something that they are working on!
Just Start Writing!
The most important thing about promotion is actually, in my opinion, more of a chicken and egg thing. I always tell people who are starting to blog, just to keep writing and posting your articles. It takes a while to get into a groove but the more you write, the more of a possibility that someone will read your content and gain value from it. So, by doing more writing, you are, in essence promoting yourself and your content as well as hopefully helping and inspiring others. If you post only once, it’s just a flash in the pan…there is a lot of content out there. You might get a big explosion or it might be just a tiny spark that quickly fades out. So keep going and create some fireworks!
Anyway, this article was originally supposed to be just a short piece on how I use two free core synchronization tools for my blogging, namely Evernote and DropBox, but, I guess that I got a bit carried away. I do hope that you find this process useful. Please leave a comment and let me know what you think or how you do it and the tools you use.
HTD says: Fine-tuning your writing process with the appropriate tools can really improve your efficiency.


5 Responses
Hi Dad!!!
I really appreciate the blogging wisdom you have shared with this article. I am new to blogging and I am always interested in tips to help me better at it, and to help improve my writing. Love your site!
http://www.martykornegay.com
@MartyKornegay:disqus
Thanks Marty. Glad that you liked it. Please do let me know if you have any questions. And good luck with the blogging, it’s definitely fun and addictive!
For some reason I just can’t get into evernote. I prefer using a notebook software called circus ponies, which has a great index. There’s a small cost there, but still much less than evernotes premium features. I also use Google Docs and Picasa. I find google spreadsheets to be a great way to get my ideas out on paper and list any html links i need to put in my posts. Picasa is great, and the quick editor works well too.
Thank you for the informative article. I am just beginning to write blogs, in fact I haven’t even published one yet. I am afraid I will do something wrong. My questin right now is, can I have two or more blogs at the same time? I have two topics I am really interested in and would like to start conversations about them but If I am using Blogger.com how can I have more than one blog topic? How about URLs, will they have different URLs?
Sandy De Laughter
Great questions. If the topics are very different, then yes, you
probably want to set up 2 sites. If they are related, you can tag each
piece that you write with keywords or assign them to categories. That is
one way to do it. It’s easy enough to set up a new blog on Blogger or
WordPress and that process is free. Then if your site starts taking off,
you might want to purchase a domain for it, otherwise, you can use a
subdomain like MyTopic.wordpress.com or something like that. Hope that
helps. I could definitely write a lot more about this.