
While I truly like Microsoft Office 2011 for Mac (you can see my review of it here on the Microsoft Office for Mac Blog), there are some folks who have complained about a feature being removed from previous versions, specifically, the “Work” menu that was present in previous versions of Word in Office for Mac (2004 & 2008). Personally, I never used that feature, simply because I didn’t need to. The “Open Recent…” menu item was just fine for me and I also really try to organize my content into a folder hierarchy on my hard drive or on DropBox.
![]()
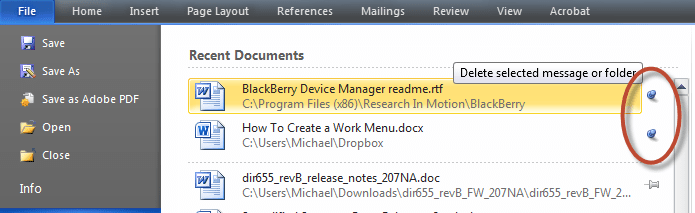
Also, in the Windows version of Microsoft Office (2010), there is a way to “pin” important documents in the File > Recent area of any of the Office programs (I’m not sure why Office for Mac 2011 doesn’t have this useful feature).
But, I’m always out for a challenge to help out wherever I can. Especially since I know some people who have simply not upgraded to the latest version of Office for Mac because this feature was missing!
So I did some searching around and found a solution (sorry, I didn’t come up with this) but I wanted to document it (with graphics) and share it so that others might benefit from this “How To.”
I have tested this out and it seems to work but I would love to get feedback as well so leave a comment!
How To Create A “Work” Menu in Word for Mac 2011
Here are the steps to create a fully-functional “Work” menu in Word for Mac (note, I have not tested this in other Office applications like Excel or PowerPoint).
- Open up all of the files that you want to add to the “Work” menu which you will be creating in the following steps.
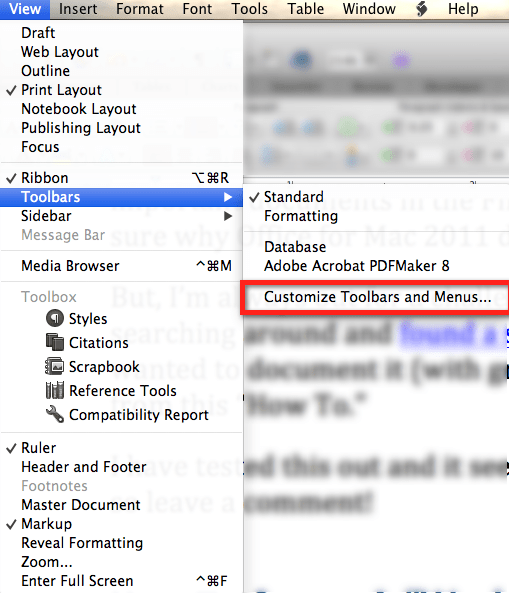
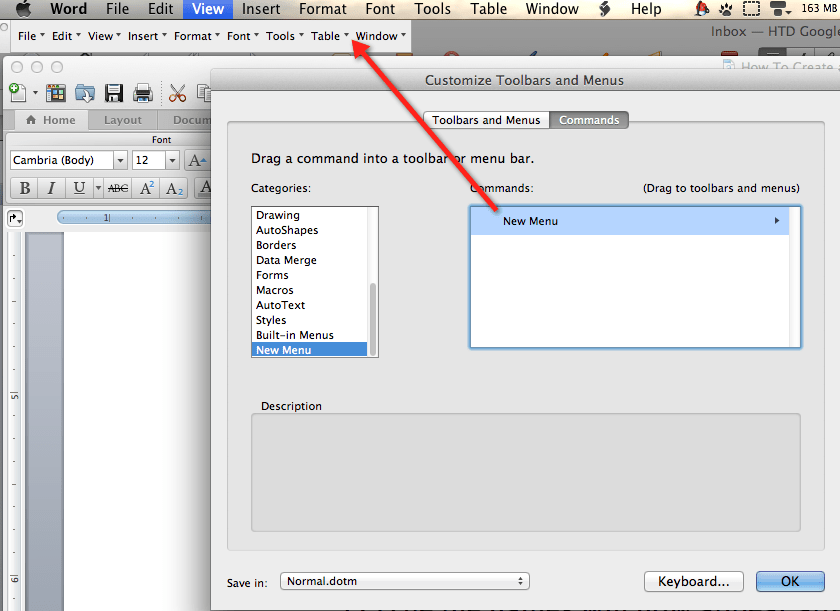
- In the Main Menu bar, go to VIEW > TOOLBARS > CUSTOMIZE

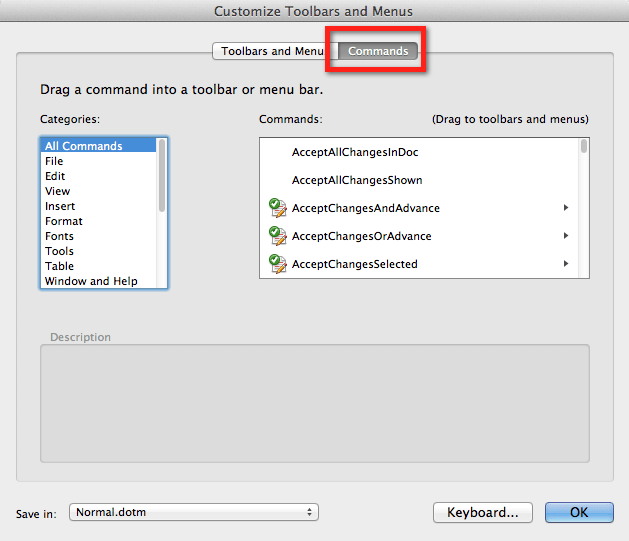
- Select the 2nd tab at the top called “Commands”

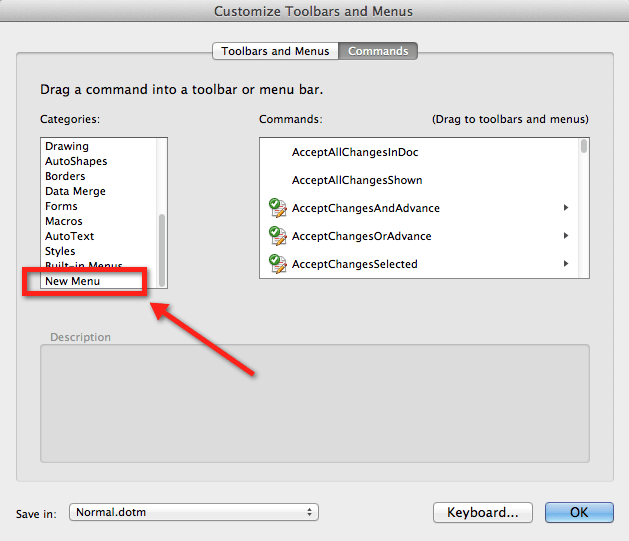
- Now scroll all the way to the bottom of the “Categories” box and choose “New Menu”
- Now it gets interesting. You need to drag that “New Menu” command from that window up to the to the “Customize Menu” that appears. Place it between the “Table” and “Window” items (or wherever you want).

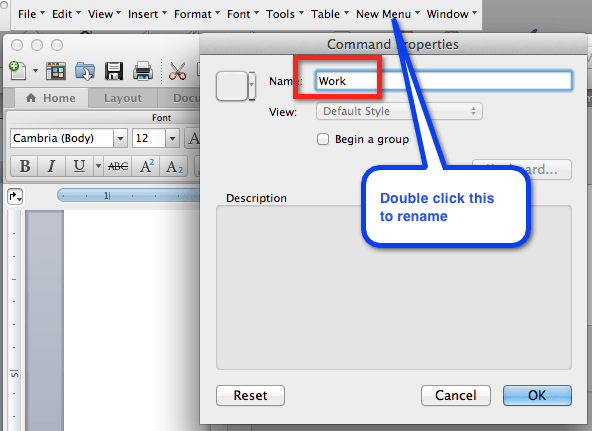
- If your menu order is not correct, drag the “Window” menu to the left so that the new “Work” menu will appear where it normally would.
- Now double-click on the “New Menu” so that you can rename it as “Work”.

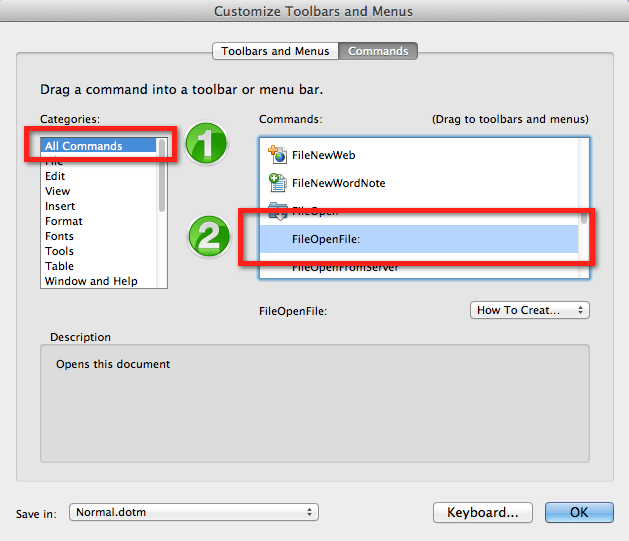
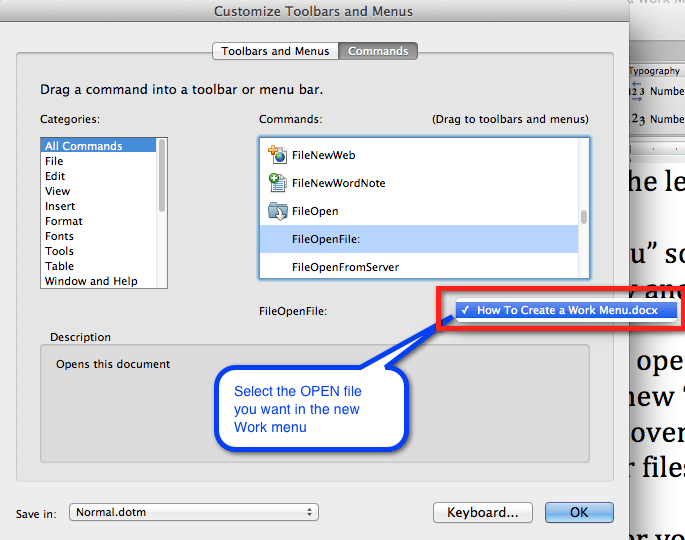
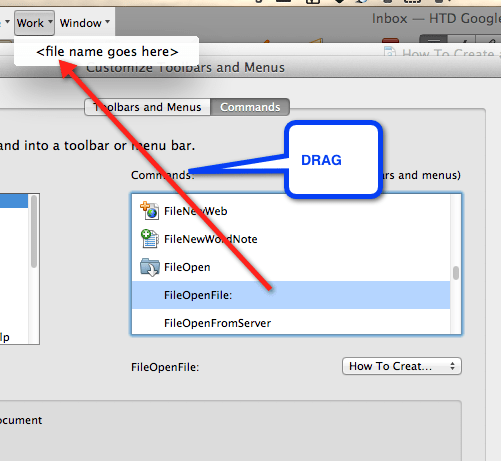
- Go back to the “Categories” window and go to the top and select “FileOpenFile:”.
- Select one of the open files that you opened in step #1 above. This will be a file that you want to appear in the new “Work” menu you just created.

- Drag the “FileOpenFile:” command over to the new “Work” menu.

- Repeat steps 9 and 10 for any other files that you want in your new “Work” menu.
- Click “OK” in the “Customize Toolbars and Menus” box and your file(s) will appear in the new “Work” menu.
That’s it!
Later on, if you ever want to go back to add more files, just repeat the process, but OMIT steps 3, 4, 5, 6 and 7 (just do steps 1, 2, 8, 9, 10, 11 and 12)
Here’s what it will look like when you are done:

But what about removing entries? Here are the steps:
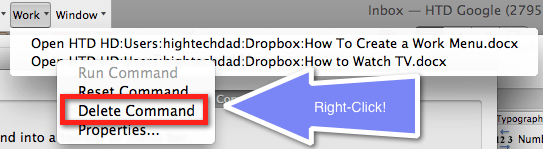
- In the Main Menu bar, go to VIEW > TOOLBARS > CUSTOMIZE
- Click on the “Work” menu and it will display all of the files you have in that menu

- Right Click (Ctrl Click) on the file you want to remove from the Work menu and select “Delete Command”.

- Repeat Step #3 for any other files you want to remove.
- Click “OK” in the “Customize Toolbars and Menus” box and your file(s) will be removed from the “Work” menu.


There you have it! You now have an easy to use “Work” menu within Word 2011 in Office for Mac 2011. Would love some feedback as to if this worked for you and if you found it useful.
Do note: if you move the file from the location where it was when you first set up the link, the command will not work! So, keep those files in your new “Work” menu in the same location.
HTD says: When you dig into the commands of Office 2011 for Mac, you can do just about anything!


6 comments
LulamaeBroadway
Thank you!!!
Starman_Andromeda
One extra step that’s useful, too. The file name that gets added–at least in Word 2011 on the Mac–includes the entire folder path to the document– so it’s a long, unrecognizable mess! To fix that. After you’ve added a file, go back into the customization– but double-click on the document’s name in the Work menu. Up will pop a window where you delete the front part of the path and be left with just the actual name of the file!
In any event, what were the software developers at Microsoft thinking? Word 2011 goes backwards in so many ways!
hightechdad
Thanks for posting that additional tip!
Bryan Van Cott
I just followed your instructions and the solution works beautifully. For anyone using this to access a form or template document in Word, it’s good practice to “lock” the document when in the Finder (you can do so by highlighting the document in a Finder window, looking at the document’s information [command + i], and then checking the box next to “Locked”). By locking the document, only a copy will open in Word, which will force you to save the document under a different name, as opposed to mistakenly overwriting the original form/template that you called up and edited.
Jay Ankeney
I’d really like to be able to create a Work menu, but when I drag the “FileOpenFile” command to my customized toolbar, it won’t go into the new Work menu. It just sits on the toolbar nexty to it under the heading “file name goes here”. Any ideas how to fix?
Bryan Van Cott
When you drag the “FileOpenFile:” command to the menu bar (the one that appears immediately below the traditional menu bar when customizing toolbars and menus), you can either drop the command onto the menu bar itself, which is what you are doing, or you can drag and drop the command into the box that appears immediately below the new menu item you just created (or any other menu item for that matter). A blue line will appear letting you know where you are dropping the command.