If you own a pool, you have a lot of responsibilities. You need to ensure that it is safe. You need to make sure that it stays clean and doesn’t turn green. But most importantly, you need to make sure it doesn’t have any leaks, especially if you live in drought-stricken California. It turns out, I had a pool leak and I was losing water daily. I didn’t want to pay hundreds of dollars to a company to find the pool leak. So I decided to figure out how to do it myself, all for about $40.
 1")
I have a fairly large, in-ground pool. It’s not heated (some day, I’m going to install solar heating for it and do a DIY video and article). I have always noticed a crack in the shallow end of the pool but I hadn’t noticed that recently it had expanded. I had suspected that it might be leaking there but I didn’t seem to be losing that much water – I had pretty much attributed it to evaporation. But this summer it was different. I was having to fill up our pool 2-3 times a week compared to 1-2 times every couple of weeks. There was definitely something wrong. And, because we live in California and have water rationing in place (and out lawns are all dead as a result), I decided I need to figure out how to patch the leak quickly and inexpensively.
There are 2 basic steps: 1) find the leak and 2) patch the leak. And, depending on where the leak is, both are fairly easy to do.
WARNING: Always be careful when working in a pool. Be sure you have someone who can watch you or work with you, especially if you are working on a leak that is in deep water or around any electrical like an underwater light.
If you don’t want to read the rest of this article, you can pretty much just take a look at the How-To video that I put together (also available directly on YouTube).
Find the Leak
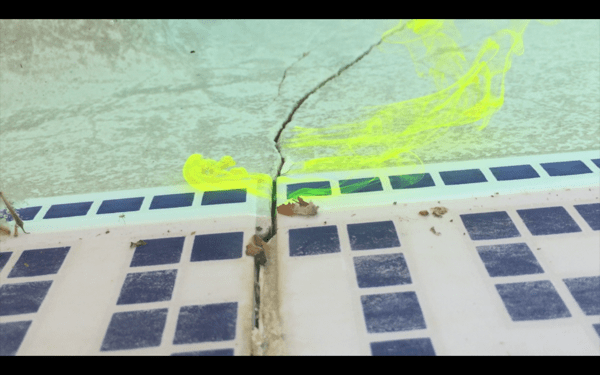
If you suspect that you have a leak, the most important and probably the hardest thing to do is find that leak. For me, the area I was going to focus on was pretty obvious. As I mentioned, I had a crack in the wall of the shallow end of the pool. We have had this crack ever since we owned the house, but over time, I believe it had expanded.
So to test my theory, I grabbed a bottle of blue food coloring. When the water was very still (e.g., the skimmer wasn’t running), I dropped a drop of food coloring very close to where the crack was. As the food coloring went down, it was sucked into a portion of the cracked area. You can see this quite clearly in my video.
 2")
You can also pay a little bit to get a real pool leak dye that is iridescent and seems to almost glow. I purchased this $10 kit (“Anderson Manufacturing FT601 Dye Tester Pre-Filled”) which included a syringe with a long plastic tube. The syringe was pre-filled with the dye. There is probably enough dye to do a few leak detections but I also purchased a bottle of just the dye (“Anderson Refill Florescent Dye for Pool Leak Tester – FD601“) in case I needed to do more testing. It too was about $10.
 3")
The nice thing about the “official” dye is that it is a bit heavier and thicker than the food coloring so you could drop it deeper and it wouldn’t dissipate as easily. And, as I said, it was incredibly easy to see.
 4")
If your leak isn’t as obvious, you will want to test a few places. First, be sure that your pool pump/filter/skimmer is not running. You want to do this when the water is relatively still. Cracks, even hairline cracks, are the most logical ones to test first. Also try around underwater lights as these can lose water-tightness over time. Skimmers are notorious for having leaks as well. And drains (down at the bottom of the pool, for example, but be sure you have help if you are testing something deep!).
Fixing the Leak
Repairing the leak, depending on its location, is actually pretty easy. I thought this would be the most expensive part of the process or that I would have to get a professional to do it. But if you just want to repair the leak and are not too concerned about aesthetics, you can easily and quickly do it yourself.
Once you identify the leak, you need to get something called Pool Putty. There are various manufacturers of it and I only tried one brand so I don’t have a recommendation on one or another. But basically this stuff comes in two tubes: Resin and Hardener. I got a 14 ounce supply of “Atlas Min. & Chem. 530318 Pool Putty” in white (you can get a yellow/cream color as well). The putty costs around $20. I got a larger supply as I wanted to be sure I had enough.
 5")
The beauty and the magic of this putty is that it will harden above or under-water, once it is mixed together. You take equal portions of the Resin and Hardener and just work it together in your hands like clay, mixing the two until it is an even color and thoroughly mixed. Then you can roll out “snake” pieces of the putty and push it into the cracks or holes.
 6")
For leaks outside of the water, you will want to use some sandpaper or abrasive to roughen up the area so the putty will adhere to the wall. For leaks under the water, you will want to ensure there is no slime or anything on the wall.
It is a bit easier to smooth out the putty under water so for those patches above water, just use a little water to smooth those areas out.
The curing process takes a few days. But once patched, the putty should last quite a few years.
Doing It Yourself
There is always some great satisfaction when you complete a DIY project, especially a find and fix a leak in a pool one. But when it comes to saving money versus having a professional do it, and in my case, saving water during the California drought, the satisfaction is even greater.
Be sure that you do check the area you patched for the leak. But, personally, I would recommend waiting until the putty has fully dried. I wasn’t sure if the dye and the putty might mix in some way, leaving wet putty with some fluorescent color.
I’m a big advocate of fixing and repairing things on your own, whether it is technology-related or otherwise. But do remember, there are some projects that it is almost better to have a professional do so do consider your options carefully.
HTD says: Finding and fixing a pool leak is pretty straight-forward. And once the pool repair is done, you have great satisfaction!