For a couple of years now, ever since the original NETGEAR Arlo cordless security camera launched, I’ve had particular areas of my home covered with video security. (You can read my original Arlo review here.) Now I got my hands on the latest and greatest Arlo cordless security camera, the Arlo Pro 2, and I was really curious to see how it stacked up against the original Arlo in terms of installation and usage. To cut to the chase, there are a lot of new and upgraded features I really like! (*Disclosure below.)
My old Arlo system consisted of four outdoor (cord-free) cameras and one wired indoor camera, each connected to an Arlo base station via a secure WiFi connection. I had the free cloud storage plan since I had only 5 cameras on my account but that was the limit. I could look back at recorded video up to seven days before as well as view live streaming video on demand (with the outdoor cameras) and the indoor camera acted in the same way based on how I configured it, recording video based on activity or motion (like the outdoor cameras). The only thing I had to do was replace the (expensive) batteries every month or so. Battery replacement really depends on how much activity the camera has – more activity means faster battery drain. But overall, my old Arlos have been quite reliable.

The new Arlo Pro 2’s builds on the original features and reliability in quite a few ways. I received a pack of two Arlo Pro 2 cameras and a new base station (which was also upgraded). It is important to note that if you have an earlier Arlo base station, the Arlo Pro 2 cameras are compatible with it so if you just want to add new cameras to an existing setup, you can really really do that.
But I wanted to use the latest and greatest so I elected to replace my old base with the new one. This adds a little extra work though. For starters, you will need to remove your old base station from your account. This also means that your existing cameras will become orphaned and you will need to reattach then like new cameras. I was fine starting from scratch so I could essentially go through a new setup. The one thing I didn’t have to do was create a new Arlo account.
Setting up the Arlo Pro 2
So I removed the old base station and added the new one easily. All you need to do is just plug it into your network and launch the Arlo app.

Just choose add base station and watch the lights on the base station go green.

Once the device is discovered, you will be prompted to add each of the cameras. So I had to (re)add my cameras.

You can actually crank through this process fairly quickly. I’d recommend renaming each camera as you go so that you know which one will go where.

When you place the base station, you need to treat it the same way you would a WiFi router because it is exactly that. So place it up high and away from obstacles or interference-causing items. Also, try to position if in the center of where the cameras will be.
Once you have set up all of the cameras, you need to go mount or place them. This is where the Arlo Pro 2’s begin to shine. This version allows you to either power it via the rechargeable battery or to plug into the wall directly. The camera 2-pack with base station comes with just one plug though. In the box, you get:
- Two Arlo Pro 2 cameras
- Two rechargeable batteries (one for each camera)
- One base station (with siren)
- One indoor power cable
- One indoor power adapter
- One Ethernet cable (to connect the base station to your network)
- Two wall mounts for the camera
- Screws
- Manual
- Security sticker

One advantage of plugging the Arlo Pro 2 camera directly into power instead of using the battery is that you can use non-stop video recording as an option (you can’t do this on battery power). Personally, I like placing the Arlo in areas that are often hard to reach with electrical or hidden away.
But to that point of remote placement and power, NETGEAR also has an accessory specifically designed to solve that challenge. It’s a mounted solar panel. While the NETGEAR site says that the Solar Panel (VMA4600) works with the Arlo Pro (original Pro) and the Arlo Go cameras, I do believe they are compatible with the Arlo Pro 2 cameras as well. (Actually confirmed on the Arlo Support Community.)
Using the Arlo Pro 2 Cameras
Unless you use the plugged-in method that I mentioned above, the Arlo Pro’s wait patiently until motion is detected and when it is, it sends out alerts and begins recording. You can then either view the recording (and listen to the audio – something new for me since there original Arlos didn’t have that capability), or you can click to watch the live stream view. It’s important to remember that the video quality and responsiveness truly depends on a couple of factors: the strength of WiFi signal between camera and base station and your mobile device’s signal strength. This holds true with the 2-way audio as well. If you have a bad connection, the audio responsiveness may not be immediate. But from my testing, the 2-way audio performed fairly well. Your mileage may vary (same with the video) based on the strength of the WiFi signal (which you can check in the Arlo app).
If you have the Arlo plugged into power, you have the ability to continuously capture video, or capture activity-triggered events as well. The difference here is a feature called the 3-Second Look Back. With this active, the Arlo will record 3 seconds prior to an activity being detected so that you understand what was going on before an event happened.
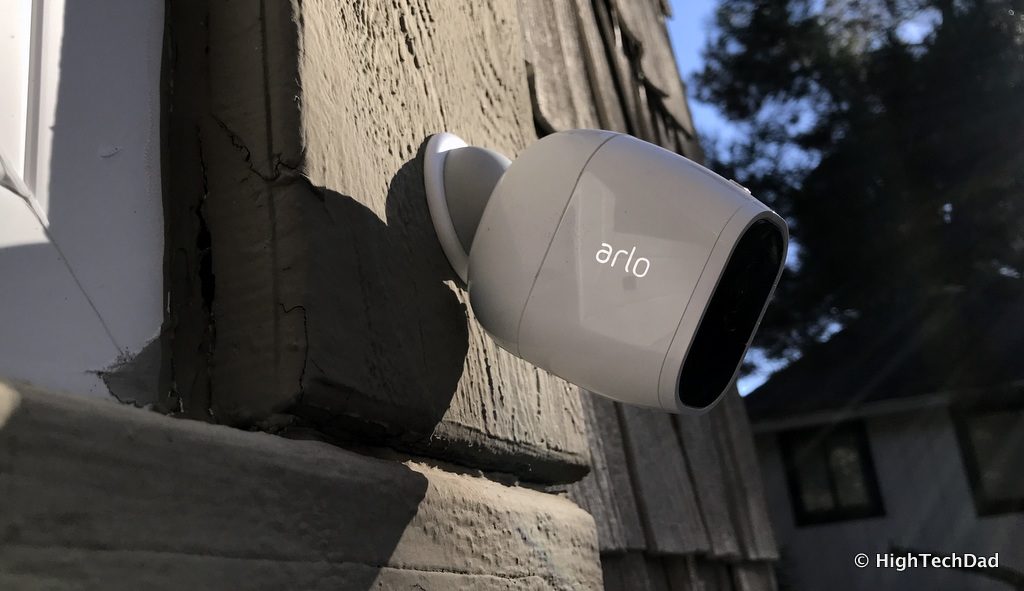
Another big difference between the Arlo Pro 2 and my original Arlo is the video resolution and the angle of the viewing area. The Arlo Pro 2 has 1080p HD quality video as well as a 130-degree viewing angle. The original Arlo is 720p and 110-degree viewing angle. You can see there difference below.
This is the original Arlo:

And this is the Arlo Pro 2:

Since I’m comparing the two versions, I should note that the Arlo Pro 2’s are slightly bigger and fatter that there original ones. But, the innovative magnetic dome used for mounting and positioning the camera is the same size. I actually simply demoted my older Arlos to areas having less traffic and promoted the Arlo Pro 2’s to important positions. The higher resolution, 2-way audio, and rechargeable batteries were three deciding factors for placing the Pro 2’s in high-traffic areas.

Once you have the Arlo Pro 2’s set up to your liking, you can connect your Arlo service to other Smart Home services. I have mine integrated with my Wink Hub 2. One “robot” that I set up within my Wink configuration was to watch for activity in the front of my house which would then trigger some lights to go on inside my house. This gives the appearance that when activity is detected, someone is reacting and turning on the lights. You can do similar configurations using IFTTT. There are some interesting IFTTT Applets that have been created using the Arlo. You can see some of them here. Things like calling your phone when motion is detected, or geofencing that turns off the Arlo security when you enter a pre-defined location.
Oh, one more thing about the new Arlo Pro 2 base station…it has a 100+ decibel alarm that can be remotely triggered using the app.
I’ve been using the Arlo Pro 2’s for about a month now and really like the ability to charge the rechargeable batteries instead of having to have batteries on hand to replace those “tired” batteries of the original Arlo. In fact, I just charged one of the Pro 2’s last night as I received the “tired” warning. The camera had about 15% left on the battery so I took it off the mount, plugged it into the USB cord/charger, and an hour or so later, it was fully charged and back in action. I realize I should have timed the charging process after the fact, but from what I informally measured, it only took an hour or so to fully charge.
Another nice thing about these weather-proof security cameras is that with the new Arlo Pro 2 base station, you can optionally plug in a USB drive to store your recordings locally instead of having to rely on the Arlo cloud storage. I haven’t tested this out yet, but it’s an intriguing option to have. Speaking about storage, as I mentioned before, there are a couple of options for storing your security videos, specifically:
- Basic Plan – FREE option for 7-days of recording storage up to 5 cameras (limited 3-month support)
- Premier Plan – $99/year or $9.99/month for 30-days of recording storage up to 10 cameras (unlimited support)
- Elite Plan – $149/year or $14.99/month for 60-days of recording and up to 15 cameras (unlimited support)
- CVR (Continuous Video Recording) Plan Add-on – if you have a plugged-in camera (does not work with battery-powered camera), you have two plans available – $99/year ($9.99/mo) for 14-days continuous recording, or $199/year ($19.99/mo) for 30 days – these are per-camera prices
Since I’m talking about pricing here, it would be good to outline the costs of the Arlo Pro 2’s. If you are setting up a new system, you probably will want to get a package (camera plus base station). A 2-camera plus base station setup retails for $479.99 (and you can get it on Amazon for $479.99 as well since it is a new product – but the price WILL drop). If you want a larger setup, you can get the 4-camera plus base station for $799.99. If you have an existing Arlo setup, you can buy the cameras on their own for $219.99 (or $219.99 on Amazon, again, the price will drop over time). There is also a bundle on Amazon that includes the base station, two Pro 2 cameras, AND a Solar Panel for $554.90.
Shop on HighTechDad
The product shown below (and related products that have been reviewed on HighTechDad) is available within the HighTechDad Shop. This review has all of the details about this particular product and you can order it directly by clicking on the Buy button or clicking on the image/title to view more. Be sure to review other products available in the HighTechDad Shop.


So, yes, the systems are pricey, but if you want to put a price on your home (or business) security and peace of mind, you need to weigh those options. Most people, I would think, would be fine with just using the Free (Basic) cloud storage plan so you eliminate those recurring costs which is a good thing. And since the Arlo Pro 2’s have rechargeable batteries, you also eliminate the costs of replacement batteries (like I have with my original Arlo’s). Overall, I feel that the NETGEAR Arlo Pro 2 system is a worthwhile investment (or upgrade if you have an Arlo system already).
Disclosure: I have a material connection because I received a sample of a product for consideration in preparing to review the product and write this content. I was/am not expected to return this item after my review period. All opinions within this article are my own and are typically not subject to editorial review from any 3rd party. Also, some of the links in the post above may be “affiliate” or “advertising” links. These may be automatically created or placed by me manually. This means if you click on the link and purchase the item (sometimes but not necessarily the product or service being reviewed), I will receive a small affiliate or advertising commission. More information can be found on my About page.
HTD says: Setting up the NETGEAR Arlo Pro 2 security system is incredibly easy. And using it is even easier. But the biggest gain is the sense of security you get as you envelop your home or business with video and audio coverage.
HighTechDad's Review
-
Ease-of-Use
-
Family-Friendly
-
Price Point
-
Features
Summary
Setting up the NETGEAR Arlo Pro 2 security system is incredibly easy. And using it is even easier. But the biggest gain is the sense of security you get as you envelop your home or business with video and audio coverage. The only place that I dinged NETGEAR on this review is really in the price. This is a premium system that may not have all of the bells and whistles. However, given the flexibility of not having to tie it to a cord for placement, and that it is extremely easy to set up, I feel this is sort of built into the price. You can, if you want, have it tethered to power, and have some additional benefits with that capability. But for me, I love the portability, the small form-factor, and the ease of use. And, above all, knowing that I can keep an eye on my property from my smartphone wherever I am.