For years, I have been a diehard user of Adobe Dreamweaver (heck, way back when it was a Macromedia product, I helped with the marketing launch). But over the years, HTML and CSS have become increasingly complex. While many WYSIWYG editors have popped up, allowing those of us with limited or mediocre editing skills to get by, coupled with the advent of WordPress and other CMS theming, there are many of us who find themselves trapped in sort of a purgatory – we are comfortable working with HTML/CSS but without tools, we struggle (e.g., just using a context-based text editor like TextWrangler or Atom); we don’t want a WYSIWYG editor because they don’t offer enough control, but coding by hand is just beyond the powers of our minds – and thus, we struggle to find that happy medium where we can tweak code by hand but also see the results real-time. I needed to move beyond Dreamweaver, and in my searches and trials of various HTML editors, I quite by chance discovered Pinegrow. And I couldn’t be happier with what I found!
As you read this review, keep in mind that I’m not an HTML/CSS developer. I do know enough to be dangerous, to be able to tweak the code on my own site as well as develop sites for others, but if you asked me to code a page by hand in HTML and make it look pretty with CSS, I will break out in a cold sweat. For that, I need a tool that is frequently updated with the latest standards, that can guide me along as I experiment and tweak things, and that offers me a way to actually learn. So, don’t ask me about super-specific coding questions. I’m looking at Pinegrow as a guy who wants to move away from Dreamweaver and understand the new powers of HTML/CSS.

Pinegrow is releasing version 3.0 of their software shortly (in September 2017 if you are reading this in the future). But they have had a demo version to play with available for trial. The trial is time-limited (but if you ask really nicely to their support, you might be able to add a week or two to your trial). Trust me, you WILL need the extra time to go through the crazy amount of features Pinegrow 3.0 has. (Oh, and here’s a hint. They regularly update the software and if your trial has expired, install the new version and you can get an extra couple of days to evaluate the new or updated features.)
Let me warn you upfront. Pinegrow is loaded (almost overloaded) with features. To someone scared by software (not me, btw), it can be quite overwhelming. But to their credit, each feature truly has a need. In this review, I’m going to touch on some of the features. I’m not going to dive too deep, again, because there are simply too many features (and many of those I just don’t understand since I’m not an expert coder). But I do want to talk about some of the ones that I found to be important.
Also, their website is loaded with explanations, screen shots, and details, in case you want to really dive deeper.
What is Pinegrow 3.0?
I highly recommend spending some time reading through the Pinegrow Introduction as it clearly describes many of the core features. As they outline, Pinegrow is primarily an HTML and CSS editor. Importantly, it does not store your files in a proprietary format. You are editing HTML/CSS so if you were to create a page/site, you could upload the files directly to a web server as saved. It does incorporate many types of frameworks like Bootstrap (not sure exactly what that is honestly) which you can use or not.
Pinegrow is an editor at heart that consists of a ton of configurable panels for working on your code. You can load up the interface with a variety of bells and whistles or keep things very clean. It’s up to you.
Some highlights of the editing interface include (and I will go into some of the details of these later in a real, page-coding example):
- Live Page Views – when you edit the code, you can see live updates of what the code would look like in a browser.
- Document Structure Tree – with this, you can easily find (and edit/move) every element in your HTML code.
- Library – this contains pre-defined HTML elements and groups of elements (including your own code) that you can drag right into your code.
- Selecting Elements in the Code or Tree – you can select single or multiple elements in the code or the tree and edit those simultaneously.
- Element properties – this is an extremely powerful way to edit specific HTML element in terms of attributes.
- Style – similar to elements, with the style editor, you can tweak CSS styles of selected elements, edit CSS stylesheets, and visually control most CSS properties.
- Element Code – while editing full HTML is great (and supported, see below), if you select a specific element, you can just edit that in a mini-editor and see real-time results.
- Page Code – as just mentioned, you can edit the full HTML code of a page in a separate panel and see live page results.
- Actions – available in the Pro version of Pinegrow 3.0, actions let you set up Smart components, Master pages, editable areas, and other functions if you are going to templatize things.
- WordPress – In the WordPress theme builder version, you can create and edit WordPress themes (which are PHP-based)
- Text Editing – Yes, there is simple text editing of items by just double-clicking on the text on the page. Easy!
- Flexible Workspace – As I mentioned before, all of the panels on the editor as a whole can be moved around, resized, and collapsed to provide the best coding environment for you.
- Plugin eco-system – Pinegrow has plugins to make coding more extensible with items like Bootstrap, Foundation, WordPress, and Smart components.
Those are some of the highlights, culled from the Introduction pages. They reinforce what I mentioned previously. This is NOT a drag-and-drop editor (where you don’t want to know what is happening in the code). But if you are comfortable with HTML and CSS, want to learn, or want a powerful way to edit, then I would recommend giving Pinegrow 3.0 a try.
Let’s look at some (very simple) examples of Pinegrow in action!
Pinegrow 3.0 in Action
There are a lot of options you can choose when you initially start Pinegrow. In order to learn some of the basic functions of Pinegrow 3.0, I started by creating just a simple page based on a template. You can create a new page, open a file, open a URL, or open a project.

These are pretty obvious choices, however, I want to first highlight the “Open URL” option. This is an amazing way to actually look at how a web page is coded and dive into how a particular author did their code. It will import in everything and let you perform live-edits on the code. It’s nice to work on your own site, for example. to identify and fix issues that may be happening. It will save a local copy or you can actually save a Web Archive from your browser and work directly with that. It’s really a nice alternative to going into a browser’s developer tools and tweaking and testing code there.
For this review and to test out Pinegrow 3.0, I decided to use a very simple (Bootstrap) template so I chose the “starter-template.html” to work from.

Once you open from a template, some basic structures are there for you to work with. Obviously, you can start from scratch and not use a template, or you can open an existing HTML file, or even a project (which may have other included files like scripts, images, CSS, etc.).
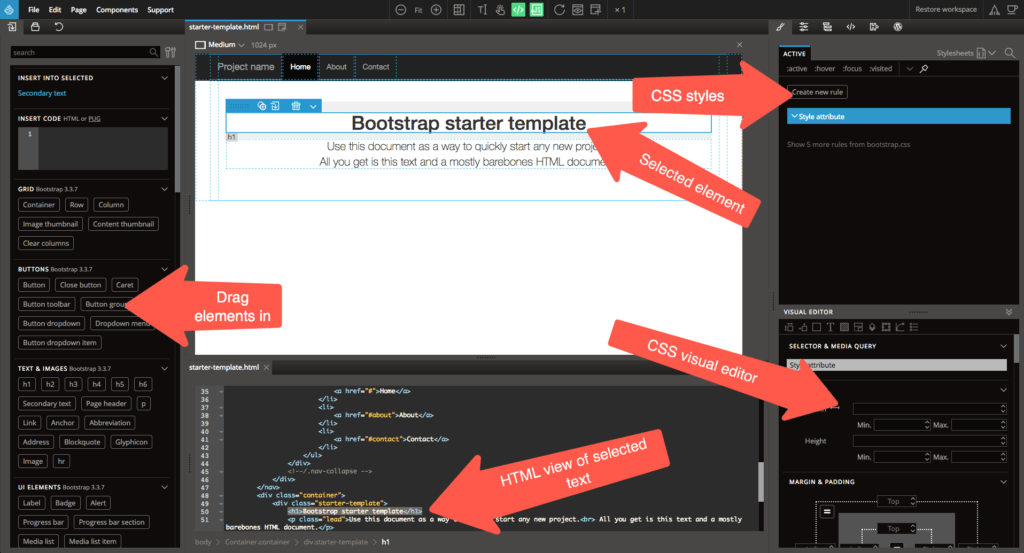
Once you open a page or create a new one from a template, you have your super-powered editor ready for you to tweak each and every setting. Below is what the main screen looked like for me (remember, you can easily tweak how you want your editor to display by hiding/closing panels and dragging them around).

In the center of the screen, you have the WYSIWYG editor. It is a fair representation of what the page will actually look like. Directly below that, I have enabled the HTML viewer (which you do by clicking one of the green buttons at the top </>). If you select something in the main editor, the HTML code is selected as well.
On the right side, you can see a variety of panels and tabs within the panels. These are for various specific types of editing. What you see here are the CSS Styles and the CSS visual editor. You can truly fine-tune your CSS using these controls.
Note, there are a bunch of other tabs at the top for:
- Style (CSS) – shown. When this is selected, the Visual Editor displays as well.
- Element properties – for attributes, classes, etc.
- Tree (Page Structure) – high-level structure of the document based on HTML elements
- Element code – HTML/CSS code for a selected element
- Actions – Master Page elements, Components, Editable Areas (in Pro version only)
- WordPress Theme Builder – for working on WordPress PHP-based themes
On the left-hand side, you have an Elements panel where you and pick and insert pre-defined elements into your code. You can, actually drag and insert these in. You can also optionally quickly code some HTML to insert in as well. Bootstrap Elements include:
- Grid – Container, row, column, image thumbnail, etc.
- Buttons – Button, close button, button toolbar, button dropdown, etc.
- Text & Images – H-tags, paragraph, link, anchor, image, etc.
- UI Elements – Label, badge, alert, progress bar, etc.
- Lists – List, list item, description list, etc.
- Tables – Table, table heading, table body, etc.
- Code – Code, code block, etc.
- Forms – Form, form group, textarea group, select, select group, radio, etc.
- Navigation – Navbar, tabs, breadcrumbs, etc.
- Media – Responsive media
- Javascript – Modal, dropdown, alert, carousel, etc.
HTML Elements include:
- Sections – Section, nav, article, aside, H sections, etc.
- Grouping Elements – p, hr, pre, blockquote, ol, ul, li, etc.
- Text – Anchor, link, em, strong, small, cite, etc.
- Edits – ins, del
- External Content – Img, link, iframe, embed, object, etc.
- Forms – Form, fields, label, input, button, etc.
- Interactive Elements – Details, summary, menu item, menu
- Head Elements – Title, meta author, meta description, meta keywords
Those are just for the Libraries that I have activated (Bootstrap 3.3.7 and Plain HTML). In fact, there are many others that can be activated as seen below which can extend the functionality even further.

So yes, as people develop libraries and plugins for Pinegrow, the functionality will continue to expand and improve!
Let’s take a look at a few of the panels (not all of them). Let’s start with the Element Properties one.

When you select an element and go to the Element Properties panel, you have full control over that particular element and can fine-tune it to your liking. Depending on what element you select, you will have a variety of configuration option that you have control over. You can easily add Classes or Attributes to the item. By clicking “Add class”, you get another panel that displays all of the classes available, any that are assigned, and any recently-used classes.

Within the Element Properties, you can tweak the text and context, change the layout and visibility, configure responsiveness of the element for different breakpoints, and more.
The Visual Editor under the Style (CSS) section is equally as powerful, if not more so. Once a style is defined, you can tweak a variety of items including:
- Dimension, margin, and padding
- Position and display
- Border
- Text
- Background
- Flexbox (WOW! Nice to have that!)
- Shadows
- Transforms
- Transitions
- Lists
If you select a style (in the case below, I selected “.greentext”, you can fully update that style.

You can see the text has a green color and is bold with an italic style and Small Caps variant. It’s extremely easy to get to that look that you are trying to achieve.
Another extremely powerful and helpful feature is being able to navigate your HTML code in the Tree (Page Structure) view.

This is a rolled-up view of your HTML code with each and every element. When you select a particular item in the Tree view, it will highlight in the page view and the HTML view as well so you can quickly go to a particular piece of code.
There are some quick actions you can take right within the Tree view. If you want to delete an item, just select it and delete it. If there is some code you want to copy, there’s a button for that. You can hide code and indent/outdent it as well. And there is a quick way to insert code into a particular section. Just choose the Insert Before, Insert After, Insert Into at Beginning, or Insert Into at End and a nifty little panel displays, allowing you to add raw code or HTML elements.

If you want to move a selected element to a different area on the page, you can just do that within the Tree view. It’s extremely easy.
As I mentioned before, you can quickly select an element and view just the code. This is a handy way to just work on a specific item without the distraction of the other surrounding code getting in the way.

The next section on the right side is the Master Page elements. Honestly, I haven’t yet explored this section as it requires setting up Master Pages and project. But here you can define editable areas (if you are working with a template). So, someone working with that page can only change the code within the editable areas. This is handy if you want to maintain a consistent look and feel for a set of pages (e.g., consistent headers and footers) but allow people to change the items within a certain section.

The last panel on the right has to do with WordPress, again, another function I haven’t explored (yet) due to time limitations on my trial.
What I really like about Pinegrow 3.0 is the fact that no matter where you are editing, in the code, visually, in the CSS, or via the visual editor, all of your changes show up real-time. It is consistency across the board. There is no need to have a web browser open to your page and hit refresh over and over. It all updates everywhere.

Another extremely powerful and helpful function is being able to define multiple screen sizes and breakpoints. Note: this feature works really well if you have a massive display! You can have multiple page view types running to get an idea of how your page will look on a mobile device, tablet, or huge monitor.

The is especially helpful if you are doing responsive design for your site. You can see how your code works and transforms based on predefined breakpoints. I haven’t played with this too much either, but what is nice is being able to simulate any environment you want.
And, if you choose a massive size like the X Large, your page display will actually shrink in size/resolution so that you can get an idea of what the code looks like (by choosing “Fit”) on the magnification. You can zoom out to actual (but then scroll bars usually display). If your code has breakpoints configured (something you can easily do), you can choose view settings for those breakpoints.
I’m actually having some issues with my own site and the mobile navigation hamburger menu dropping down below my logo. So, conceivably, I could import the URL of my site and then just start working with the code for my navbar until I get the hamburger menu in the proper place.
Another great feature is the In-Line text editing mode which allows you just click on the text to edit it as well as apply some basic HTML formatting code.

Just to jump back to working with CSS and adding classes and styles, you can quickly edit the style sheets that are attached to a particular page. Just open the stylesheet and you will see what has been defined in the CSS.

Here, I selected the .greentext style and then clicked an icon to edit the actual CSS. This is a great way to learn how CSS is composed (properly). You can, obviously, use the Visual Editor as well, but if you want to learn, be sure to look at the code that is produced.
Once you have the style defined, you can also add it to a particular element. In the example below, I added my .greentext to the p.lead element.

Now to circle over to the left side of the screen, we have the Elements panel which I talked about previously. Here, you can just drag elements from the library and onto the WYSIWYG editor and you will be prompted to choose where you want to place that element. It takes a little bit of practice and trial and error to figure out the best way to insert an element so do play around with this function.

Lastly, there is a great History panel that shows all of the changes you have made to both HTML or CSS. I believe this is session-based so changes you made prior to opening your document will not display here.

What is nice here is that you can just click to roll back any changes you recently made. Clicking on a previous edit will “undo” all of the subsequent edits. I really found this helpful.
There are gobs of other features and functions I haven’t touched up either because I haven’t tried them or because my skillset is too limited to truly understand their importance. And, it seems that on a quite regular basis, the Pinegrow developers have been pushing out new enhancements (and bug fixes). They seem to be extremely active in the development of Pinegrow 3.0.
Summary & Pinegrow 3.0 Pricing
Have I convinced you yet that Pinegrow is truly an HTML/CSS editor worth testing out yet? I hope so. Personally, I keep gravitating back to it to try out new features or test sites or understand complex code. And, as I said, they do have a Free Trial available so definitely check that out!
In terms of pricing, I feel it is actually quite reasonable. BUT, you need to make a decision on which version you truly want or need. (For me, since I do a little bit of everything AND I want to try to actually develop some WordPress Themes, I would need the top-of-the-line version.) But let’s look at their pricing.
There are three versions of Pinegrow and with each step up in price, you obviously get more features. And note, as of this writing, there is some special pricing to celebrate the launch of Pinegrow 3.0. Here’s a direct link to their pricing information which has more details.
- Pinegrow – for single page websites – $39 (regularly $49) for personal licenses and $64 (regularly $79) for company licenses
- Pinegrow PRO – for multi-page websites and web apps – $80 (regularly $99) for personal and $143 (regularly $179) for company
- Pinegrow PRO + WP – multi-page websites, web apps, and WordPress themes – $120 ($149 regularly) for personal and $207 ($259 regularly) for company
These are 1-time payments and include a year’s worth of free updates. After the year, you can pay half price to continue to get updates, or not pay and not get updates. There are also Student and Educator discounts as well. For the Personal License, you can install on up to 3 single-user computers (which is great)! It’s available for Mac, Windows and 64-bit Linux.
The nice thing is, it seems that Pinegrow can grow with your experience. If you are just starting out with HTML and CSS (or are looking for a drag-and-drop editor with little access to the HTML code behind what you see), then I probably wouldn’t recommend Pinegrow. However, if you are any level above that, I believe Pinegrow to be a fantastic tool and editor. And, as you use it and look at the code it creates, is a great way to learn HTML and CSS at your own pace. (So wouldn’t we all qualify for “student pricing?”)
While I don’t receive any type of commission for this article, if you found it helpful in your evaluation, do tell them that HighTechDad sent you! And if you have questions, feel free to leave a comment! Happy coding!
HTD says: Pinegrow 3.0 offers tremendous features and capabilities to medium- and advanced-level HTML and CSS coders in a platform that can be customized to your needs. More importantly, it is an awesome teaching tool for those who want to learn new skills or improve their coding.
HighTechDad's Ratings
-
Ease-of-Use
-
Price Point
-
Features
Summary
Pinegrow 3.0 offers tremendous features and capabilities to medium- and advanced-level HTML and CSS coders in a platform that can be customized to your needs. More importantly, it is an awesome teaching tool for those who want to learn new skills or improve their coding. While initially the number of features can be quite overwhelming, over time and with some practice, the true power of this HTML editor can be realized. So don’t let the “4” value in the Ease-of-Use rating deceive you – it’s simply because there is a rather steep learning curve to truly understand and use all of the features. And this HTML/CSS edit is definitely not for beginners. Intermediate to Advanced-level coders will be pleased, I believe. The price point is great for the amount of functionality you get, especially during the Pinegrow 3.0 release pricing. The best thing is, you can really learn how to produce better code (or code in general) using Pinegrow.