Sometimes the best smart home and home automation technology is one that you basically set and forget. And when I was contacted by the folks at Rachio to find out if I wanted to test out the new Rachio Gen 3 smart sprinkler controller, I realized that I really hadn’t done much with the Gen 2 version, other than program it about a year ago. Since then, my Rachio has been silently watering my lawns without any intervention from me. So, I was indeed curious about what could be improved upon in a product that was already pretty great. Well, the folks at Rachio listened to user feedback and made some pretty nice improvements. Read on for my initial impressions having tested out the Rachio Gen 3 version. (*Disclosure below.)

For the past few years, California has been in a pretty severe drought, that is until the last rainy season when we got some pretty good rainfall. And during those dry years, I decided to let my lawn just die. My brown and dread grass was like a badge of honor – I was doing my part at conserving water. This is what my lawn looked like then:

But once the rains came and the water supplies returned to normal, I decided to bring my lawn back from the dead. So, with some hard work of thatching, re-seeding, fertilizing, and of course, watering, my previously brown and dead lawn came back to life. And one of the core factors that brought my lawn back was the “set it and forget it” watering performed by the Rachio Gen2 automated smart watering controller. Here’s my lawn now!

Back in July 2017, I reviewed Generation 2 of the Rachio. And while many of the core components remain in Generation 3, there are some big updates and upgrades that I need to talk about. At a high level, here’s what has been updated:
- New Rachio app – well, owners of Gen2 and Gen1 benefit from this upgraded app
- Weather Intelligence Plus – exclusive to Gen3 users, provides hyper-local weather precision
- WiFi updates – now supports 2.4 & 5 GHz wireless
- New wire connectors – Gen2 was a bit harder to connect wires, Gen3 is now a “snap” (literally)
- Button controls – there are now Run, Pause, & Skip buttons on the outside
- Easy cover removal – Gen2 took a little bit of force, Gen3 has a magnetic cover
- New wireless radio – allows for connectivity to the soon-to-be-launched Wireless Flow Meter
- Light bar – clearer indication of what is being watered, and other system alerts
My initial impression? Rachio has listened to customer feedback and has addressed the minor negatives from the previous version which, in my opinion, is still an amazing smart watering controller.
Upgrading from Rachio Gen2 to Rachio Gen3
Much of the installation process is the same. In my case, I was replacing the Gen2 with the Gen3. So, if you want to learn about installation, you can get an idea from my Rachio Gen2 review. So, in this review, I wanted to approach it from the upgrade and new features in the Gen3. But before doing that, I do have to comment on the “set it and forget it” functionality of Rachio in general. As I mentioned, sometimes one of the best features of a smart device is not even knowing that it is doing its job. And that was true with my Gen2 Rachio.
First, let’s talk about what’s in the box. You have the Gen3 controller, a power plug, some screws and drywall mounts, and an instruction booklet. The installation (or in my case, the replacement) process is quite straightforward. Here is what I did as well as my recommendations.

If you are adding a new controller completely, be sure you will mount it near an AC outlet. Also, be sure that the wires to your sprinkler controllers reach the spot where you desire to mount the Rachio. I know that goes without saying but there is nothing worse than not having those wires reach and to have to bind them to another wire. In my case, I simply put the Rachio Gen3 where the Gen2 was.
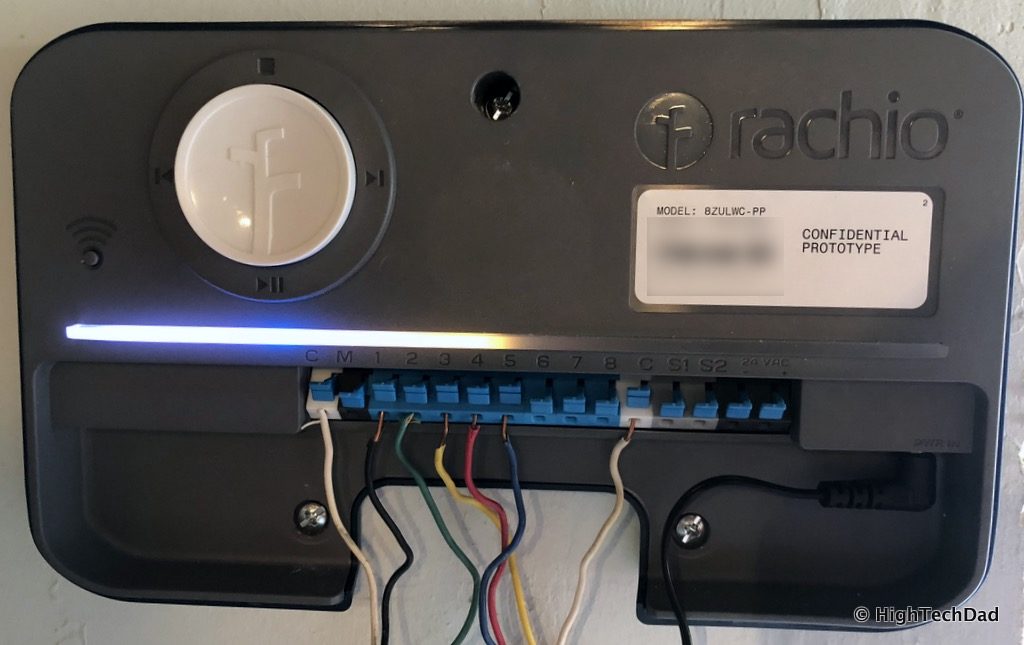
Next, and I would recommend this if you are doing either a new install or an upgrade, take a detailed photo showing which wires go where. This can be a life-saver especially if you have disconnected everything and want to have the watering stations in the same order as your previous install. This was from my Gen2 Rachio:

Remove the old controller. If you are doing an upgrade from the Gen2 to the Gen3, you are in for a little surprise. (And this is something I asked about when I was being briefed on the Gen3.) The screw holes for the Gen3 exactly match the ones from the Gen2! Yay! In fact, because of the new layout design, there is actually one less screw hole.

I want to take a step back and briefly talk about the new design of the Gen3 compared to the Gen2 because there are some great improvements that make installation and usage a bit easier. For starters, you don’t need to feed the wires up through a hole (something that I messed up on in my first install of the Gen2). So, once the Gen3 is mounted to a wall, you really don’t have to take it off again if you need to add more wires or move the wires around.

Second, the new wire clips to attach the wires are much easier to snap in and snap out. And they now support bigger wires (14 & 16 gauge wires). With the Gen2, you sometimes needed a small screwdriver to push down on the clips to remove a wire. The Gen3 makes this a lot easier.

Also, the layout of the wire clips is in a straight line, again a bit easier for “cable management.”
Next, Rachio heard us complain about taking the cover off on the Gen2. It required a little bit of force and wasn’t immediately intuitive. The Rachio Gen3 now has an easily-removable magnetic cover. It’s super easy to snap on or off.

And, there are now button controls directly on the face by the signature Rachio logo. Using these buttons you can Run, Pause, and Skip stations or schedules manually. Honestly, I rely heavily on the app to do all of the controlling, but it is nice to have this physical feature if, for some reason, my WiFi is down and I can’t control the Rachio via the app. On the Gen2, you had to take off the cover to access some of the manual control buttons. Gen3 is much more intuitive.

Also, there is now a light bar across the length of the body of the Gen3. This light bar provides status on things being watered as well as alerts or notifications used during the setup. It’s pretty bright and I don’t see a way right now within the app to disable or dim the light. That could probably be solved through a software update potentially.

So, back to the install. After removing the Gen2, I mounted the Gen3 in the same place (using the same screw holes). Then, I connected my watering station wires. There are plugs for common wires as well as optional rain/water sensors. Using the picture I took of my Gen2 setup, and with a smile on my face about the easier wire connectors, I had the wires reconnected within seconds. Lastly, I plugged in the power and the light bar lit up.
From there, you need to go to the recently updated Rachio smartphone app. If you don’t have a Rachio account, you will need to create one. As I already had one, I simply logged in and chose “Add Controller” as my option. (Note: my Gen2 shows as being offline.)

The next step is to connect the controller to my account. It needs to determine my location (you could have controllers in various properties if you wanted to).

Next step is to scan the barcode within the Rachio controller itself. You simply use the camera of the smartphone to do this.

Then you will want to set up the connectivity (WiFi) for the Rachio Gen3. Attach to the same wireless network you want your Rachio to be on. I have one set up in my garage for convenience. Another nice upgrade to the Gen3 is the fact that it now supports both 2.4 GHz AND 5 GHz wireless bands.

Once you are connected to WiFi, you need to set up your Zones. As I talked about in my review of the Gen2, this is actually a pretty fun process. I have been told that there will be a migration wizard available for those users who want to keep their previous settings from their Gen2’s. Unfortunately, at the time of this writing, the wizard was not available so I had to do it manually.

At this point, I actually stopped the setup. Since I felt that my previous settings were pretty good, I decided I would manually configure them. For zones, there are plenty of things you need to define: soil type, slope, type of lawn or watering area, type of sprinkler, amount of sun or shade, square footage, and more.
I found out something that I didn’t know. Rachio also has an extremely functional web interface as well. So I decided that I would pull up the old configurations on my iPhone and then manually configure the zones and watering schedules using the web interface. The copy-over process again took just a few minutes. And I actually made some changes to my configuration as part of the process.
In my previous setup, I had configured the watering schedule to be Flex Monthly. This meant that my watering frequency and duration would automatically be updated monthly based on the weather and season. But, I now saw that there was an option to do a Flex Daily which meant that the frequency and duration would be dynamically updated on a day to day basis. Using the Daily option also means that you potentially have better water savings. If a freak rainstorm comes and you are scheduled to water that day, the Rachio will automagically skip a scheduled watering in that case. There is also a way to do a Fixed schedule if you want strict watering times and durations.

Then you define which zones you want included in that particular schedule. You can have different schedules based on different zones. I only have 4 zones that are all pretty much lawns so I grouped the zones into one schedule. But, if I had a drip system for plants on my deck, I might set up a different schedule for those.

You can then configure the days you want to water: Any Days, Specific Days, or Even/Odd Interval. This is pretty self-explanatory. Because I want my Rachio to be completely autonomous, I told it to water on any day.
After that, you define when you want the schedule to run: end before sunrise, start at sunset, end before specific time, or start at specific time. Again, you can choose your preference although Rachio recommends the first options (end before sunrise) because this allows the water to soak into the soil which hopefully prevents evaporation. I set it initially to this, but then I actually changed it to “end before a specific time.” I had noticed in the past that when our sprinklers were running, our water pressure in the house would drop and this often happened when I was showering in the early morning. So, I made sure that the watering would end before I hopped in the shower.

You then define when you want this particular schedule to start and end in terms of date. I just made it start immediately and end never.

Next, you decide if you want a Smart Cycle. This is actually something that I recommend that you set. Basically, it breaks up a watering cycle up. For example, if you have a duration set for 20 minutes, Rachio will break the cycle in half. It will start with 10 minutes of watering, then it will pause and water something else, and then it will come back and re-water for another 10 minutes. The gap between the watering will allow the water to soak in which actually helps the absorption of the water to get down to the roots as opposed to just running off.

With Gen3 (and somewhat with Gen2) there is Weather Intelligence (Gen3 adds a bit more functionality to get hyper-localized weather). But two settings here are Freeze Skip and Wind Skip. Freeze Skip is pretty obvious, the Rachio won’t water if the temperature is below freezing which could damage your plants or lawn among other things. Wind Skip is a new setting which will prevent watering if it is extremely windy out. You don’t want to water the street or your neighbor’s garden if the wind is blowing too strongly and sending water elsewhere!

Lastly, Rachio will automatically define the watering duration based on the configurations you set up for the zone. In the past, I actually dialed back these recommendations slightly just to conserve a bit more water. I just subtracted out 5 minutes.

Once you finish all of the schedule configurations, you can pretty much let your Rachio take over control. But you always have the option to skip a pre-scheduled watering which you can do directly in the app. The app shows when the next schedule will be as well.
And, using the Weather Intelligence, your Rachio will automatically adjust frequency and duration based on the weather conditions from a local weather station. Another change that I did in the setup of the Rachio Gen3 was to choose a “personal” weather station (typically run by individuals) instead of one further away that was “national” weather station. This means that weather forecasts, wind, etc. are much more localized to my home and not an area that is hotter (which it was in the past).
A Notable Rachio Gen3 Add-On
I have pretty much covered all of the big differences between the Gen2 and Gen3 Rachio’s. The physical redesign for usability really makes the install process easier, being able to not worry what type of WiFi band you use is great, and, the redesigned smartphone app makes the monitoring and controlling more intuitive. But there is something else built into the Gen3 that is worth talking about, specifically the support for the new Wireless Flow Meter.

The Wireless Flow Meter is a completely new product and it only works with the Rachio Gen3. This device is attached to your sprinkler water line before the watering stations themselves. Using some scientific wizardry, it monitors the flow of water to your watering stations. With a properly functioning (meaning no leaks or breaks), it sets a benchmark for the flow of water. Then, if a break occurs, it will detect that a particular watering station is consuming more water than normal.
We all know how sprinkler heads can be lopped off by lawnmowers, for how the PVC pipes can crack (perhaps due to freezing). But often, if your system is watering in the early morning, you don’t know about this until after the fact, when you find floods of water, or worse yet when you receive a huge water bill. The Wireless Flow Meter monitors the flow and when it detects an anomaly, it will wirelessly (NOT using WiFi but using Zigbee or something similar) communicate with your Rachio Gen3 controller and automatically shut off watering to that bad water station.
I haven’t tested the Wireless Flow Meter but hope to do so in the future when it becomes available as it sounds like a great addition to the new Rachio system. And, it will supposedly give you a much more accurate reading of your actual water consumption.

4/23/18 update: Standard pricing is as follows (note: Gen3 is not yet available on Amazon but you can see all Rachio products here):
- 8-Zone Rachio Gen3 – $229
- 16-Zone Rachio Gen3 – $279
- Wireless Flow Meter – $99
- 8-Zone Rachio Gen3 AND Wireless Flow Meter bundle – $329
- 16-Zone Rachio Gen3 AND Wireless Flow Meter bundle – $379
Shop on HighTechDad
The product shown below (and related products that have been reviewed on HighTechDad) is available within the HighTechDad Shop. This review has all of the details about this particular product and you can order it directly by clicking on the Buy button or clicking on the image/title to view more. Be sure to review other products available in the HighTechDad Shop.

If it isn’t already obvious by now, I’m quite impressed and extremely happy with my Rachio. And with the updates that the Gen3 now has, I highly recommend people think about upgrading their watering controllers to one that is intelligent and effective. Depending on your community, you may even qualify for a rebate from your Water utility (it does vary by city and state). But the best thing about having a Rachio is not only being able to control it remotely but to just set it and forget it as I said. And watch your garden get watered and conserve water through smart irrigation.
Disclosure: I have a material connection because I received a sample of a product for consideration in preparing to review the product and write this content. I was/am not expected to return this item after my review period. All opinions within this article are my own and are typically not subject to editorial review from any 3rd party. Also, some of the links in the post above may be “affiliate” or “advertising” links. These may be automatically created or placed by me manually. This means if you click on the link and purchase the item (sometimes but not necessarily the product or service being reviewed), I will receive a small affiliate or advertising commission. More information can be found on my About page.
HTD says: The Rachio Gen3 smart sprinkler controller is a critical and important upgrade for any home that has plants or lawns that need to be watered. Water conservation is key to a sustainable planet and having a smart home device that knows when or when not to water based on the weather is extremely important.
HighTechDad's Ratings
-
Ease-of-Use
-
Family-Friendly
-
Price Point
-
Features
Summary
The Rachio Gen3 smart sprinkler controller is a critical and important upgrade for any home that has plants or lawns that need to be watered. Water conservation is key to a sustainable planet and having a smart home device that knows when or when not to water based on the weather is extremely important. This next generation of the already great Rachio smart sprinkler controller improves upon the previous version while adding some nice installation enhancements as well as the ability to connect a wireless water flow meter. The Rachio Gen3 is almost easier to install than the Gen2 and coupled with the updated smartphone app, is incredibly easy to use, earning a rare 5 star from me. However, with updates and new technology frequently means that the price goes up. Gen3 is slightly more than Gen2 (so I dropped that star rating by half a star) but still is quite good based on what you get. But best of all, once you configure the Rachio, you can pretty much let it do its magic all by itself. It will periodically remind you that it is working away as it changes a frequency or duration automatically. Definitely a solid product!