Not only do I write technology, gadget, and product reviews here on HighTechDad, but occasionally, I post articles and videos about repairs, fix-its, and how-to’s. In this particular case, this is a How To and Fix It article on diagnosing and repairing a leaking KitchenAid Dishwasher (applicable to models KDTM354DSS4 / KDTM354DSS5). I will cut directly to the chase here: while there is some information in this article, my 30-minute diagnosis and repair video walks through all of the steps to do this $10 repair that will literally save you $100s!
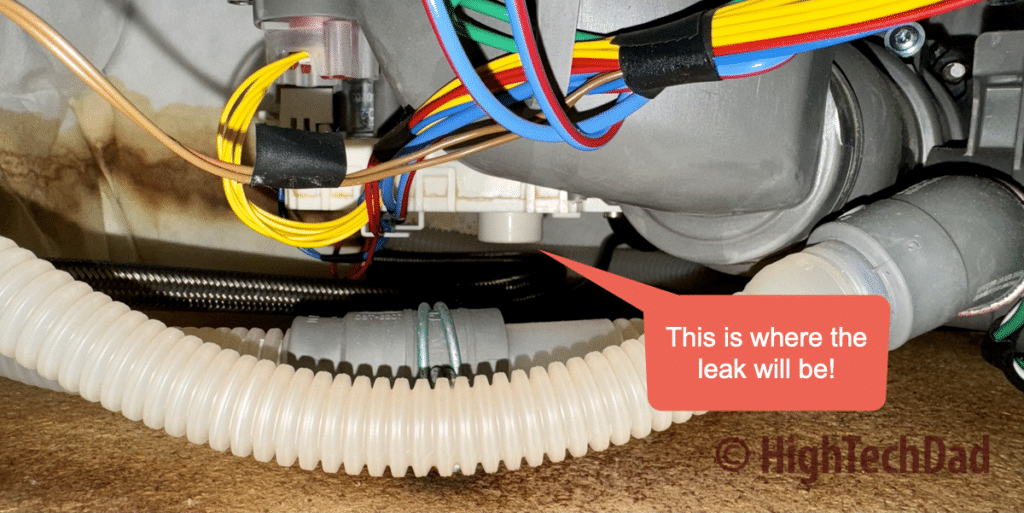
First, I want to point out that the Fix It for this leaking KitchenAid Dishwasher is specific to just ONE type of leak. There are many other possible ways your dishwasher might be leaking. IF this is the type of leak you are encountering, then THIS is the fix you want to do. AND, it is relatively easy to do without removing your KitchenAid dishwasher or taking it apart.
A few important things to note:
- I am NOT a repairperson – please, don’t ask me super technical questions about dishwasher or appliance repair nor the names of tools or parts because I will either not know or give a pretty generic answer.
- If you screw up, it’s not my fault – this article and my video are how I did things. They might not be appropriate for your particular issue. And it might not be the best way to fix things. You assume any and all risk if you do it yourself and mess up (sorry!).
- Check other sources – be sure to validate what I outline here and in my video. It’s always better to have a second or third opinion.
- Disconnect the power – when working with appliances or anything that plugs into the wall, before sticking a metal object into the innards of a device, disconnect it from electricity.
- Turn off the water – if the appliance connects to water, it’s best to turn it off. And remember, water and electricity don’t play nicely together.
OK, you have been warned!
Table of Contents
Let’s get into the backstory, the diagnosis, and the repair. But first, let me talk about my repair video (and some other sources I used).
Fixing a leaking KitchenAid Dishwasher video
I could write thousands of words about this repair, but I’m a bit more of a visual learner. And I feel that seeing someone do a repair or a DIY project is a bit easier to comprehend than reading about it.
I make my How-To and Fix-It Videos because I want to (hopefully) teach and empower others to do things themselves. These videos can save money, build confidence, and simply help you learn something new. Sometimes, I make these videos so that I can look back years later and do the same repair again (a good example of this is the one I made about changing my car’s headlight bulbs).
Anyway, I have a feeling this won’t be the last time I do this repair on my KitchenAid Dishwasher. Appliances wear out over time (and I’m convinced manufacturers do this on purpose to keep repair people employed and sell parts). Thus, the video.
If you are searching for something in particular about this repair (perhaps you are stuck or want to see something again), I have listed several chapters in the video. Click on any of the links below to jump directly to that part of the video. (You’re welcome!)
Chapters:
00:00 – Start
00:11 – KitchenAid dishwasher started leaking
01:16 – The backstory
02:04 – The 6 stages of appliance ownership
02:55 – Other helpful videos
03:38 – I am NOT a repairperson!
04:14 – Safety first!
04:37 – Remove sound dampener panel
05:14 – Where THIS particular leak shows up
05:32 – Run a rinse cycle to find leak
06:34 – This video is only for THIS particular leak
07:01 – Leak identified!
07:25 – DON’T remove the dishwasher!
07:42 – Walking through the repair
08:05 – Diverter valve seal replacement
08:39 – Remove the washer arm
09:09 – Detaching the hoses
11:45 – Hoses disconnected
12:02 – Remove the cover
12:41 – What you will replace
13:38 – Look at the part you are replacing
14:27 – Close-up of new part
15:30 – Put the part in the proper direction
15:57 – Removing the old part – it’s tricky
17:18 – Another way to possibly remove the old part
19:01 – Got the old part out
19:33 – Putting in the new part
20:23 – Start the reassembly
20:50 – Put on cover & reattach the hoses
22:12 – Tip – put cover in place first
22:49 – Reattach the washer arm
23:37 – Doing the leak test after repair
24:13 – Success! Saved some $$$!
24:33 – Final thoughts
25:13 – Part works on other dishwashers
25:38 – Additional HighTechDad info
Whew! I hope that is helpful.
The Backstory
I have had this KitchenAid Dishwasher for several years. I love it. It’s quiet and has been doing a great job washing my dishes. A couple of months ago, I replaced my kitchen sink garbage disposal. And, after a dinner party and running our dishwasher, the next morning we found some water on the kitchen floor. It wasn’t a flood, but it was enough to make me scratch my head.
Immediately, I thought that I hadn’t hooked up the garbage disposal properly. I have put in a few garbage disposals in my time, so that was a bit surprising. But under the sink, it was dry. Then I thought perhaps I had damaged a pipe in the wall (scary thought), but the wall was fine. So, it was something else.
Let me stop for a second here because I’m actually going into the stages that any homeowner, renter, or appliance owner goes through when something goes wrong.
The 6 stages
If you have had anything break at home, like an appliance, a gadget, or a vehicle, you have probably gone through many or all of these stages.
Stage 1 – the “oh crap” moment
This is that stage when something has gone wrong. For me, it was the water on the floor. And after drying it up and re-running the KitchenAid dishwasher a second and third time, more water appeared, truly defining that OH CRAP moment.
Stage 2 – Total denial
This is that stage of the “oh, this just isn’t really happening,” and you just hope that you are dreaming or in some sort of an alternate universe.
Stage 3 – This will cost a lot of money
Once reality sets in, you start thinking about how much a fix or replacement will cost. Do I need a new dishwasher? Is there some plumbing I need to replace? Do I have to call a repair person? Just take the dollars out of your wallet and start burning them.
Stage 4 – Ignore the problem and it will go away
This stage is similar to the initial “total denial” stage. Sometimes, if you give things a rest for a bit, they will magically correct themselves. (Not usually, but occasionally.) For us, we ended up using our leaky dishwasher as a drying rack and hand-washing our dishes for a month or so.
Stage 5 – Do some research
You have to move out of the denial and ignoring your problem stages; otherwise, nothing will get done. So, I decided to do some research and see what the leak problem might be. I got the KitchenAid model number (KDTM354DSS4 / KDTM354DSS5) and searched on YouTube. And I came across a couple of good videos that seemed to point to the same issue.
On both videos (Video #1 and Video #2), the same symptom was present —a leak from the bottom (see the picture below).
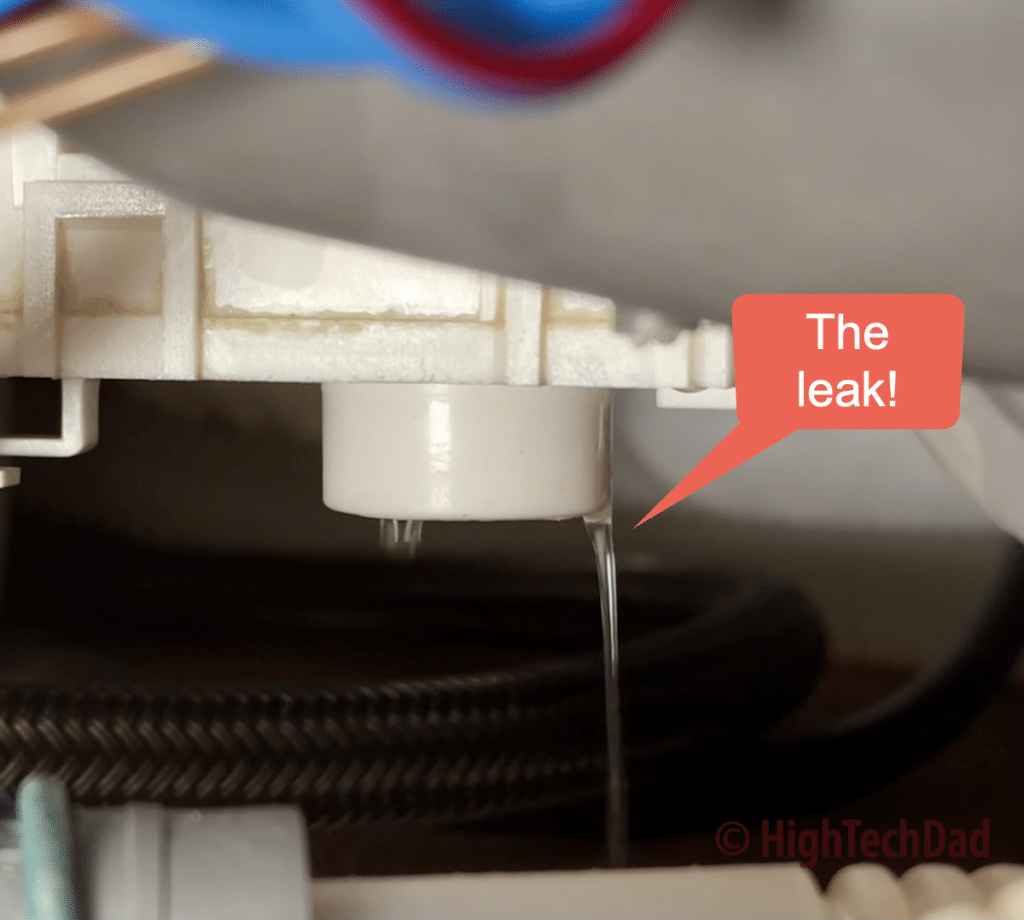
So I went to my dishwasher and ran a rinse cycle. And, the leak started happening right where it was “supposed” to happen for THIS particular repair.
Stage 6 – Fix it yourself!
With my leak and possible fix identified, I decided it was time to fix it myself (and record a video of the process). The particular part that supposedly wears out over time is the Diverter Valve Seal (or Grommet or rubber washer or thingamagiggy). I ordered one (a 2-pack) from Amazon. It was a 2-day delivery, and it only cost about $10.
The rest is history, which is documented in my video.
High-level KitchenAid Dishwasher leak fix it information
I won’t go into all of the details since those are all in the video. However, here are the high-level steps.
Start with identifying if the leak is the one I and others encountered. See the pictures above (and the video). Do the rinse test. If it is, you are in luck. Order the Amazon part and wait a few days. If the leak is elsewhere, sorry, but I don’t think that any of this information will help.
Here is what the old and the new part looks like.
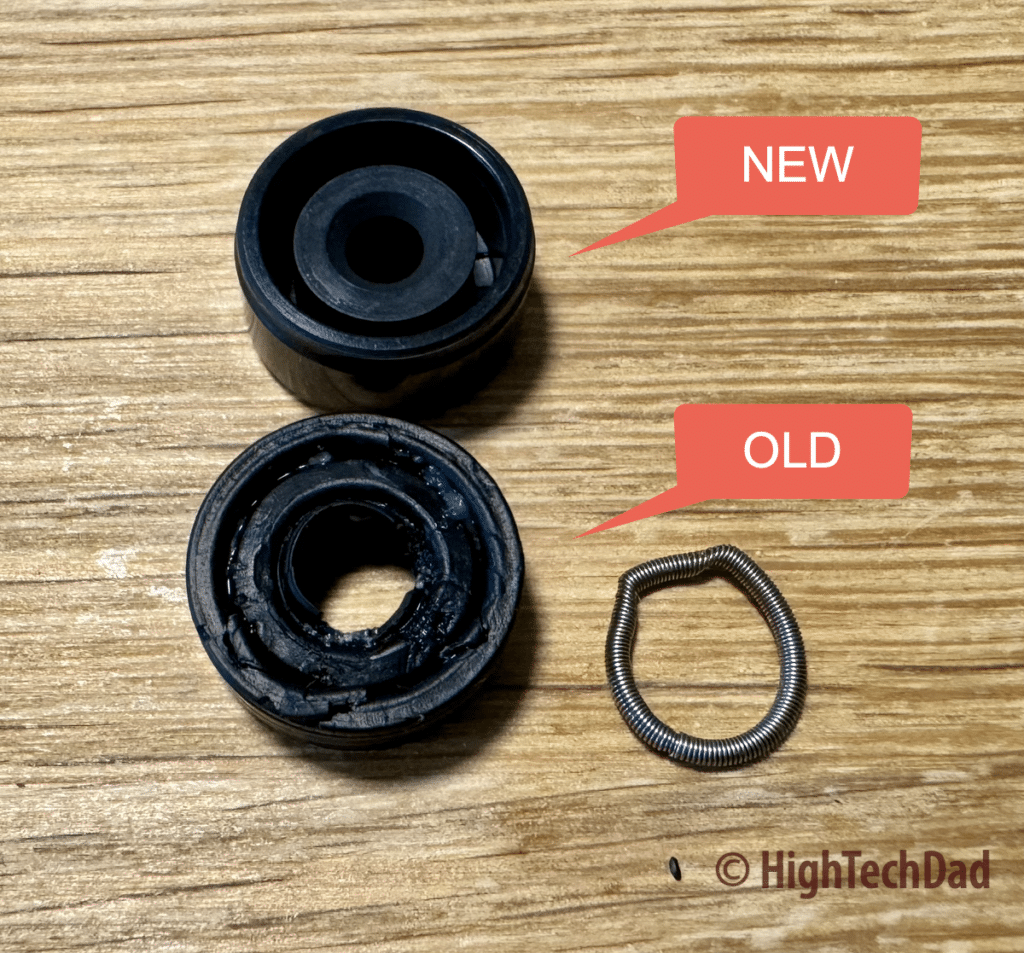
A quick thing to note – while the Amazon product I ordered was supposed to come with that circular spring, which I believe holds the grommet a bit more tightly, it did not. But when I installed the new one, it was snug enough.
Disconnect the electricity and turn off the water. Then, you will need to remove the sprayer arm.
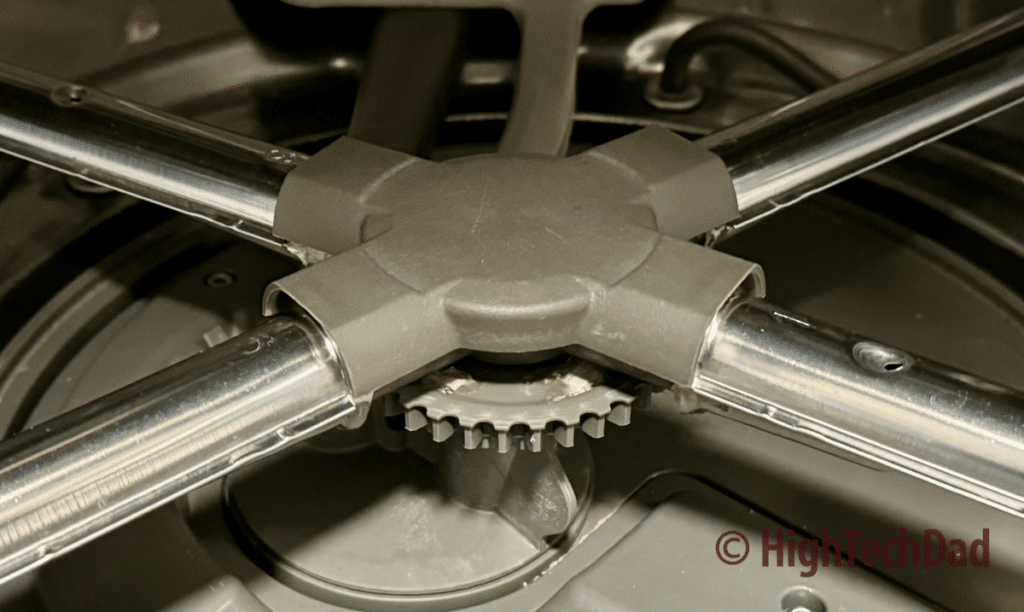
Grab the teeth and turn it counterclockwise. You will quickly know that it has been released. Remove it and clean it up.
Next, you need to remove the KitchenAid Dishwasher Diverter Valve cover. You will need to disconnect two hoses. The one on the left has two clasps, and the lighter-colored one on the right just pops up and out. The cover has a clasp holding it in place. You move the clasp and turn it counterclockwise.
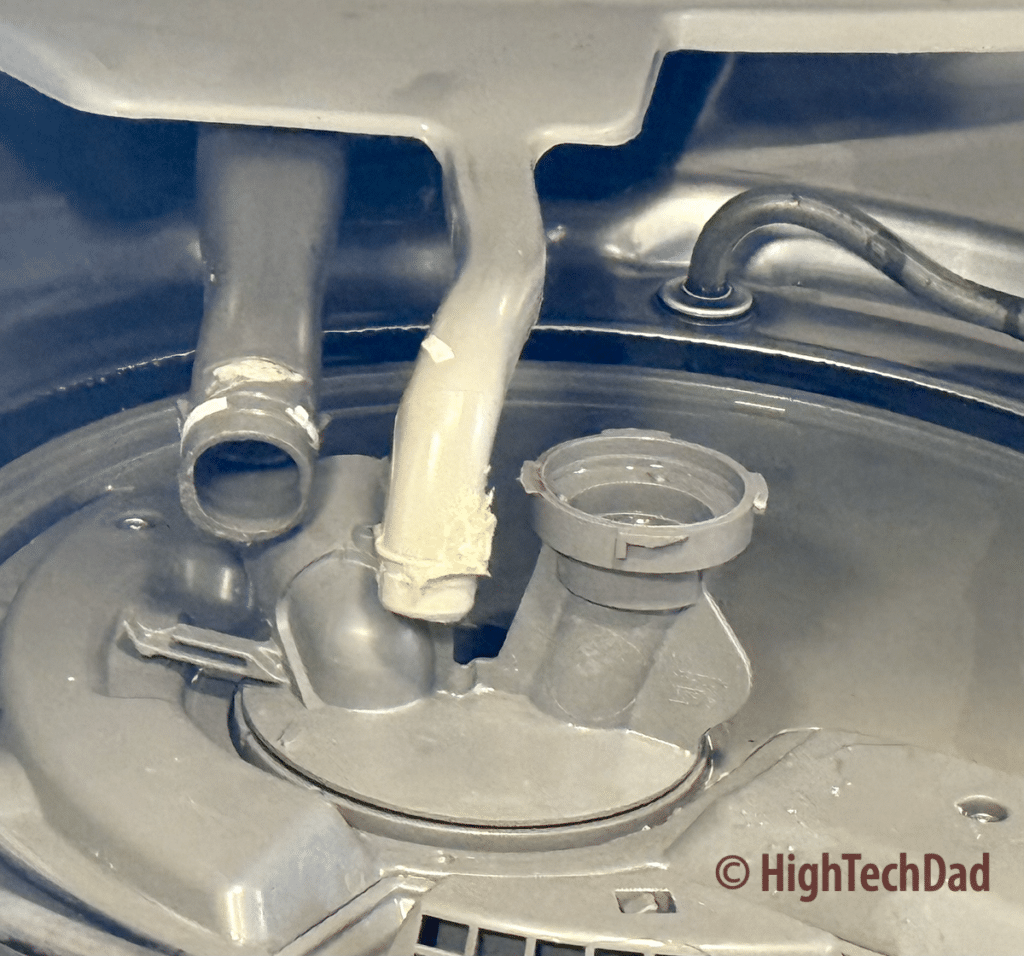
The hoses will be dirty, so be sure to clean them. The Diverter Valve cover will also be gunky. Clean it, too.
Unfortunately, I don’t have any other photos of the inner parts. However, my video does have a LOT of close-ups, and it is probably a better source.
Here are the remaining things that I did in this KitchenAid Dishwasher repair. Once you remove the cover, you take the plastic white cap off. The cap simply sits on top loosely. There is only one way to put it on, so don’t worry too much about where the circle is.
Once you have the cap off and have cleaned everything up, you must remove the old grommet. This can be a bit tricky. If you have a hook or some small needlenose pliers, those can help. Just be sure you don’t damage the surrounding plastic with whatever removal method you choose.
Also, you need to be sure you install the new grommet or valve seal in the same way you installed the old one; otherwise, it will probably leak.
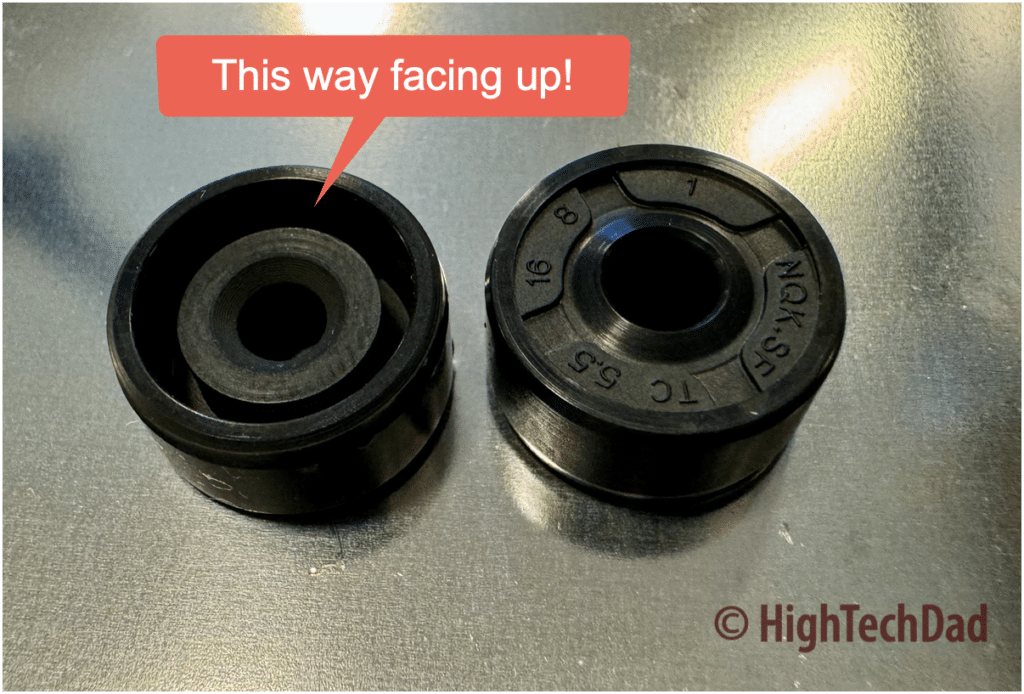
Once you remove the old valve seal, install the new one. You can use a little dishwashing detergent to lubricate it a bit. The fit should be quite snug and tight. Be sure to push down on the old valve seal.
After that, simply go through the process of putting the white cap back in place, replacing the valve cover, connecting the hoses securely, and then putting the sprayer arm back in.
Again, please watch my video for all the details and close-ups.
Remember, YOU can fix it yourself!
I hope this article and the video provided enough information and details. Please do let me know if you encountered this type of KitchenAid Dishwasher leak (or perhaps a different one). Also, I would love to know if you found this helpful and if you were able to repair it yourself.
This fix is relatively easy, I feel, and very inexpensive. And it can definitely save you hundreds of dollars if you do it yourself.
HTD says: With a little bit of knowledge, you can do just about anything. Identifying the leak and repairing this KitchenAid Dishwasher is a great way to build confidence and also save a lot of money in the process!


2 comments
Harold R T hompson Jr
love the video on dish washer .I use a small pick to get seal out good job
Michael Sheehan
Nice! I’m so glad that it helped! Thanks for the comment.