I have, over the years, cracked open a few PowerBooks and MacBook Pros, either to change a DVD drive or to upgrade the Hard Drive. My latest upgrade I did was to put a 320 GB Hard Drive in my MacBook Pro. I actually got pretty quick at it as I had to do it a couple of times. There are some fantastic guides on how to perform “surgery” on your various Macs over at iFixIt. Their guides are clearly walk through the steps needed to perform the upgrade or part swap. Complete with pictures, tools and parts required, screws used and instructions, these guides are critical if you are performing any work on your Mac.
They are, however, missing one thing (at least the ones that I used), the instructions on how to put things back together. Most of the guides end with phrases similar to “just follow the steps in reverse order to reassemble.” Usually, this is great. I use an egg carton to hold my screws. On each step in the instructions when screws are removed, I write a number down on the instructions and a corresponding number on the egg carton. Putting things back together is usually pretty straight forward.
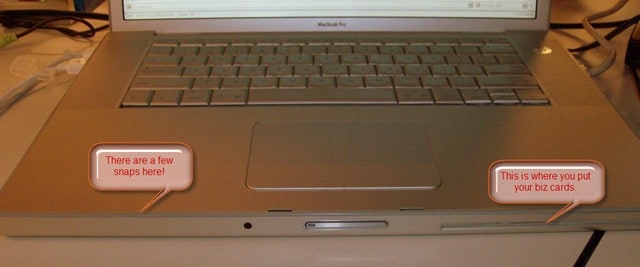
With the MacBook Pro (and most likely with the PowerBook), when you are reattaching the Upper Case to the Lower Case, there is a trick. Usually the back and sides fall right back in place (be sure you guide it so that no little metal pieces or tabs are out), but when you get to the front of the computer, there is a bit of a challenge. There are several little snaps in the front part that take a lot of pressure to actually make “snap.” The first few times I tried this, I didn’t know that you actually had to make them snap so I just put it together and did the rest of the assembly instructions. For the most part, everything seemed fine without the full snapping but it just didn’t make sense. So I scoured around the Net and didn’t really find much that tells you that you actually MUST press firmly on the edge of the laptop (see illustration below) until you actually hear it SNAP.
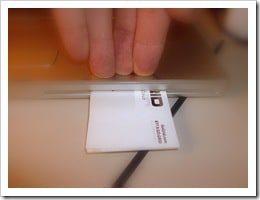
But before you go madly snapping away, you MUST be careful when you try pushing down when you are over the DVD/CD ROM slot. That section is naturally weaker than other parts. But I have a solution for that which works very well. Simply get 4-6 business cards and slide them half-way into the slot. This will provide enough padding and resistance for you to snap above the DVD slot (see illustration below).
As with any DIY (do it yourself) repairs or upgrades, you may be voiding your warranty with Apple. These things are not for the weak-hearted, caffeinated (shaky) hand or novice user. Proceed with caution and be sure you read through the instructions carefully before you even attempt to do anything.
Did you find this solution useful? If so: [paypal-donation reference=”Snap MBP case”]
HTD Says: Be sure you hear that “snap” when you connect your MacBook Pro Upper Case to the Lower Case, otherwise, your job isn’t done!


6 comments
ThuanTM
very nice with me
Mac uninstall application
Thank you for the precious advice
tonybuy
China manufacturer offers dvd case,cd case,dvd box,cd box,dvd/cd pp box automatic and semi automatic welding machine,second hand injection machine,plastic moulds both hot runner moulds and cold runner molds,PP/poly and PS recycle material,CPP film for dvd cases and poly cd cases and Marker Pens.
http://www.media-packs.com/
Mitch
Thank you for a great tip! The business card idea worked great.
Greg
Excellent! Just as you said, none of the other articles out there have any hints on getting the case back together. Your suggestion worked perfectly. Thanks!
Greg
Excellent! Just as you said, none of the other articles out there have any hints on getting the case back together. Your suggestion worked perfectly. Thanks!