
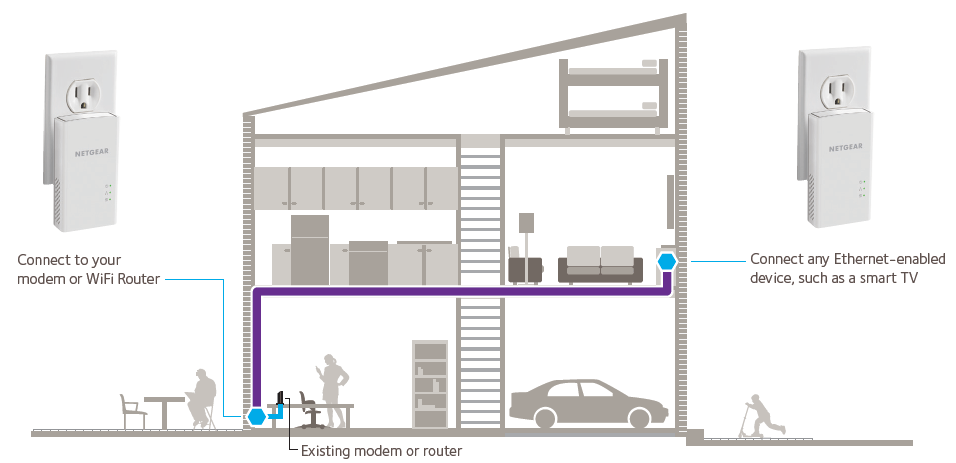
My dad’s house has a problem. The Internet connection comes in at one part of his home upstairs, but the wireless signal doesn’t make it downstairs to the other end of his home, making his streaming capabilities there practically impossible. Because his home is older and historic, he doesn’t want to run Ethernet cabling on the outside of his home or drill holes throughout the house. And WiFi simply won’t help because there are too many walls to go through. So, as I want to enable him to be able to binge-watch shows, as well as be able to use WiFi throughout his home, I had to figure out a simple solution. It turns out NETGEAR has just the solution with the Powerline 1000 (PL1000).
| Disclaimer: I am a NETGEAR Ambassador and I received this product in exchange for my honest, unbiased opinion and review. |
PowerLine technology is not that new but it has been improving dramatically. Essentially, it allows a network to be created using a home’s electrical infrastructure. To put it simply, you can run Internet connectivity through the electrical wiring of your home. And, when properly set up, the speeds are quite dramatic. PowerLine is good in environments where you have obstacles that could degrade WiFi signals, where you can’t run Ethernet cabling or where you quickly want to set up a temporary or permanent network.
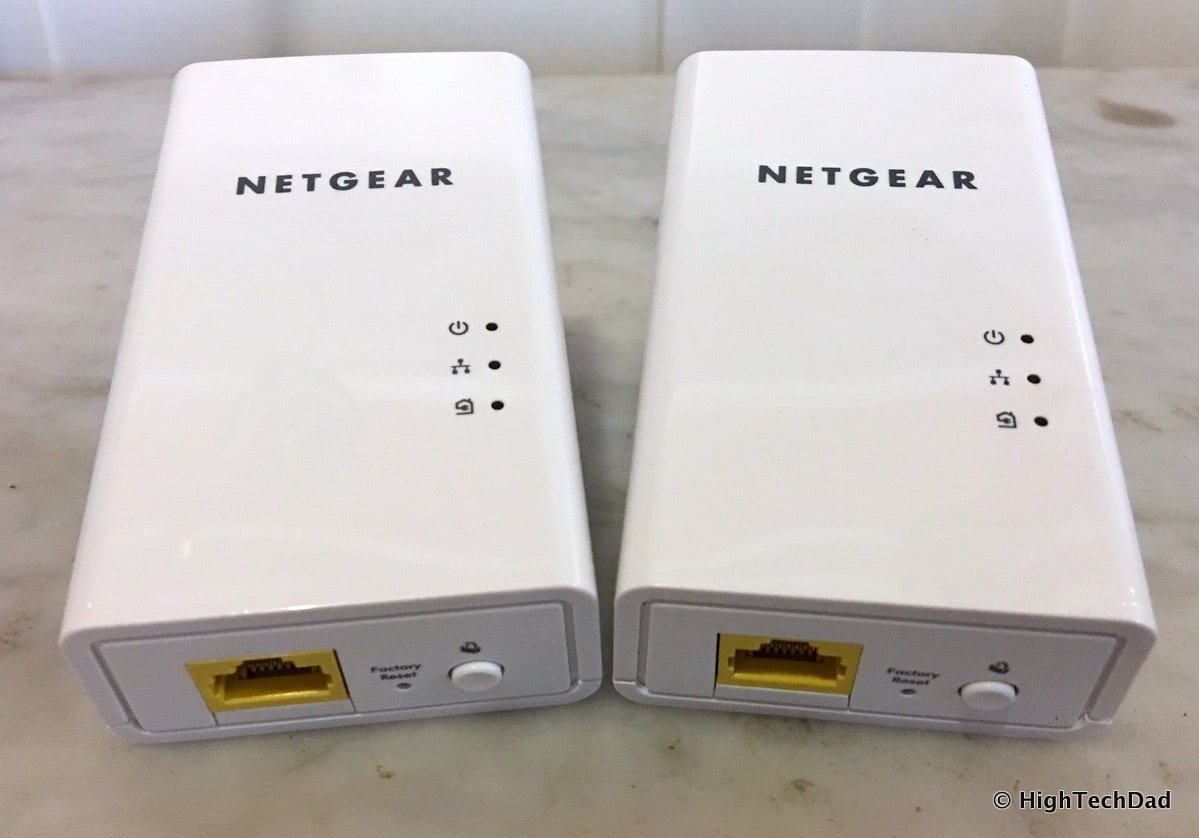
NETGEAR has a variety of PowerLine products with varying speeds capabilities and some with a WiFi router built-in. For my father’s home, I had the NETGEAR PowerLine 1000 (PL1000) which has two PowerLine adapters. Each adapter has the following:
- A single, Gigabit Ethernet port, capable of 1000 Mbps speed
- 3 LED indicators: Power, Ethernet and “Pick-a-Plug”
- Security button
- Reset button
The device is pretty simply from outward appearances. But its simple design doesn’t mean that it isn’t powerful. Quite the contrary.
Setting up the NETGEAR PowerLine 1000
This is probably one of the easiest networking devices you can set up. There is no management screen or software you have to work with. You don’t have to log in or configure anything. Ideally, you simply plug each PowerLine 1000 adapter into the plugs where you have connectivity already and where you want the connectivity to extend to. Let me explain it a bit more.
First, you need to find a plug near your primary router or modem. A word first about the plug. You need to have a 3 pronged socket to plug this in. Also, and this is important, you should NOT plug the NETGEAR PowerLine 1000 into either a surge protector or an extension cord because that will potentially filter and/or degrade the signal which passes through the line. You MUST plug directly into the wall, or you will kill the PowerLine magic.
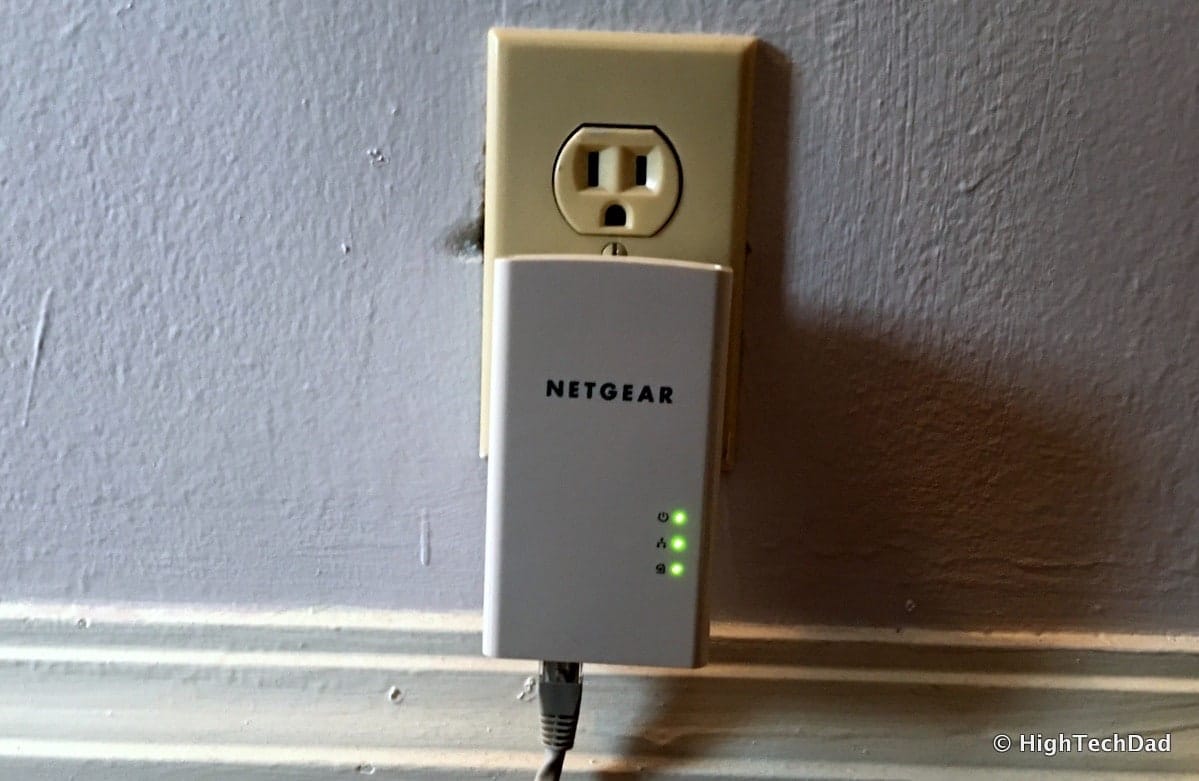
OK, back to the first plug. My dad had a DSL modem (which was also a WiFi router). You plug one of the provided Ethernet cables into the router/modem and one into the NETGEAR PowerLine 1000. Then plug the NETGEAR PowerLine 1000 into the electrical socket. When you plug it in, a green light will show in the Power LED. If it is blinking green, it is powering up. (And if it shows orange, it is in power-saving mode.) Also, when you plug in the Ethernet cable, the Ethernet cable light will show solid green when it’s connected.
Now comes the fun part, something that NETGEAR makes really easy, finding the best plug to put the second adapter in. I would recommend starting near where you want the connection to be. However, each home is wired differently and the ideal position might not provide the best PowerLine speed. NETGEAR has added a “Pick-a-Plug” light that makes choosing the best plug with the strongest signal a snap. Just plug the second NETGEAR PowerLine 1000 adaptor into the wall and wait for it to connect and start communicating with the first adapter. When it creates a link, the “Pick-a-Plug” light will have one of four possible states:
- Off – it hasn’t connected with another compatible PowerLine device using the same security
- Red – the link speed is less than 50 Mbps (good)
- Amber – the link speed is between 50 and 80 Mbps (better)
- Green – the link speed is greater than 80 Mbps (best)
When I first plugged in both NETGEAR PowerLine 1000 adapters, the “Pick-a-Plug” remained off despite trying numerous plugs throughout my dad’s house. So, I did a factory reset of both adapters.
Doing a factory reset allows you to reset the security on each device. You can add additional PowerLine adapters throughout your home and have them as part of the same PowerLine network (where you would need to set up a shared security key) or as distinct networks (with different security keys). For my dad’s situation, I wanted the two PowerLine adapters to talk together so by resetting to factory, they automatically set up security between the two of them.
The NETGEAR PowerLine 1000 has a security button which allows you to easily add additional PowerLine adapters into the same secured network.
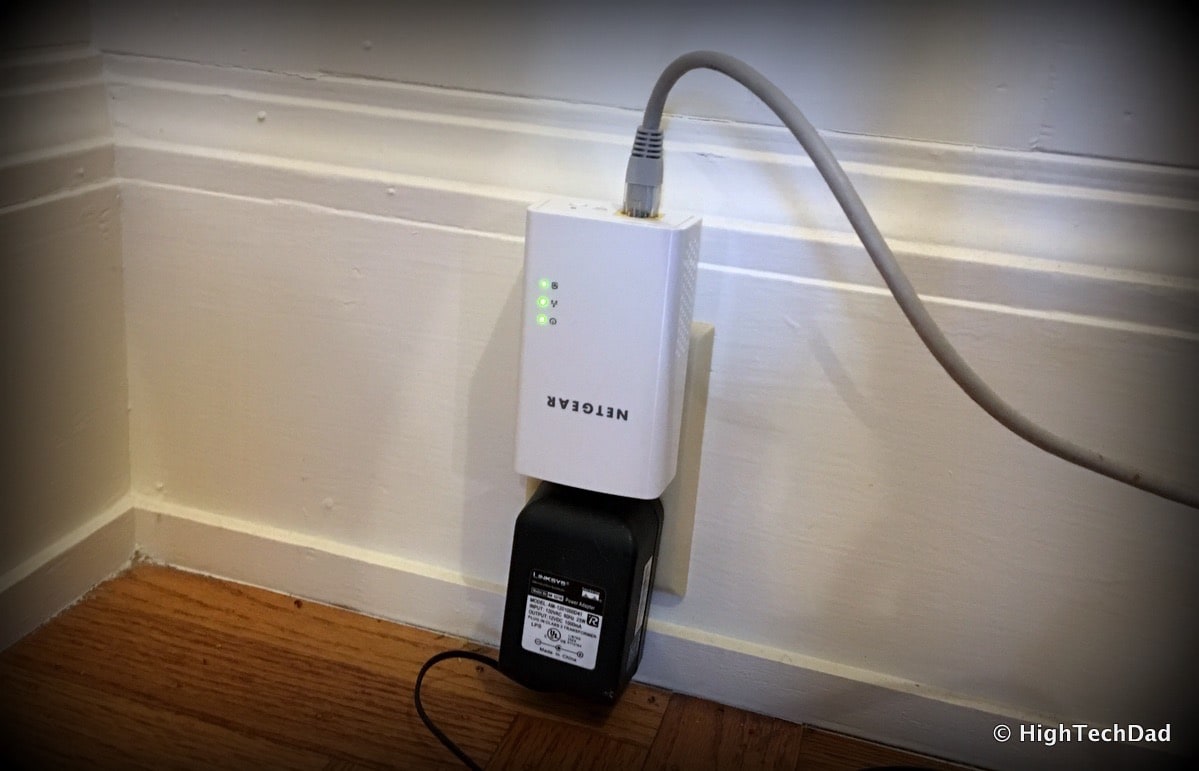
So, once I got the two NETGEAR PowerLine 1000 adapters communicating, I started testing plugs. I had already configured a WiFi router that I would plug the PowerLine adapter into so that I could have another WiFi network somewhere else in the house. The first plug that I tried was next to my father’s TV. Within seconds of “booting up,” it had locked on to the first PowerLine adapter. It showed green which meant a good link speed, but then I noticed that it would start to flash red periodically. This was a warning of varying signal strength so I decided to try a different plug.
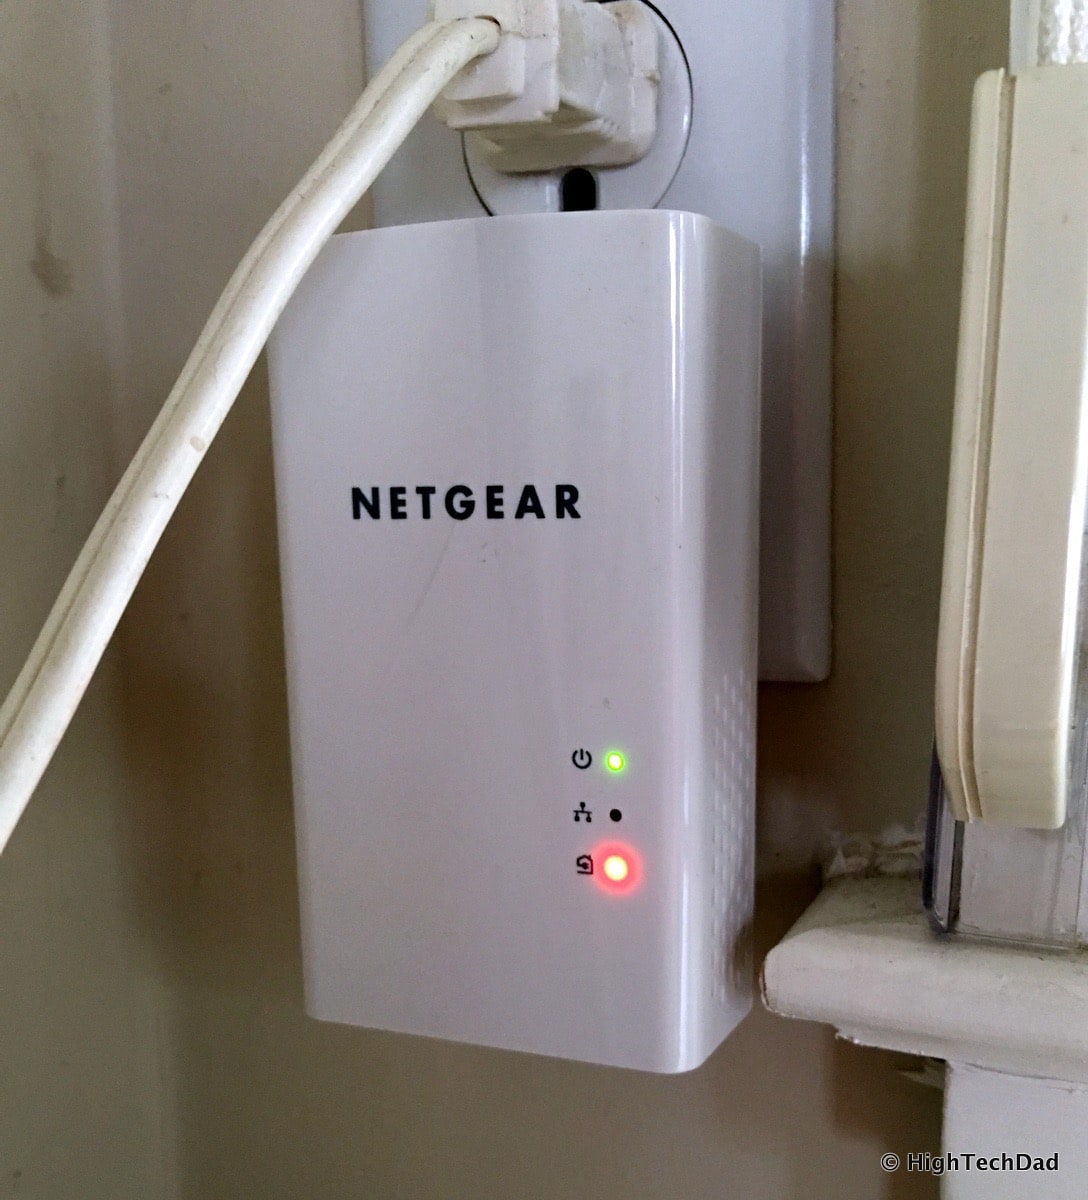
Two other plugs in the same room went immediately red. So, the wiring in this room was not ideal.
It’s important to note that many homes have complex wiring. I found that newer homes with more modern wiring are a bit better. Older homes (mine was built in 1945 and my father’s in 1910) have more mixed wiring, newer Romex with older knob-and-tube or other circuits. So if there are multiple circuits or breakers throughout your home, some plugs may actually be “further” away from others, despite them being in close physical proximity.
Anyway, eventually I found a plug that held a solid green light for the “Pick-a-Plug” function. I then plugged in the WiFi router and voila, I had a new network, far from the originating one.
Lots of words to describe something that was actually really easy to do. Ideally, plug both NETGEAR PowerLine 1000 adapters, which feature the latest Homeplug AV2, into the wall and within minutes, a new, fast, secured networks is created between the two endpoints. That was the promise and that is what I got to work. And the coverage is up to 500 square meters.
The NETGEAR PowerLine 1000 (PL1000) retails for $69.99 (there is a similar model on Amazon for $59.99). And there are other versions, one with a WiFi router built in (so you don’t have to attach one like I did at my dad’s) and one that has even faster speeds (up to 1200 Mbps).
If you are looking for a way to easily extend your network without having to run Ethernet cabling, or if your WiFi coverage is not working well, definitely take a look at one of NETGEAR’s PowerLine products. You can have a new network or coverage up and running in a matter of minutes, without software or cabling required.
Disclosure Text : I have a material connection because I received a gift or sample of a product for consideration in preparing to write this content. I was/am not expected to return this item or gift after my review period. All opinions within this article are my own. Also, some of the links in the post above are “affiliate links.” This means if you click on the link and purchase the item, I will receive a small affiliate commission. More information can be found in my About page.
HTD says: Extending your network easily using your existing home electrical wiring is incredibly easy with the NETGEAR PowerLine 1000 (PL1000) adapter.


1 comment
Benjamin
THANK YOU! I couldn’t figure out why I was getting such a poor signal, but after I found your article and read what you wrote about connecting directly to the wall it fixed my problem.