
A few weeks ago, my daughter’s (hand-me-down) 20″ iMac G5 started acting up. It was showing the infamous “spinning beachball”, was locking up, the fan was running a lot and loud and the machine was having kernel panics. I did a quick S.M.A.R.T. scan on it which is usually a good indication of the health (or lack there of) of a hard drive. The results of that test confirmed my suspicions, the hard drive was dying and needed to be replaced immediately. I made a quick clone of it right away!
So I started asking around on Twitter for some recommendations on good replacement hard drives. I didn’t need much, something that was comparable to the 250GB hard drive that was in there. Well, the people at iFixit.com saw my tweets and suggested a few options. I have used iFixit’s repair guides many, many times and have referenced them in previous how-to posts as well as on Twitter quite a few times. I personally find their guides to be irreplaceable and mandatory for any computer “surgery” that I might perform. One thing lead to another, and it ended up that I received a donated drive from iFixit. So, it is only fair that I acknowledge that fact and thank them as well. THANKS iFixit!
Anyway, I’m not a stranger to replacing hard drives. I have done it quite a few times on my MacBook Pro and my PowerBook G4’s (pretty difficult task on both of those actually) as well as on PCs (which is a bit easier). The first time I really hacked into a Mac was when I put a SuperDrive into an iMac DV SE (that was my first purchased Mac back in the day…I still have it!). Regardless, I wouldn’t attempt any repair without first taking a look at an appropriate iFixit guide.
The guide that I used is this one (having first gone through an identification wizard to ensure that the proper guide for my Mac was being displayed). After that, I started on my hard drive replacement adventure. I’m not going to go through all of the steps of replacing the hard drive because that is what the iFixit guide is for. However, I did document the process in this video:
Some (General) Installation Items to Note
Here are some thing to think about prior to installing or during the installation process:
- Be sure to read the install directions well before you even purchase a hard drive (or tools).
- Have a complete external backup of your bad hard drive (if possible). SuperDuper! is a fantastic utility that you can use for FREE for this purpose. Check to be sure that you can boot from your copy once you have one. Firewire drives work best.
- Check to ensure that you have the proper type of drive.
- Read the instructions again!
- Sometimes the instructions (even from iFixit) might be a bit off (e.g., the type of screw). Be prepared for the unexpected.
- Always be careful when pulling out cables, they are delicate and break easily!
- If you get stuck, don’t panic. Read the instructions again and search for videos or read comments on that particular part.
So, of course this is reading a bit like an infomercial for iFixit.com. In some ways it is. But the great thing about them is the content that they provide for teardowns of various computers and gadgets and especially their install guides is FREE. Have I mentioned that I have used their guides before many times (grin).
Pictures from the Operation
Below is a picture of the G5 iMac opened up (the Hard Drive is in the upper right corner):

This is a close-up of the Hard Drive. It is actually pretty easy to remove (compared to other installs I have done):
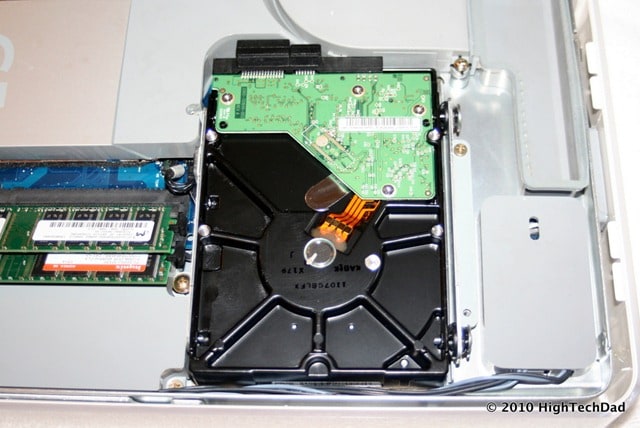
This is a close-up of the Hard Drive’s Thermal Sensor. I actually had a lot of difficulty trying to pop this off. It’s not required that you disconnect it but it is a bit awkward removing the drive with it still attached. I was just concerned that I was putting too much pressure on the connector and that it might break:

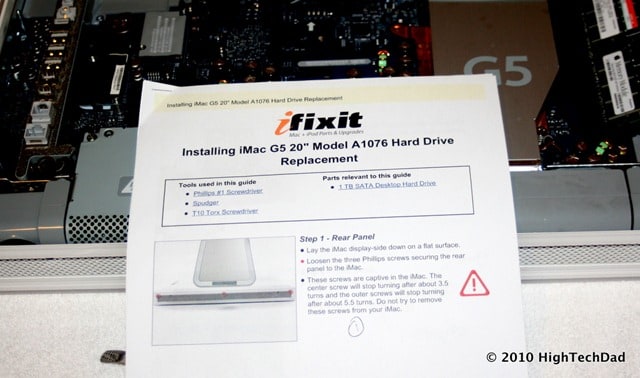
Of course, the iFixit guide was in hand! Note, as I read through the guide, I numbered all of the sections where screws had to be removed. Losing a screw or trying to find the right one is something that you don’t want to get into:
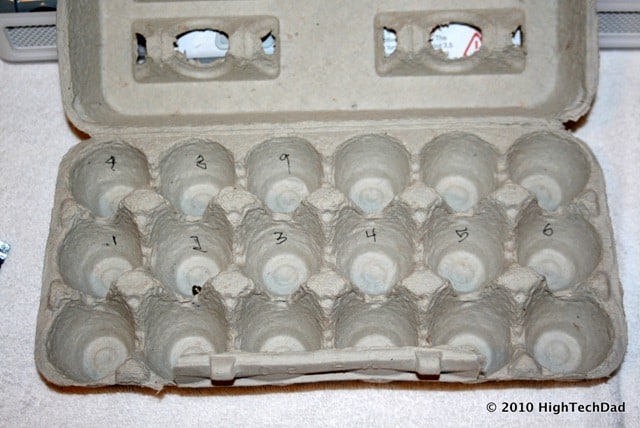
I have this very “high-tech” solution for keeping track of screws. As I just mentioned, in the instructions I number all of the screws that are removed. The egg carton serves as a great place to store these tiny screws and each section in the carton I have labeled with a number that corresponds to the same part in the instructions in the iFixit guide.
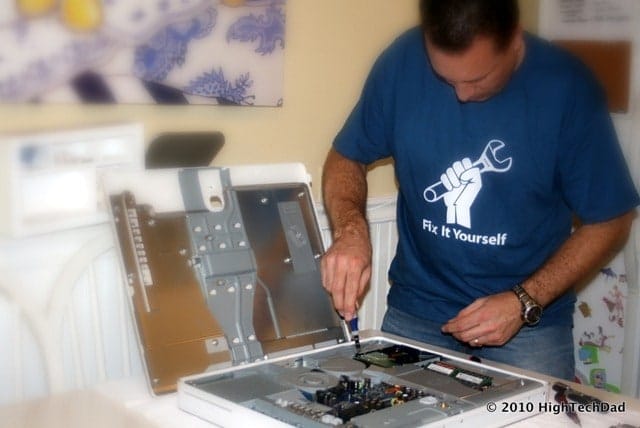
And, for good karma, I was wearing my “Fix It Yourself” shirt that iFixit sent me as well. I actually love the play on words: 1) you have the ability to fix it yourself or 2) don’t ask me to fix it for you! Fix it yourself! (HAHA). Oh and my kitchen is really a great operating table for these types of technical surgeries:
The most important thing to remember when you do upgrades or replacements yourself is that you might void your warranty. Also, you may (unintentionally) do damage to other components in your computer which can be costly to repair. However, on the flipside, you can save a lot of money compared to either replacing the computer completely or having someone else do it for you. For me, the excitement is in doing it yourself and the sense of accomplishment you feel after doing it successfully. And, then you can say that you are an expert (or at least not a novice)!
Disclosure Text : I have a material connection because I received a gift or sample of a product for consideration in preparing to write this content. I was/am not expected to return this item or gift after my review period. More information can be found in my About page as well as here.
HTD says: Do it yourself upgrades and replacements are really fun if you have the nerves and steady hands to do it. It’s not for everybody though, just make sure you prep ahead of time and have lots of time to complete.


2 comments
Desktop computers
this is always good to read such type of articals…
data recovery
thanks for your valuable guidance