A few weeks ago, Microsoft released an update for the Mac version of OneDrive that included their new On-Demand service. For me, and probably others who rapidly run out of hard drive space over time, this is a big deal! In essence, it’s using one of the core attributes of cloud computing, that of expanding or contracting storage on-demand, to basically make your hard drive larger than it actually is. And, when you couple the new On-Demand feature with the already existing selective sync feature, you have a pretty powerful combination of on- and off-line capabilities that can definitely add some space to your precious hard drive.

As you probably know, Microsoft OneDrive is one of the many available file and folder syncing services available (like Dropbox, Box.net, Google Drive, etc.). You upload files to OneDrive (either via a local file sync or directly via a web browser), and instantly, your data is stored in the Microsoft cloud. You can then access those files via a web browser, or using smartphone or operating system apps directly on your device.
My workflow for blogging, for example, relies on OneDrive for images. I take photos on my iPhone, upload it directly to a folder on my OneDrive iOS app. Then later on one computer, I access those images and do any necessary editing, and then later access those images from another computer. OneDrive keeps the latest version of those images synced continuously. I do the same process with videos. It’s a very simple use case, but it works.
But, over time, you can imagine that my hard drive folder started to become quite filled up with large video and photo files. And that isn’t a good thing.
6/21/21 Update: If you are also using Microsoft OneDrive AND Time Machine, you will want to see my How To/Fix It article – they don’t always play nicely together!
Selective Sync with Microsoft OneDrive
As my process I described above is very time-based, meaning, once I publish a video or article, I really didn’t have a need to always have my photos or videos available on each and every device. So, I started using Selective Sync on OneDrive.
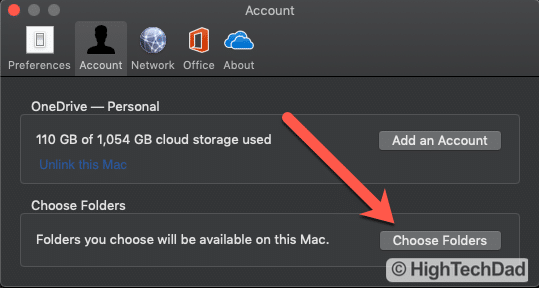
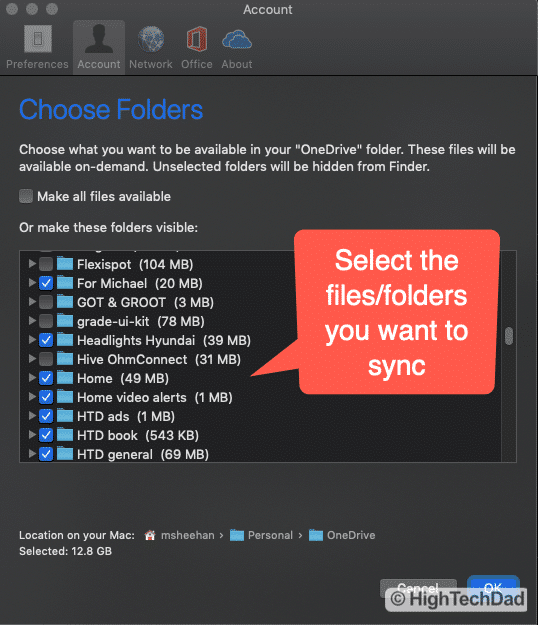
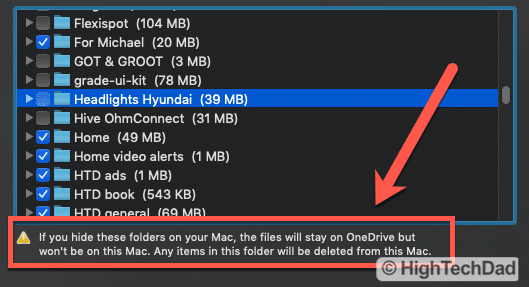
By going into the OneDrive preferences, I can pick and choose the files I want to sync (and download) on a specific computer. When I’m done with a project, I just uncheck the sync box, and then that folder magically disappears on that particular computer. Of course, all of those folders reside in the special OneDrive directory on my Mac. (This also works on PCs as well, obviously.)
Making this part of my process means that when I’m done, I basically clean up my Mac and free up space on my hard drive.
But, those files are still available within the Microsoft OneDrive cloud. I could quite easily access them directly via a web browser on the OneDrive site. I could also choose to re-enable the syncing so that the files can re-download to my hard drive. And, with the smartphone versions of OneDrive, you can always see all of the folder and the files therein (as stored in the OneDrive cloud).
I highly recommend that if you use OneDrive, you start playing around with the selective sync feature.
There are a couple of ways to access it. You can go into the OneDrive preferences.
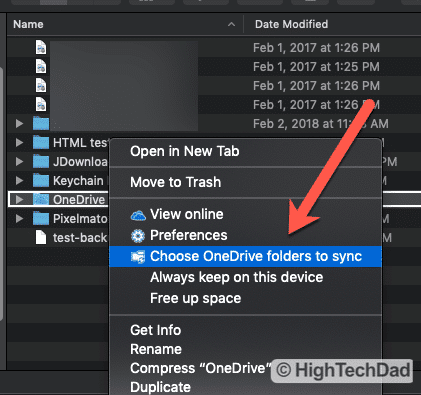
Or you can right (or control) click within the OneDrive folder on your Mac (or PC) and select “Choose OneDrive folders to sync.”
In either case, you get a listing of all of your OneDrive folders, and then you can pick and choose the ones you want to have locally stored (and synced as well).
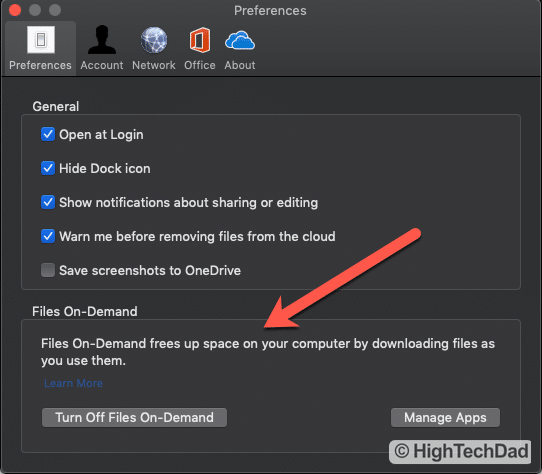
Updating OneDrive with On-Demand Feature
But now there is another fancy way to do a quite similar process – On-Demand. It is slightly different and equally nice to the space on your hard drive.
To activate the On-Demand, you obviously need to have the latest and greatest version of Microsoft OneDrive. I had the version that came from the Mac App Store. But just to be sure, I actually downloaded the app directly from Microsoft. I installed it directly on top of my existing implementation of OneDrive.
But, when I looked for the On-Demand settings, they were nowhere to be found. Hmmm. So I tweeted Microsoft OneDrive asking for some direction.
They provided me with some technical information. It was a bit cryptic, but I read through it. What I ended up doing was:
- Relaunching the Mac Finder
- Quitting and relaunching OneDrive
- Restarting my Mac (this is what I think actually allowed for the new settings to take)
Once I relaunched OneDrive (after the reboot), the On-Demand settings were there. Yay!
Using OneDrive’s On-Demand Feature
Now that I had the On-Demand feature active, I was ready to start testing it out. It’s pretty straight-forward. You simply need to decide which folders you want to stay “in the cloud” and which you want stored on your hard drive (full size).
The big difference between Selective Sync and the On-Demand functions is that if you choose NOT to have a folder/file on your hard drive using Selective Sync, it WON’T appear. Whereas, if you choose to (YES) have a folder appear using Selective Sync, you have the option to keep the full version on your hard drive, or simply have it listed there (but not downloaded – saving space).
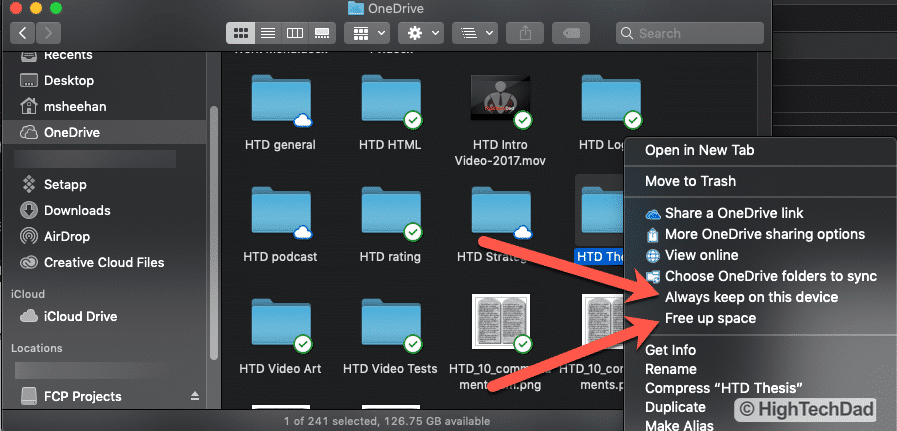
Basically, with On-Demand, you have a “pointer” to the file or folder…it looks like it is there, but in reality, it’s a tiny file that says “hey, I’m here if you need me!” Then you can just double-click on the file, and it will download from the Microsoft OneDrive cloud.
Here’s what various states of files and folders look like once you enable the On-Demand functionality.
If there is a green checkmark, the file has been fully downloaded to your hard drive. If there is a blue cloud icon, the file is being fully stored in the OneDrive cloud (but not on your hard drive). And if you see the two circular arrows icon, that file or folder is currently being synced and/or downloaded/uploaded.
That’s it. Hopefully pretty easy to understand.
Using OneDrive’s Selective Sync & On-Demand Features Together
So why would you want to use both of these features? You probably could just use the On-Demand feature on its own and be just fine, honestly.
But for my particular workflow, I have lots and lots of folders and files that I just don’t want to see all of the time. They could be too old or simply not relevant. So, I use the Selective Sync function to essentially “hide” those files and folders from my Mac (or PC), knowing that I can easily re-enable them and download them when I need them.
As I stated, the files and folders are always visible on OneDrive for the web (browser) as well as within the OneDrive app for your smart device.
I highly recommend that you do update OneDrive to take advantage of the On-Demand functionality. It works for Personal and Business OneDrive account. And lastly, if you are a home user, I also highly recommend getting a subscription to either Office 365 Home ($99.99/year for up to 6 users) or Office 365 Personal ($69.99/year for 1 user). Either of these subscriptions includes 1TB of OneDrive storage PER USER!!! It’s a great deal, especially with the ability to use Office online or install it directly on your devices.
And here’s a quick tip, you can order Office 365 from Amazon, and you may be able to save some money in the process! A 12-month subscription for up to 6 people with Mac/PC download is $79.99 (normally $99.99). A “key card” version of the same is $89.99 (again, normally $99.99). And, from reading the comments, I believe you can extend an existing version using the key.
Shop on HighTechDad
The product shown below (and related products that have been reviewed on HighTechDad) is available within the HighTechDad Shop. This review has all of the details about this particular product and you can order it directly by clicking on the Buy button or clicking on the image/title to view more. Be sure to review other products available in the HighTechDad Shop.
-
 Microsoft Office 365 Family$99.00

One last thing, this is NOT a sponsored post. I just feel that Microsoft is doing a great job innovating in this space and bringing fantastic features to all of us. (And if you are having issues with OneDrive, be sure to take a look at my article “OneDrive Sync Issues? How to Reset OneDrive for Mac the EASY way! [UPDATED w/ Video]” as it helps get OneDrive working if you do encounter issues. I haven’t had to use the process I outlined in some time though.
HTD says: The latest release of Microsoft OneDrive brings some great functionality of accessing your files and folders On-Demand. Enabling this can save you tons of space on your hard drive, and, if you use with Selective Sync, you have an even better way to manage everything!


