Everybody has some sort of a main viewing room or area of the house where there is a larger TV and comfortable seating where families and friends gather to watch movies, TV shows or play video games. The big screen TV has become a digital fireplace of sorts or a congregation point in the house. With hectic schedules governing our lives, we often struggle to find a family grounding area within homes. My family is no different and to that end, we regularly schedule movie nights where we can all just hang out together, huddling around the big screen.
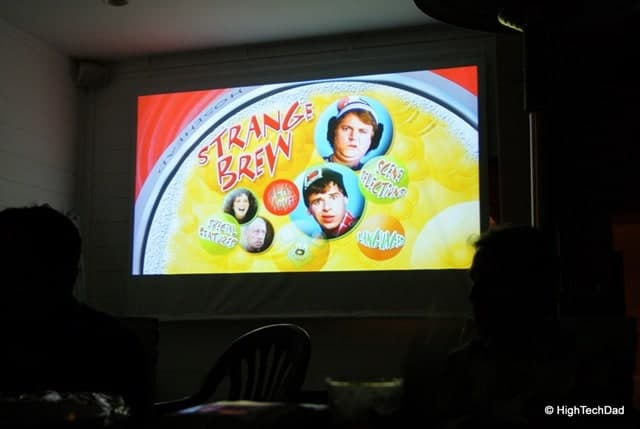
But sometimes, you need to do a bit more and take on a project that will benefit your friends and family in a different way. My friend and neighbor realized that he had a way to contribute to a “movie going” experience but all from the comfort of his backyard. Recently, he invited all of the neighborhood dads over for a “Dad’s Night Out” at his place to drink beers, eat appetizers and watch a movie classic of our generation: Strange Brew.
Being a gadget geek and someone who knows a bit about A/V, but definitely has an appreciation for people’s home theater setups, I was thoroughly impressed with the do-it-yourself backyard home theater that my neighbor Steve, set up, enough so that I wanted to share it with others in hopes that others may benefit from these instructions.
The General Components
Listed below are the primary items involved in this particular theater setup. For the most part, these items are required for any outdoor theater. I will go on to describe these, at times providing insight from the actual “designer” (Steve).
- A good theater area
- Screen
- Projector Shelf
- Projector
- The Sound System
Each section will have some details and reasoning behind the particular selection of an item or product.
A Good Theater Area
When designing an outdoor theater environment, you need to consider a few things. Obviously, you might not have the idea area to do the setup described in this post, but you will definitely need:
- a relatively sheltered area
- access to a power supply
- solid structures to hang various components and speakers, as well as the screen
- a fairly large area for seating (e.g., 30′ x 20′)
- forgiving neighbors when you have a movie night
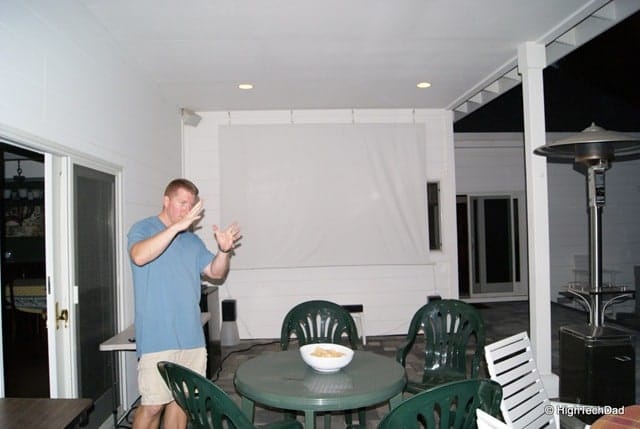
Personally, while I have the backyard space, I don’t have the necessary structures to support speakers nor the screen. There are ways to mount speakers on stands but hanging a large screen is a bit more daunting as any wind can cause ripples in the screen (not an ideal viewing environment).
Screen
Selecting a proper screen that doesn’t kill your budget is critical. However, finding one that works AND that is inexpensive is difficult. Steve said “There is an option of painting a wall but that was not going to fly with the wife who wants the outdoor theater to disappear when not in use and this would mean painting part of my house (not going to happen) plus, who has a very flat wall on the side of their home with no windows?”
That meant that the screen had to be something removable. There are inflatable screens that you can buy but those can get expensive as well. Here are some inflatable and other types of screens for outdoors on Amazon. These range from a couple hundred dollars to several thousand.
There are other ways to save money on the screen (and use that savings for your projector – a better use of your money). I remember when I was buying a turntable, the place where you should spend your money is on the needle and not the turntable itself, so spend your cash on a good projector!
So, Steve got a bit creative here. He needed a piece of fabric that was both large but also didn’t have any seams in it because they are visible. Most fabric stores don’t have material large enough to accomplish this. Then Steve stumbled across the perfect thing, a blackout curtain from Wal-Mart. It is one panel (no seams), comes in white and is constructed not to have light bounce back. And it was only about $39. Simply have it shipped to a local store and you don’t have to pay for shipping.
The blackout curtain that he got from Wal-Mart is this.
The size is 80″w x105″L which is quite a nice size for a screen. Also, since it is a curtain, it is made to go on a curtain rod which meant that there was a much easier way to hang the screen. For Steve’s setup, he did have to sew a matching curtain rod channel at the bottom of the screen (actually his wife kindly donated her seamstress skills to this worthy cause for this project).
The problem with a large fabric screen is that it can suddenly become a large sail when a bit of wind start blowing. So, you need to be sure that you securely anchor it on both the top and the bottom. You start with getting a long curtain rod. Steve found that PVC worked best for this task, since it had to be about 105″ long. Also, it isn’t expensive. He went with 3/4″ which was stiff enough to support the curtain but narrow enough to fit through the channel that came with the curtain. He did say that 1″ looked like it could fit as well.
To ensure that the screen stayed flat, Steve came up with a clever idea of attaching it to the PVC (which also helps later when you are rolling it up for storage). He first considered using nuts and bolts but there is no easy way to secure those in the middle of the pipe. Then he thought about using wood screws but wasn’t sure about the longevity of that and wanted to prevent them from loosening. Instead, he decided on pop rivets. Pop rivets are what you find holding your jeans together, for example. So, he simply drilled a hole through the curtain AND the PVC pipe and put 4 rivets across both the top and bottom pipes.
He left the bottom pipe extending out about 4″ on either side so that the bottoms of the screen could be tied down (which prevents the sail action when it’s windy as well as keeps the screen flat).
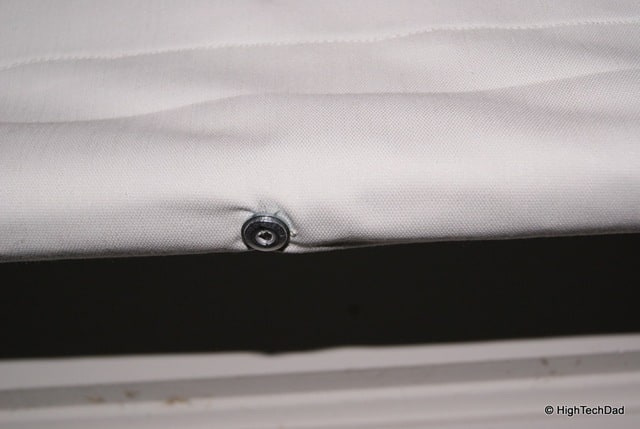
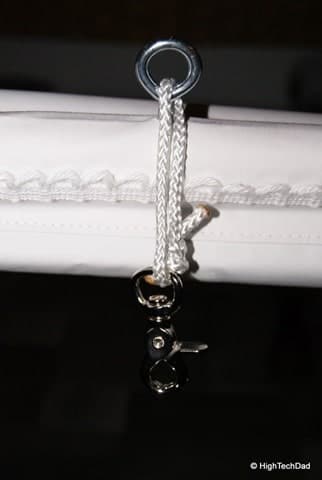
To hang the screen from the ceiling, Steve drilled in 4 i-bolts across the top. These self-threading bolts were simply screwed into pre-drilled holes on the pipe.
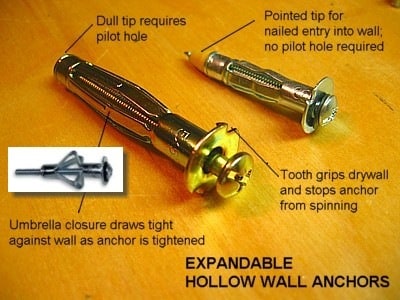
Similarly, he wanting matching i-bolts in the ceiling of his covered patio, but to ensure that they could handle the weight, he put in expandable metal anchors.
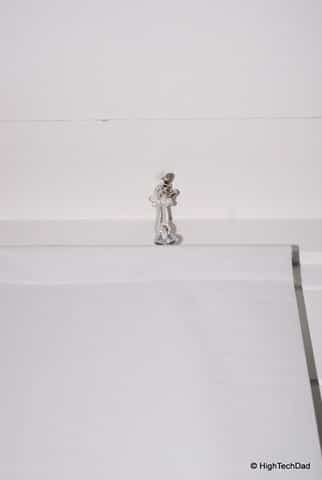
He then used nylon rope which was tied to the i-bolts attached to the screen and PVC, then tied that rope onto clips that he could take on and of in order to secure the screen to the ceiling of the patio.
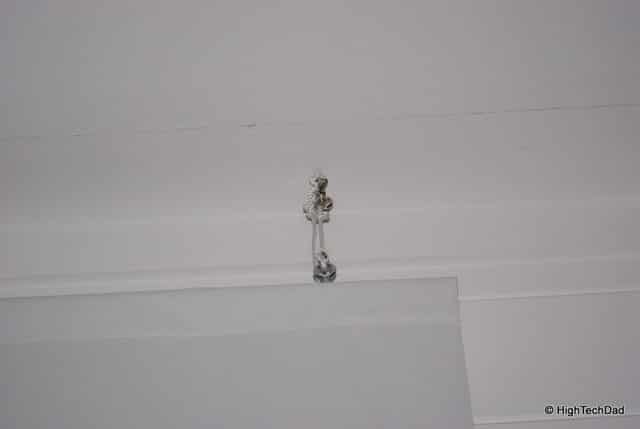
Here is a close-up of the clasp that attaches to the ceiling and the screen:
The lower part of the screen was then tied down using a bit more rope.
Projector Shelf
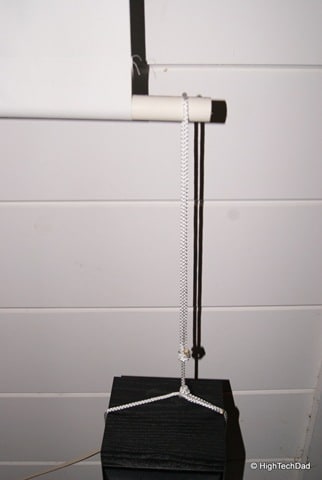
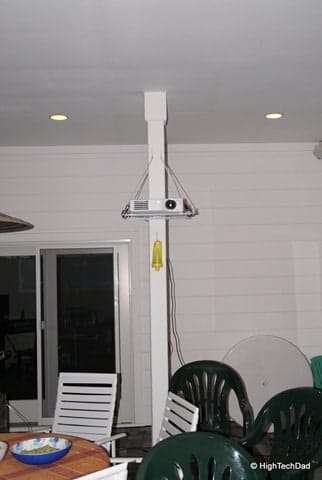
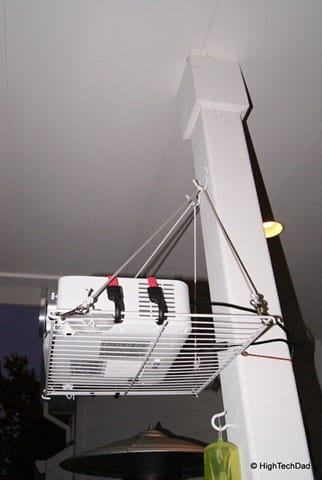
Steve has an ideal location for his outdoor theater setup. It is a covered patio that measures approximately 28’x12′ with some pillars at very strategic and helpful locations. Before shopping for the projector, he had to figure out how to raise the projector above the seating, as well as make everything “disappear” when the theater is not in use. He needed a secure and level shelf on which to place the projector. Luckily, he had a pillar that was directly in line with where the screen would be. He did tell me that some of the ideas for hanging the shelf came from his 9 year old son and he just expanded on those ideas.
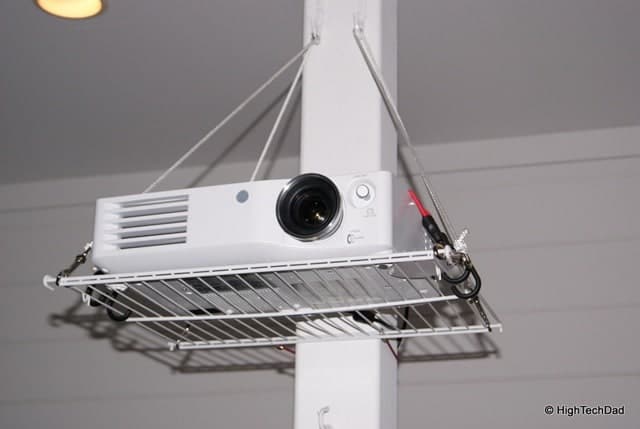
What he came up with was pretty ingenious. He put two hooks just down from the ceiling of the covered patio and painted them so that they would match and blend in with the background. Then at Home Depot, for about $10 he picked up a wire shelf that was large enough to hold the projector. After that, he got 2 sections of nylon rope and tied them to the wire shelf, having the rope run from back to front on both sides. Using a mini bungee cord which ran around the back of the pillar, he was able to stabilize the shelf pretty well. 2 larger bungees were then used to go over the projector to keep it from being knocked off should someone bump into the pillar.
The Projector
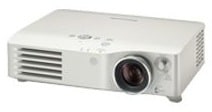
It is important to read the reviews of various projectors. This particular projector is a 720p with at 6000:1 contrast ratio. It has 2 HDMI inputs as well as 1 component, 1 S-Video and 1 Video input.
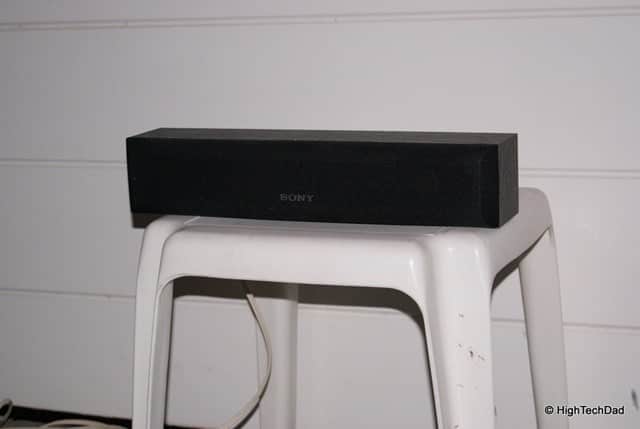
The Sound System
The surround sound system comprised mainly of Sony products. For this type of setup, a 5.1 system was more than sufficient, providing 2 front channels, a center channel and 2 rear channels. Because this is a worthy cause, once I can extract it from my over-cluttered garage, I will be donating a sub-woofer to the cause (hopefully not to the annoyance of the neighbors).
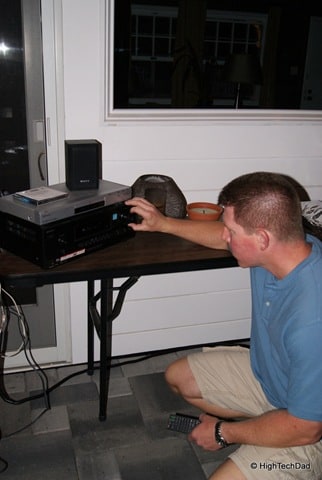
The receiver is a Sony STR-DH500 (obtained on sale at Fry’s Electronics for $149 – Amazon lists it at $158.06 so the Fry’s deal was pretty good). Obviously there are many types of receivers out there that you can choose from. I do recommend a 5.1 surround to really capture the best audio experience. This particular unit is a 100-watt, 5 channel receiver with 3 passive HDMI inputs and 2 component inputs. Also, it does not support BRAVIA sync. It is an entry level 5.1 system.
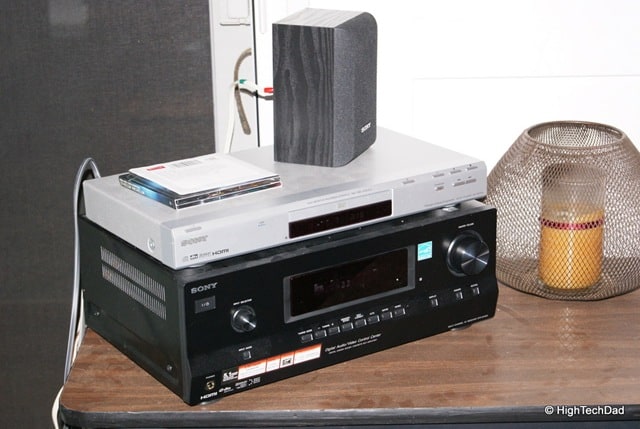
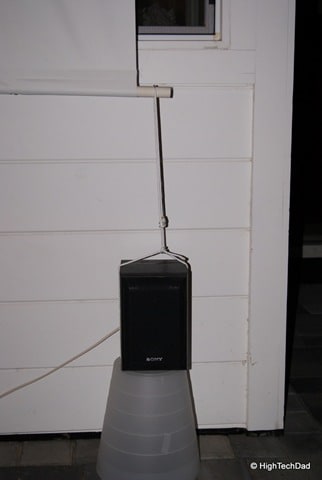
The 5.1 speaker setup consists of a set of Sony SS-CR3000 (available on Amazon for $71.99) and a set of bookshelf speakers, Sony SS-B1000 (on Amazon for $49).
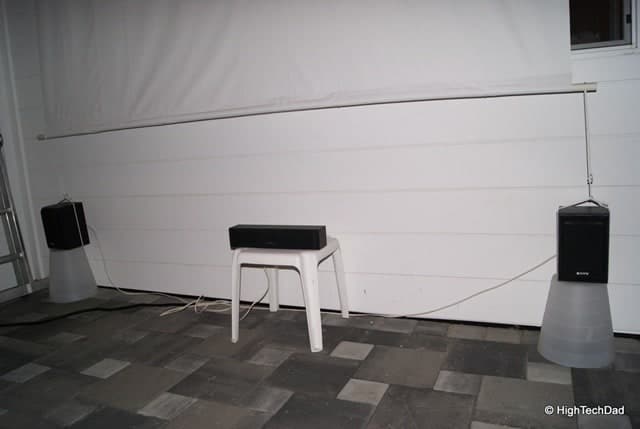
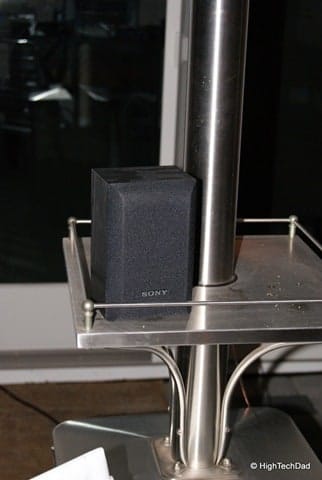
The bookshelf speakers were used for the front channels, especially because they worked well to weigh down the screen. The wires are connected via standard speaker wire with the ends being fashioned with banana clips. This was to ensure that the breakdown was going to be quick and easy. The wires are color-coded and go through a flex tube to keep them all together.
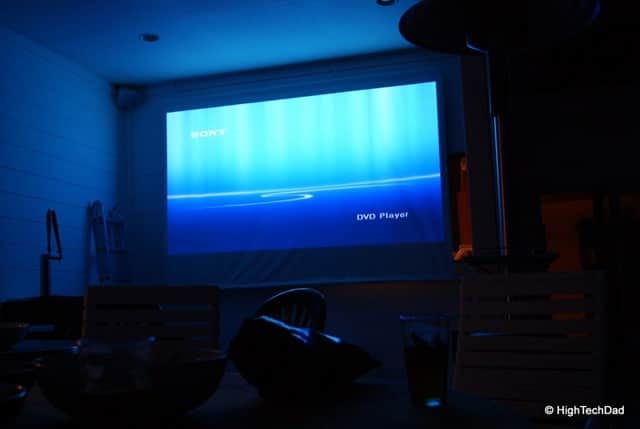
The DVD player was just an old non-HD one that Steve had sitting around. The quality of the display (up-sampled) looks good enough to me actually. I saw a couple of movies and the quality is practically HD quality. Eventually, the system can be upgraded to a Blu-Ray player to make the entire setup fully HD.
There is a 15 foot HDMI cable that runs from the projector to the A/V receiver as well as an optical cable for good 5.1 digital surround sound. Steve got both of these cables at Amazon.
The Full Costs
Listed below are the full costs of the entire home theater project.
| Manufacturer | Model | Cost |
| Panasonic | PT-AX200U | $950.00 |
| Sony | SS-CR300 Center & Surround Speakers | $71.99 |
| Sony | SS-B1000 Bookshelf Speakers | $49.00 |
| Sony | STR-DG520 5.1 Receiver | $149.99 |
| Sony | DVP-NS700H | $49.95 |
| Wal-Mart | White Blackout Curtain | $39.99 |
| Speaker Wire | $20.00 | |
| Amazon | 15ft HDMI Cable | $2.00 |
| Amazon | Optical Surround Cable | $3.00 |
| Home Depot | PVC | $5.00 |
| Home Depot | Wire Rack for projector | $14.99 |
| Misc Bolts | $20.00 | |
| TOTAL | >>>> | $1375.91 |
As you can see, most of the expense is in the projector (just like the needle of a record player). You could pay considerably more and only achieve marginally better performance or visuals.
The Experience
The second time this home theater was used was for a Dad’s Night Out. We watched a “classic†(Strange Brew). The experience was simply amazing. The sound was good and the screen showed quite well, especially the darker it got outside. Later, I was able to see it in action again with the short film from Wall*E. With digital animation, the quality of the video was practically HD (I wonder what it would look like from a Blu-Ray player).
This particular home theater really does disappear completely. When dismantled, it was practically invisible with the exception of the i-hooks that are suspended from the ceiling. Many of the same principles can be used here. You could set up either an indoor or outdoor theater.
Obviously, your mileage may vary with your setup. This really depends not only on your budget, but also on the environment where you want to set up an outdoor theater. I do have to say this, once you do complete the project, the rewards are incredible. Apart from the “coolness factor” of simply moving the movie-going experience outdoors, you also extend the family space to areas that may not have been used during the night. If done properly, it makes for a great “movie outing” with out having to leave the comforts of your own home.
HTD says: Having a home theater is great for friends and family. And the DIY factor allows for a true sense of pride!


7 comments
Houstonwarren3
I have been trying to create a permanent outdoor TV area for about a year now but the cost of an actual weather proof TV is ridiculous at over $5000 for a 50+ inch model. I have a covered patio very similar in layout to this gentleman and happen to have the same projector in our indoor theatre room. The bulb on it is beyond its normal use-life and I was trying to decide if I should replace the $350 bulb or just pay $900 for a new high def projector. This article has helped me decide. The PTAX200 goes outside for outdoor TV/movies. We used the same PVC pipe technique but I just taped 2 vinyl blackout curtains together on the backside with ducttape to create a reasonably seamless outdoor rated screen that can get wet/damp. It is easily washable. In lieu of having to sew anything together or sew the material around the PVC, you simply use tape on the rear to secure it all together. No wrinkles and the seam is 100% lost while viewing. You would be suprised what you can view a projector on and not see. While trying to decide on the size of screen for our indoor theatre, I taped printer paper together with scotch tape in the size of the screen I was considering and watched Armagedon (sp?) on it. I literally forgot that I was viewing on paper :) Good article.
Anne Angala
This is really great and very impressive. I would like try this brilliant idea and share this to my friends. Thanks.
Dave
Just pick up a projector on sale. Thank for the screen tip! I'm ordering one. Look like that will work great and inexpensive.
Ski Goggles
nice post
George Jacob
Great post! The item list is exactly what I'm looking for. Thanks.
George Jacob
Great post! The item list are exactly what I'm looking for. Thanks.
max191
Thanks for a great blog. I was able to get the information that I had been looking for. Thanks once again!
regards
charcoal grill