
Keys are a pain! I have so many keys on my keychain that I feel like a locksmith and I’m not even sure what keys go to what lock. But you can’t just throw them away, right? And, keys get lost. To top it off, they are simply and completely low tech. Also, the more people you have in the family, the more keys you have to make and as soon as someone loses one, you might have to change all of your locks. The SchlageLINK not only eliminates the need for keys, it also lets you assign codes to every member of your family, track locks and unlocks and control other components in your house.
If you have an active family, people go in and out of your house all of the time. Wouldn’t it be nice to be able to get notified when people come and go? What about setting up notifications that are uniquely tied to particular members of the family, the house cleaners or your neighbors? With the SchlageLINK, you can. And, you can do a whole lot more. And I have some hands-on experience to prove it. Schlage provided me with a complimentary starter kit deadbolt system to evaluate and document not only the installation processes but also how it works.
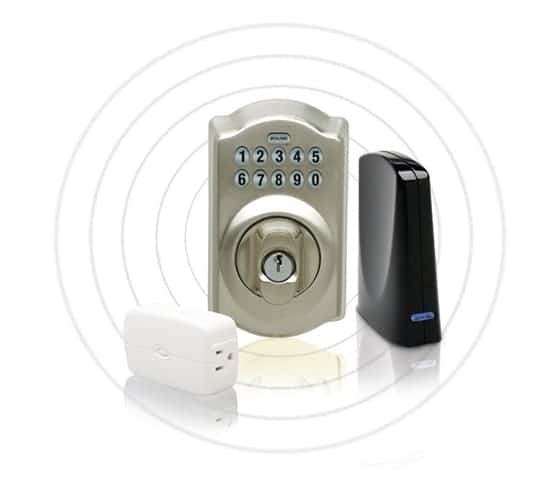
The SchlageLINK starter kit consists of the following:
- Schlage Wireless Keypad Deadbolt or Door Lever
- Schlage Bridge
- Schlage Light Module
With this setup, you are able to remotely control a light in your house, as well as set up and control access to the deadbolt system (or lever depending on the model). But before I go into the inter-workings of the system, I thought it might make sense to show the install process. If you don’t get the deadbolt, you can get the Door Lever version that has the buttons with the lever.
Physically Installing the SchlageLINK
My install of the SchlageLINK Starter Kit is fully documented below:
Hopefully you found the video informative. I thought I would write a little bit more about it as it didn’t go as smoothly as possible for a few reasons, most of them not my fault. For starters, while the site claims that the SchlageLINK can be installed in less than 30 minutes, don’t believe the hype. That only happens when you have a perfect install environment. Unfortunately, I did not. Here are some quick tips:
- Measure first – whoever first installed my original lock did not measure out the distance between the deadbolt hole and the handle hole. As the SchlageLINK is a bit bulky, if the holes are a bit too close, you may run into some issues. As it turns out, I had to replace both the handle and the deadbolt to make them fit.
- Test the fit many times – I found that when I put in the deadbolt portion, the screws did not completely line up. You may have to slightly resize the holes to make it fit. This typically happens when replacing hardware in older doors. Newer doors are usually drilled properly and you probably won’t run into issues.
- SchlageLINK is fragile – there are some internal items that are delicate in the SchlageLINK. There is a little black tab (see the video) that simply guides a wire from one side of the door to another. I snapped it off in the process of resizing and testing the holes. Also, the wires that connect the two sides of the lock are delicate and you need to be cautious when working with them. Once everything is installed though, it should be solid and safe.
These were just the issues that I had during the install process. Read on for some other thoughts.
Setting up the Communication
Once you have physically installed the SchlageLINK, you get to geek out! This was the part I was really looking forward to. I had seen some ads on TV of the SchlageLINK iPhone app in action turning on lights and controlling the lock.
Before I go into the techy stuff, I do want to point something out about the SchlageLINK’s functionality with the deadbolt. It does NOT actually physically move the deadbolt to lock or unlock the door. It only controls the dial that spins on the outside. When the lock is engaged, the lock simply spins. After you enter a code or remotely “unlock” the door, the deadbolt handle is “engaged” and you can actually move the bolt.
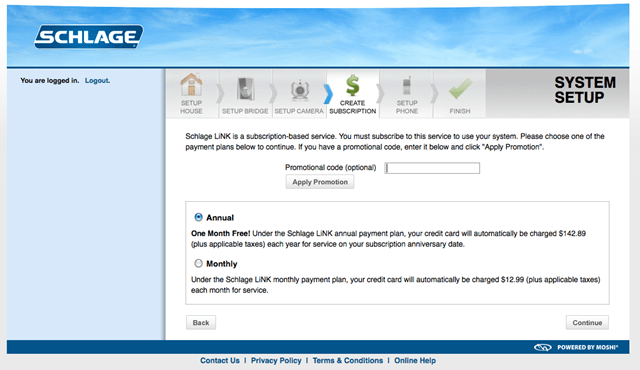
So, once you have the lock set up (and you have optionally plugged in the lamp module), you are ready to set up the programming of the bridge. Do note as well, to use the SchlageLINK’s full functionality, you are required to pay a monthly fee of about $13, but this does allow you to remotely control the lock, lamp and other modules (like webcam or thermostat). Without the monthly subscription, you can use the front door lock with the keypad only, but that is it.
Schlage is very good at documenting the installation process so I will keep it fairly brief. You need to have a wired internet connection (the bridge cannot do it wirelessly unless you have the appropriate 3rd party hardware to do that). But first, you need to set up the Z-Wave wireless connection (secure) with the bridge and between the deadbolt or lever and any other components (like the light module, webcam or thermostat). This is actually quite easy to do with the lamp module: simply press the plus (“+”) button and double click the button on the lamp module. Blinking lights confirm the connection.
With the deadbolt or lever, you need to do a similar process but it does involve entering in the 6 digit code that comes printed on a yellow sticker on the documentation that came with your lock (it is also within the lock itself but if you have already installed it, it’s a bit hard to get at – obviously). Once you have paired all of the items, you are good to go and can connect and activate the bridge via the internet.

Here is another hint, something that I ran into. Test your Ethernet connection prior to connecting to the bridge. What I did was connect a laptop to the Ethernet cable to check connectivity. As luck would have it (and I didn’t follow my own test), I had a bad Ethernet cable. Also, to top it off, SchlageLINK had a rare outage the weekend I was doing my setup. I wasn’t able to connect to the “master server.” I kept trying and resetting the devices but I couldn’t connect.
Eventually, after the outage was resolved (and note, it didn’t affect the functionality of the lock which is designed to work without any type of internet connectivity), I was able to connect to the master server. Do note, that it did require completely “un-pairing” all paired devices (lock and lamp module) as well as fully resetting the lock by removing the 9 volt battery, but once that was completed, I was able to go through the setup process.
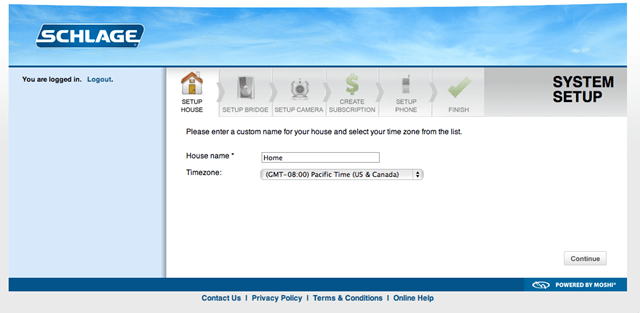
First set up a “Home”:
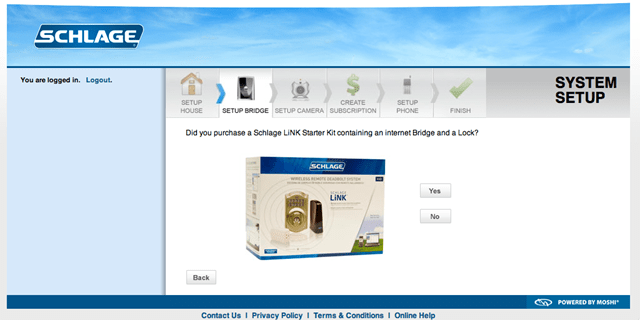
You need to have purchased a LINK Bridge in order to proceed (and use the online site):
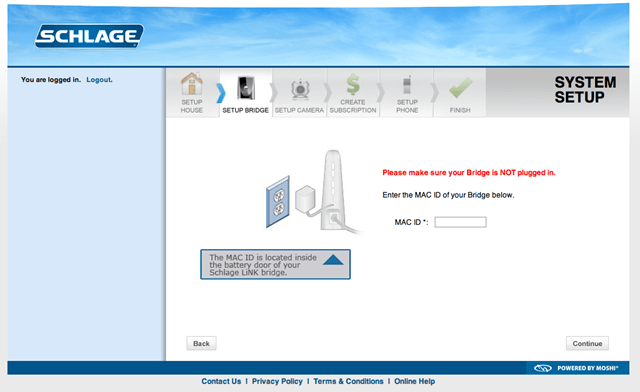
Enter your MAC address (located in the battery compartment of the Bridge):
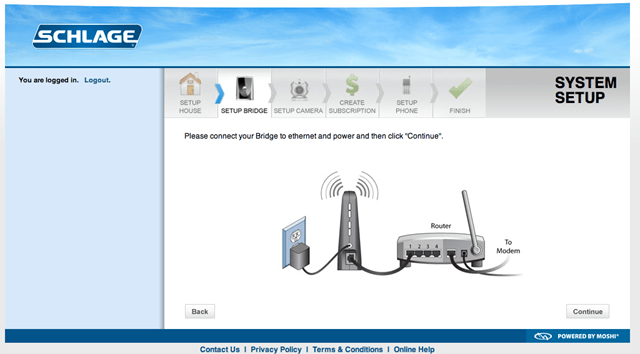
Connect the Bridge:
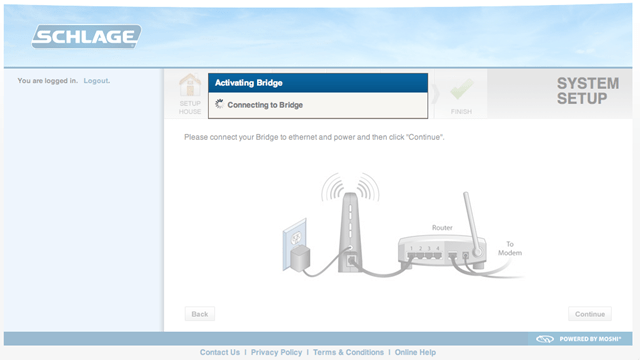
Schlage will attempt to connect to the Bridge:
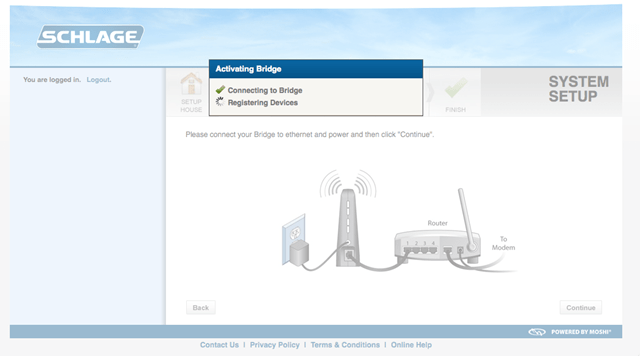
…and register any devices it detects:
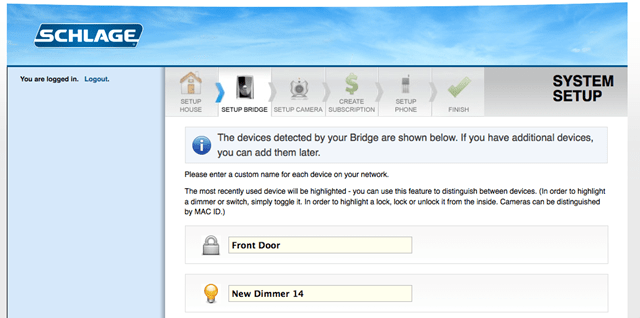
The devices will show up for you to name:
Decide on how you want to pay for the SchlageLINK (monthly or annual):
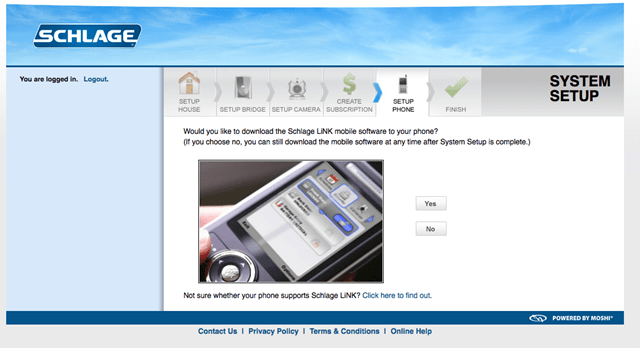
You can then configure the mobile phone application and do other configurations:
Once you get all of your modules and locks installed and activated within your account (“home”), you can start programming the devices. This can be setting up additional codes for other members of your house, creating “scenes” for lighting within your house using the light module, and setting up schedules for when your scenes are activated or deactivated. Additionally, you can configure various cellphones to be able to allow you to control your entirely linked home. I set up my iPhone to work and my wife’s Blackberry Bold as well, both devices have native applications.
Controlling the Environments and Reporting
Within the web application, you are really able to see a lot about your home setup. Below is the main screen. The top bar shows all of the various items that you can control and view (security, cameras, lighting, climate, scenes, schedules and events).
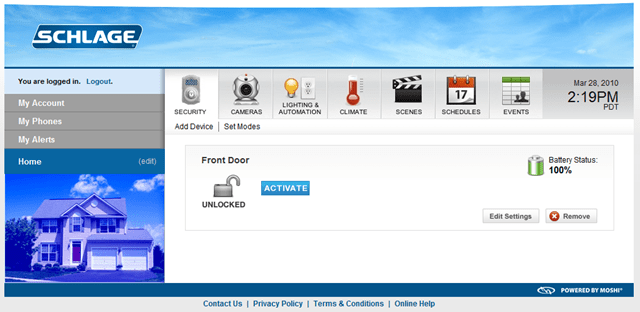
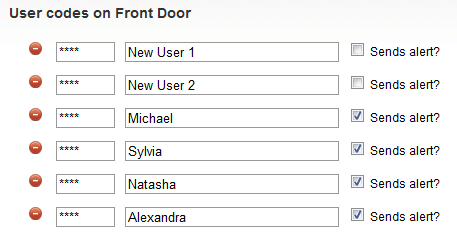
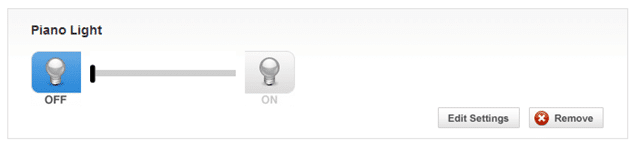
The picture above shows the status of my Front Door lock (locked). Clicking the activate button will allow the front door deadbolt to be unlock if someone is outside to spin the dial. Under the Edit Settings page, you can create additional door lock codes and configure the Bridge to send email notifications when a code is entered.
You can name the lamps and set the level that the light can be at (it can send different dim levels). Using the web interface or a cell phone application, you can turn on or off the lamp as well as see its current state.
Under the Scenes section, you can set up different lighting environments (note, I only have one lamp module, with others, you can set up other types of lights). Also, in order to set up a Schedule you must set up a Scene first.
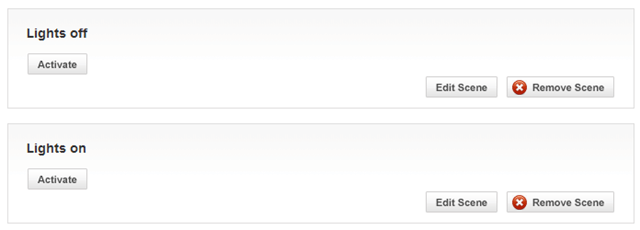
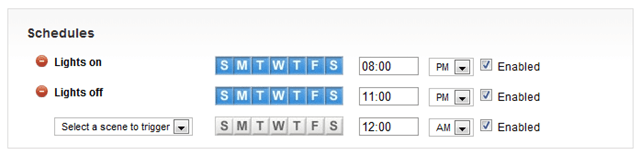
Below is one scene that I set up. In this scenario, you choose the time and day of week that you want a scene to be triggered. This one turns on my lights from 8-11pm every day of the week.
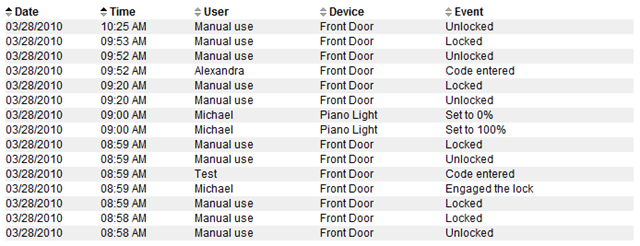
Lastly, you have a full record of everything that takes place with your devices including if a door is manually locked or unlocked, if a code is entered or if a scene is activated. Additionally, you can get an email Alert if a user enters a code to unlock the door. This is particularly helpful if you have kids and want to know when they get home and enter their code to come in.
One thing that I would have liked to have seen within the Events section is attempts on the keypad as well. This would be especially useful to discover if someone was trying to enter an incorrect code repeatedly. You could get notified on repeated attempts and, if you had the optional webcam, take a picture of the person trying to get in.
Pricing and Final Thoughts
For the most part, I think the SchlageLINK is a great product to have, especially if you have an active household and need to keep track of the comings and goings of your family. Getting notifications when your children get home, being able to set up automatic schedules for lighting scenes in your house, being able to remotely monitor your house via video webcams (not tested), and seeing all of the activity of your door locks is really great. There are many different situations where the SchlageLINK can be helpful in terms of maintaining security around the home, that it is worth the investment.
The SchlageLINK starter kit retails between $250-300 on Amazon (see the Deadbolt kit or Door Lever). You can see all of the SchlageLINK products on Amazon here. The monthly fee is $12.99.
Personally, I think the monthly fee of $13 is a bit steep. I would say that it should be a bit less expensive (perhaps $5/month) or have a tiered pricing based on the number of components you have (e.g., a base rate for the starter kit and then each additional module like a light or webcam or thermostat would be an additional charge). Don’t get me wrong, I do think that for the SchlageLINK to be fully effective, you must pay for the monthly free, but over a year, the cost would be about $156 which is on top of the price of the hardware itself. Also, you are dependent on your internet connection and for the “master server” at Schlage to be up and running for the system to be fully effective.
But, once you get your system fully set up, I would think that it would quickly become indispensible. I personally like keeping tabs on what activity is happening in my house. For that peace of mind, in my opinion, the SchlageLINK is definitely worth the investment and time to set up.
Disclosure Text : I have a material connection because I received a gift or sample of a product for consideration in preparing to write this content. I was/am not expected to return this item or gift after my review period. More information can be found in my About page as well as here.
HTD says: the SchlageLINK brings high-tech to the usually boring task of locking and unlocking your doors (among other things).
[amazonproduct=B001NEK6JC]


1 comment
CourtneyM
Great article Michael!
Just wanted to add one thing. To help with that price, Schlage is celebrating LiNK’s first birthday with you by giving a $50 rebate on the Schlage LiNK Starter Kit.
The rebate lasts through April 30th and is a cash rebate at Lowe’s and RadioShack but a mail-in rebate at any of the other 5,000 Schlage retailers.
Feel free to contact me if you have any questions about LiNK.
Full Disclosure: I work for Schlage but I thought you might be interested in the new price.