I decided I was tired of waiting around for the next version of DD-WRT to come out (v24) which, as of this writing, was at RC7, I believe. I twittered today that I was tired of waiting and got a tweet back saying that I should check out Tomato and that people were saying some good things about it. I quickly Googled “DD-WRT vs. Tomato” and found this post which pretty much convinced me I should do it. I also watched a few of the videos on the Tomato site. It looks pretty nice.
My only issue was that I wanted to do OpenVPN on the router. A few days ago, my Linksys decided to reset itself back to factory settings (guess it was getting a bit tired of DD-WRT as well) and I lost all of my OpenVPN settings (grrr). So, instead of trying to figure it out, I decided to install a modified version of Tomato that has OpenVPN built in. I’m not going to go into how I configured my OpenVPN. That would probably be better as another stand-alone post.
However, here are the steps that I took to migrate from DD-WRT (“Firmware: DD-WRT v23 SP2 (09/15/06) vpn”) to Tomato (“TomatoMod 1.16.1374 – Binary” with OpenVPN). These steps might not apply to you. There are instructions within the ReadMe of the Tomato firmware files that tell you how to do things for different types of routers and firmwares. Be sure to read it.
- Save Config – Save your existing DD-WRT configuration by going to Administration > Backup. That way you can always try to go back and restore your settings. (Note: this is NOT the firmware itself, just the settings you have made).
- Print Config – I took screenshots of my important configuration pages on my existing DD-WRT setup. You can print these as well.
- Downloads – Download the various firmwares. I would recommend getting the DD-WRT firmware as well so that if you have to, you can try to roll back to it.
- Documentation – if you are working on your one and only router, I would also recommend getting all of the documentation printed (or PDFed as I did) because you might be caught offline until you get things configured. This is part of the reason why you might want to download all of the backup firmwares as well. Since I have a few extra routers and a cellular card, I am a bit lazy when it comes to that. I also downloaded the regular Tomato firmware (version 1.19). READ THROUGH THE DOCUMENTATION!
- DD-WRT password – the documentation states that you can get locked out because of a chage in DD-WRT’s use of the nvram password variable. They give you steps on how to get that password. Essentially, you have to telnet into the router and type “nvram get http_passwd” and save that result (it’s cryptic).
- Choose the right Tomato firmware version – there are a bunch of files within both the Tomato and the TomatoMod compressed file. Since I have a Linksys WRT54GL, I chose the one called “WRT54G_WRT54GL.bin”
- Apply the firmware – within the DD-WRT admin GUI, go to Administration > Firmware Upgrade and navigate and select the firmware .bin file you want to apply. I selected “No Reset” as the option there. Then cross your fingers. You should see an “Upgrade Successful. Unit Rebooting now” in the old DD-WRT format.
- Logging in – If all goes well, you should get a User/Password prompt. For User, enter “root” and for the password, enter the password that you wrote down from step 5 above. (I had a bit of trouble with this because I had a lower case L that looked like a number 1…but I got in.)
- Checking your configuration – Now you can take time to peruse the new Tomato GUI. Since I did not “reset” my router, most of my configs stayed put.
- Change your Password – don’t forget to change your password from the cryptic one in step #5 to something you can remember.
- Test it all out – mine seemed to be a bit faster after enabling QoS. I need to read up on that a bit more to fully understand the best settings.
- Enable OpenVPN – Go to this thread and work through it. For configuring your server keys and certs, look here. I haven’t gotten it working yet but may write a post once I do.
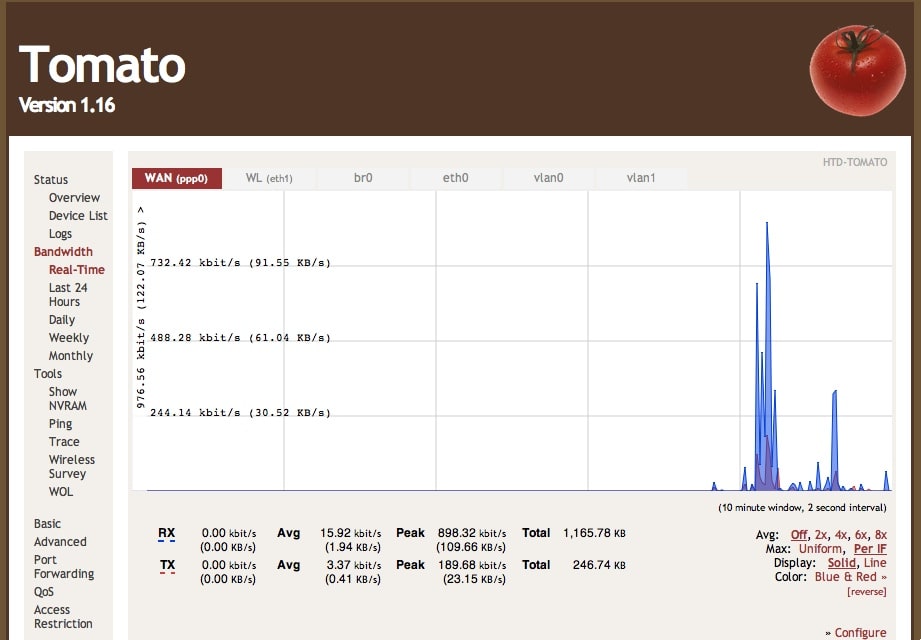
So far, the UI is clean and understandable. I will be playing with some of the feature later. I like the realtime graphs of the QoS stuff. Ooooh shiny! Pretty colors!
HTD says: Tomato router firmware is the next black!


35 Responses
Wondering if anyone has been able to successfully put the OpenVPN config on here without running into the error that the “WAN Up script too long”. Anyone? (Also testing DisQus – grin).
Wondering if anyone has been able to successfully put the OpenVPN config on here without running into the error that the “WAN Up script too long”. Anyone? (Also testing DisQus – grin).
Cheers to you I hope you like it ;)and as for the too long WAN up script it's pretty simple just generate the keys in the init script
Cheers to you I hope you like it ;)
and as for the too long WAN up script it's pretty simple just generate the keys in the init script
I posted something on your forum about that. Need some simple steps on doing it. Any pointers?
I posted something on your forum about that. Need some simple steps on doing it. Any pointers?
an upgrade will soon be available to make use of all the features that are currently addedI'll fix that script size thing too ;)
an upgrade will soon be available to make use of all the features that are currently added
I'll fix that script size thing too ;)
Great! Any idea on an ETA? I'm sure it will be a good one.
Great! Any idea on an ETA? I'm sure it will be a good one.
less than a week I'm practically done but I want to make sure everything works and nothing breaks..
less than a week I'm practically done but I want to make sure everything works and nothing breaks..
Just updated to Tomato and i what a difference! I want my the rest of my time back from trying to configure DD-WRT
Just updated to Tomato and i what a difference! I want my the rest of my time back from trying to configure DD-WRT
No doubt Tomato is better choice. Just a thing to mention – when upgrading from DD-WRT 24sp1 to Tomato 1.23 I failed on step 5 – DD-WRT password. So I had to do hard reset, which is done as described: "Don’t freak out if you can’t login…the same thing happened to me. The next paragraph has a solution for you.
HARD RESET:
Since the Tomato interface did not accept the password I obtained through the Telnet session before the flash, I had to perform a hard reset. To do this you need to hold the reset button on the back of the router while unplugging the router. Continue to hold the reset button as you re-plug in the router. Once the router is plugged in you should continue holding the reset button for 30 seconds to complete the hard reset."
So always RTM.
Glad that you added that into the comments. Are you using a modded version of Tomato or just the 1.23 version? I haven't upgraded yet.-HTD
Glad that you added that into the comments. Are you using a modded version of Tomato or just the 1.23 version? I haven't upgraded yet.
-HTD
I'm using the original v 1.23 provided at http://www.polarcloud.com/tomato
I'm using the original v 1.23 provided at http://www.polarcloud.com/tomato
Ah ok. I'm looking for a good Tomato mod that handles OpenVPN well. I have one but it is out of date. Want to update it. Someday…-HTD
Ah ok. I'm looking for a good Tomato mod that handles OpenVPN well. I have one but it is out of date. Want to update it. Someday…
-HTD
I know this is an old post, but you should always do a reset after you upgrade to Tomato from DD-WRT. Always.
I know this is an old post, but you should always do a reset after you upgrade to Tomato from DD-WRT. Always.
@Brian,Thanks. What version of Tomato are you on? (Are you on Tomato?) Are you using one of the VPN “flavors”?-HTD
@Brian,
Thanks. What version of Tomato are you on? (Are you on Tomato?) Are you using one of the VPN “flavors”?
-HTD
No, I'm not using any of the VPN flavors. Just vanilla 1.23. DD-WRT info that is still in the NVRAM after you upgrade to Tomato can cause problems in some cases. That's why I suggested to always do a reset after upgrading. :)
No, I'm not using any of the VPN flavors. Just vanilla 1.23. DD-WRT info that is still in the NVRAM after you upgrade to Tomato can cause problems in some cases. That's why I suggested to always do a reset after upgrading. :)
Well , the view of the passage is totally correct ,your details is really reasonable and you guy louis vuitton handbags give us valuable informative post, I totally agree the standpoint of upstairs. I often surfing on this forum when I m free and I find there are so much good information we can learn in this forum!
Thanks! Just followed this post, and I’m officially transferred from ddwrt to tomato on my Linksys WRT160N
Update! I went back to ddwrt because Tomato wasn’t playing nice with my iPhone 4 (very slow internet speeds). It played nice with an iPhone 3GS, and all the computers in the household. I played around with the settings, but no combination would bring normal speed to the iPhone 4. Oh well! Tomato was pretty, at least.
Interesting. I don’t have any issues with my iOS products. I’m running a custom Tomato firmware specific to my Linksys e3000. I also have a Belkin but I think that belkin is doing all of my iOS devices.
Cool stuff. The only thing that slightly confused me is the firmware file was a *.trx file, not a *.bin file. But the instructions worked. Since I am a bit paranoid I used the option to reset my settings. Once I remembered to use 192.168.1.1 as the original IP address, I was able to connect and restore my configuration settings.
Thanks for the comment. I have my main router (Linksys E3000) running now on a customer Tomato build. Just the other day, I installed DD-WRT on a Belkin PlayMax to resolve some issues I was having with their stock firmware. It seems to be running quite well now.
Interesting. I don’t have any issues with my iOS products. I’m running a custom Tomato firmware specific to my Linksys e3000. I also have a Belkin but I think that belkin is doing all of my iOS devices.
Fried