Yesterday I ran into a little issue. I tried to use my Cisco VPN client on my Mac after having upgraded to Lion. For some reason, it was not working. I did find some ways to correct that (the Error 51 issue) and how to migrate your Cisco setting over to the native Mac OS VPN client, but that will be the subject of another post. This post is about another issue that I seemed to have resolved where when using my VPN, none of my hostnames were resolving, fully qualified or shortened ones weren’t working, only using an IP address.
You might not think that this is a big deal, but for me it is because it is hard to remember IP addresses and if you have a DHCP environment, sometimes those IP addresses change. If all of this sounds like greek or geek-speak to you, let me try to explain it quickly. You can access a computer if you are on the same network in several ways:
- By name – mycomputer
- By fully qualified name – my computer.mycompany
- By IP address – 192.xxx.xxx.xxx
When you are on the same network, you have routers and DNS servers that translate the name that you put in and convert it into an IP address. This is much the way that the internet works; domains translate into public IP address. If your network is set up properly, and you are on that network, you can just type in the name of your computer (e.g., in a Remote Desktop Application) and you “should” be able to connect. If you can’t, your internal networking might not be working right. But, if you have the IP address of your machine, you can always use that to connect.
Side note: To get a machine’s IP address, all that you have to do is “ping” that computer by simply issuing the command ping mycomputer and it would (hopefully) respond back. In the ping process, I could get the IP address of that machine, for this example, let’s say that it’s 192.168.1.10.
The issue for me was that when I used Remote Desktop to connect to my computer, when I was at work, I could just user mycomputer in the name field. But when I was doing it remotely (via the VPN), my connection would simply timeout. However, if I put in the IP address of my machine (e.g., the 192.168.1.10) and had the VPN on, I could successfully connect. The problem was, I didn’t always know the IP address of the machine that I wanted to connect to. I really wanted to use a hostname.
How to Get Hostnames to Resolve using a Mac VPN Connection
Anyway, I thought that I would cut to the chase. With a couple of configurations, I was able to get my VPN connection to work with just the computer name, and no need to type in mycomputer.mycompany.com or the IP address.
A quick note: while this configuration worked for me, it might not be 100% successful for you as it really depends on how your network administrators have set up the routing within your organization.
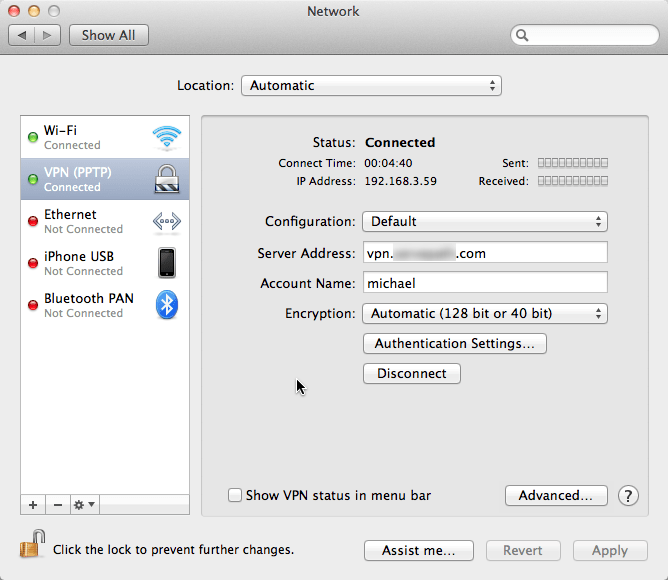
First, set up your VPN connection. The one shown below is a PPTP VPN network connection using the built-in Mac OS X Lion VPN.

Each company may have a different type of setting. In the example above, I put in our VPN server address (e.g., vpn.YOURCOMPANY.com). Then you enter your Account Name and then the Encryption level (I chose Automatic). After that, click on the Authentication button and enter in your Password or whatever is proper based on what your network admins have told you.
With this configuration, you should test the connection and make sure that it connects. If it doesn’t, you need to double-check your settings. If it does, and you know that fully qualified name of a server in your network (e.g., you are at home and want to connect to a server at work), type in the name (only) of that server. You can also ping that server to test. In the image below, you can see that I tried to ping just the server name (“skynet”) and that server couldn’t be found or it timed out. Then I tried a fully qualified name (“skynet.MYCOMPANY.com”) and it too timed out. If yours works, then you are lucky and you can probably skip the rest of the steps below.

The next thing that you should try is to enter a SEARCH DOMAIN into the Advanced configuration area. What this does is it appends whatever domain you put in to the machine name. So, if you ping mycomputer and you have a Search Domain of my company.com in the Search Domain, it will make the server name full: mycomputer.mycompany.com. Try adding that config and doing the ping process again.

See if and where you get timeouts. If you still get them, you will want to try the step below. If everything responds back, you probably can stop here.
The next setting you would want to try is also in the Advanced section. Go there and under Options, select SEND ALL TRAFFIC OVER VPN CONNECTION. This is important, especially if your subnet or IP block that you are using is the same on both networks (e.g., your remote network and work network). Also, by sending all of your traffic through the VPN connection, all your transmissions are more secure. There are plenty of cases though where when you create this secure VPN tunnel, traffic to the Internet in general may time out (I didn’t run into this issue with my particular setting – it could be something that your network administrator needs to enable on the VPN router itself).

Note: Remember, that each time you make a change to the configurations, you will need to APPLY them and then Disconnect and (re)Connect your VPN connection.
Try the ping process again with the “Send all traffic over VPN connect”. This is what I got when I tried it:

So with just a few additional configurations, I was able to get my Mac OS X Lion VPN connection working and resolving hostnames fully. To recap:
- Configure your basic VPN settings
- Add a “Search Domain”
- Check the “Send all traffic over VPN connection”
I’m planning on writing a post soon on how to convert your Cisco .pcf file into just using a Cisco IPsec connection within the Lion VPN client. In my case, I didn’t need to do this, but I will test this out regardless.
I’m curious, did these VPN connection tips work for you? If so, please leave a comment. If they didn’t, feel free to ask some questions (although I’m not really a VPN expert and it took me a while to figure this “simple” fix out), but I will try my best to answer.
HTD says: VPN connections are great and extremely helpful…but only when they work!


13 Responses
Unfortunately this did not work for me. When selecting the Cisco VPN profit in Lion, there is no “Options” tab and no option for “Send all traffic over VPN”. I am able to connect to an IP address but not to a FQDN, even when adding my company’s domains in the “Search Domain” VPN section. …still looking for a solution.
Remember, I didn’t select the Cisco IPsec option when creating the VPN Tunnel, I chose the PPTP option which is where you can find that “Send all traffic over VPN”.
Encountered a similar issue when trying remote desktop connect to my work computer from my home computer (running on Linux/Ubuntu) over a Cisco VPN compatible VPN protocol. While the steps were slightly different on a machine running Linux, the tips you provide in your blog article were nevertheless very useful. I have since been able to use my work computer name as-is when connecting over Linux/Ubuntu’s remote desktop connectivity tool after successful login to my corporate VPN.
Awesome! Glad that it helped you out.
I used to be able to RDP with a FQDN but several weeks ago it quit, and I could only use the remote computer’s IP address. Given our VPN setup, I have to use Cisco IPSec. The correct DNS servers appear in the VPN window, but they don’t seen to get used. I’ve spent many hours trying to resolve this.
this tip works great, thanks!
Nice article but a little outdated. Here is the tutorial for Setup VPN on MAC which you can use to set up your vpn on MAC and keep enjoying the Internet freedom.
Best tutorial ever. Do you think PureVPN is good for Mac users? It is good as per user recommendations. Here a source for more information http://www.purevpn.com/vpn-service/mac-os-x-vpn.php
I think the part I’m still foggy on is what a search domain is. What the domain that is set under the router is for and how that works with my public domain. It’s not my domain I suppose.
Yes, it’s confusing. If you click on the (?) within the Preference Pane, you will get the following explanation from Apple help:
“The search domains you enter in your Network preferences are automatically appended to names you type in Internet apps. For example, if you specify the search domain apple.com, typing “store” in your web browser takes you to store.apple.com. Or, if you use campus.university.edu as a search domain, you can type “server1” in the Connect To Server dialog in the Finder to connect to server1.campus.university.edu.”
It’s a way, from my understanding, to shortcut to sub-domains if you are within a pre-defined network (like work). At home, it doesn’t really make sense. Some corporations automatically specify it for you when you connect to their wired or wireless network. Hope that helps a bit.
I followed this instructions but hostnames do not resolve. I use local for my search domains since it works on the home network. ie. I refer to all my hosts as hostname.local and they work. Over VPN I have to use the IP address. Something else I noticed, over VPN I can only connect to internal web sites. I cannot ssh to a host or use the vnc:// . but if I put a Web site on, say 192.168.1.53 , I can access it just fine, event if it uses a non-standard port ( like 8080, or 9091 ) . I’m befuddled.
No.
I think Express VPN is working fine for mac Os.But if you want more choises then PCMAG and ReviewsDir are providing many good VPNs for Mac.You can check it out.