
As many people know, Apple’s new Operating System, OS 10.8 – a.k.a. “Mountain Lion,” is officially available for purchase and download. Just head over to the Apple App Store on your supported Mac and purchase and install Mountain Lion now! As part of the upgrade process, your Emergency Recovery Boot Partition will be upgraded to support re-installs of Mountain Lion without the need for an external installer. But what if you want to install Mountain Lion on another computer (that is supported)? There is a way to easily do this, but remember, you should only do this with computers that you own or manage (and you wouldn’t need to do this if you had all of your computers use your Apple ID in the App Store – you would just install right from there).
So, if you do want to create an installer DVD (and you could do this with a USB drive as well), here are the steps to do so.
NOTE: The expanded size of the Mountain Lion installer will NOT fit on a single-sided DVD. You MUST have a dual-sided DVD in order to burn the DVD.
UPDATE 07.26.12 – Thanks to commenter Benoit’s comments, you can now burn a single-sided/single-layer DVD. See updated instructions below.
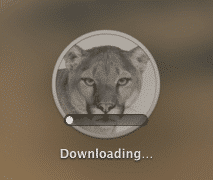
Step One – Download the Mountain Lion installer
Head over to the Apple App Store and download the installer.
If you have already purchased Mountain Lion, check your “Purchases” section and you can download from there.

Then sit back and wait while it downloads.
Step Two – Quit the Installer Once it’s Finished Downloading & Copy
The installer will automatically launch once it is completed downloading. You need to STOP that lion in it’s tracks right there. Just select “Quit” from the “File” menu.

Then, go into your “Applications” folder and copy the Mountain Lion Installer to another location like your Desktop. (Remember to copy and not move.)
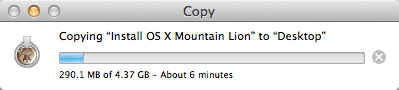
You can see that the installer is about 4.37 GB (as I mentioned before, the expanded size is LARGER than what will fit on a single-sided DVD so get a dual-sided DVD).
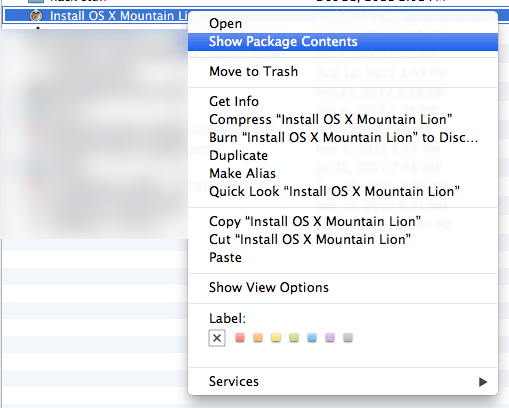
Step Three – Show Package Contents & Copy the Installer File
From the copy that you created of the installer (e.g., the one on your Desktop), you will need to extract the actual installer DMG from the Package Contents. To do this, right-click on the Installer file and choose “Show Package Contents”.
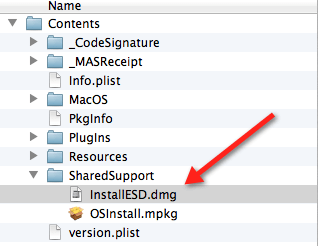
From within the Package Contents, navigate to: Contents > Shared Support and select the “InstallESD.dmg” file and COPY that back to your Desktop (or wherever you want). You will need this file (“InstallESD.dmg”) for the bootable DVD.
Remember the location where you put that .dmg file.
Step Four – Burn the DVD (or the USB drive)
The next step is to burn the actual DVD. As I already said a few times, you need a dual-sided DVD (see step 4a below on how to burn a single-sided DVD). I only had a single-sided DVD so I’m showing the steps here that you would use.
(Note: untested instructions for how to make a bootable USB thumb drive are below as well.)
DVD Installer
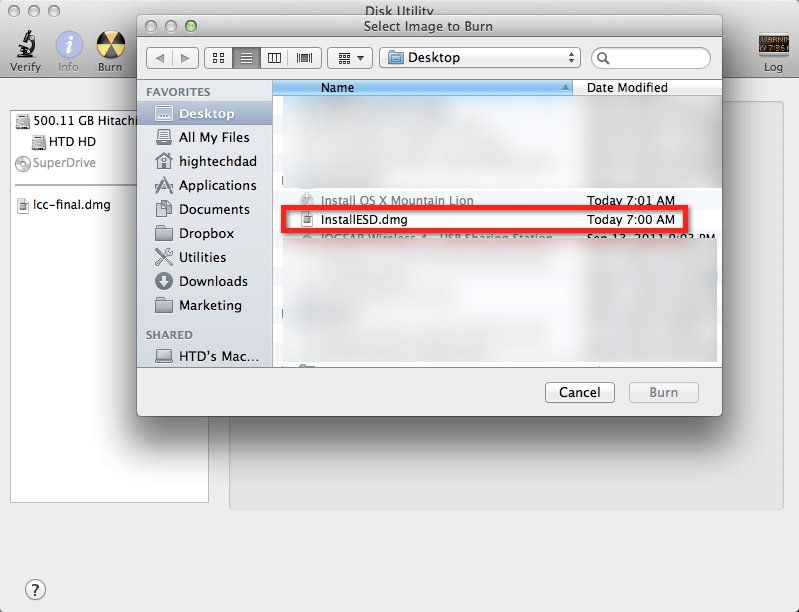
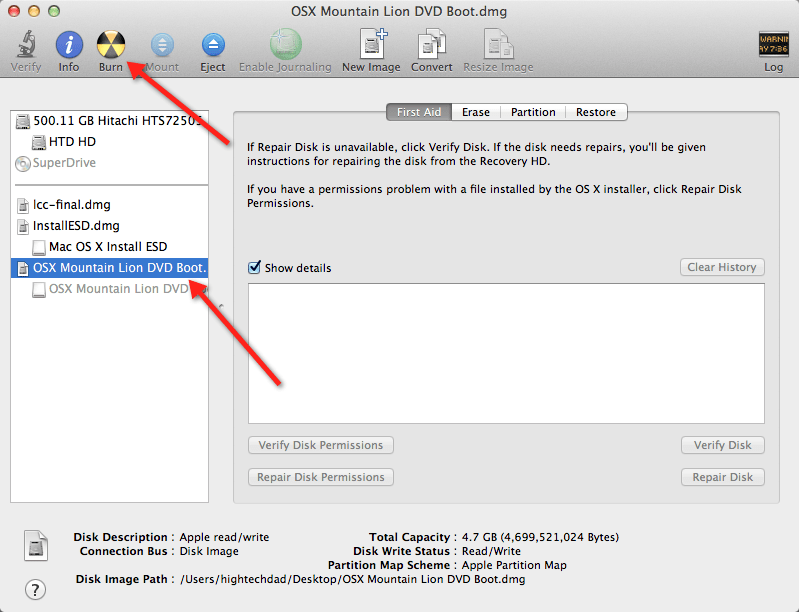
First, launch the “Disk Utility” application. Then click on the “Burn” icon.
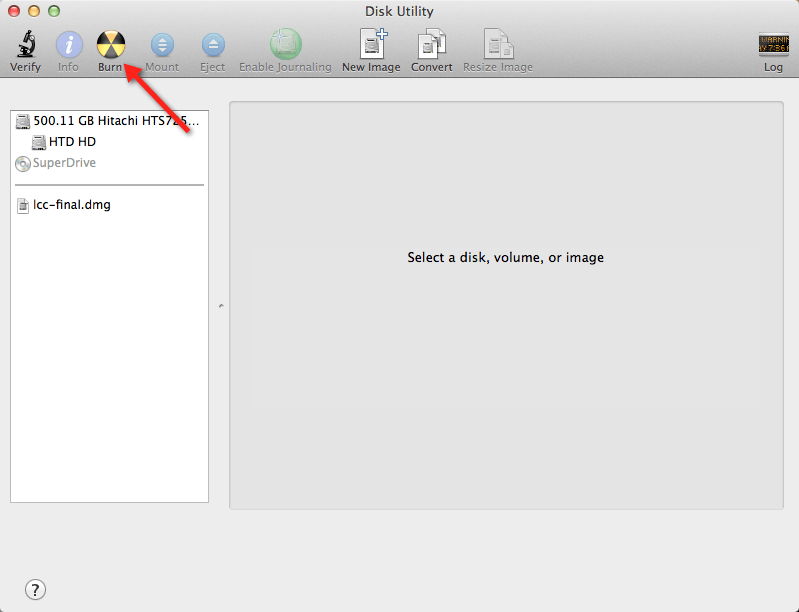
When you click on the “Burn” icon, you will be asked which image you would like to burn. Navigate to where you saved the “InstallESD.dmg” file and select that.
Normally, your DVD would start burning at this point, however, I didn’t have a dual-layer/double-sided DVD and the expanded size of the installer just wouldn’t fit.
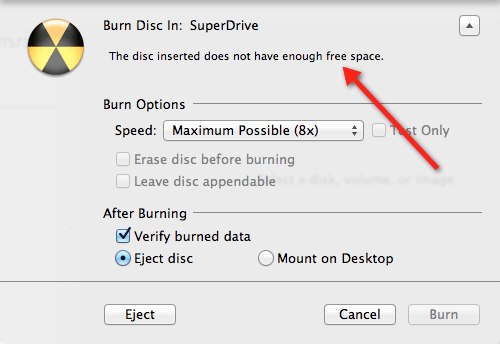
But if you do have a dual-layer DVD, you should then click the “Burn” button and you will shortly have a bootable Mountain Lion Installer DVD.
Step 4a – Burning a Single-Layer DVD
Thanks to comments and instructions by Benoit (in comments section below), there is now a way to burn a single-layer/single-sided DVD. I have tested this out and it seems to work. Here are the steps:
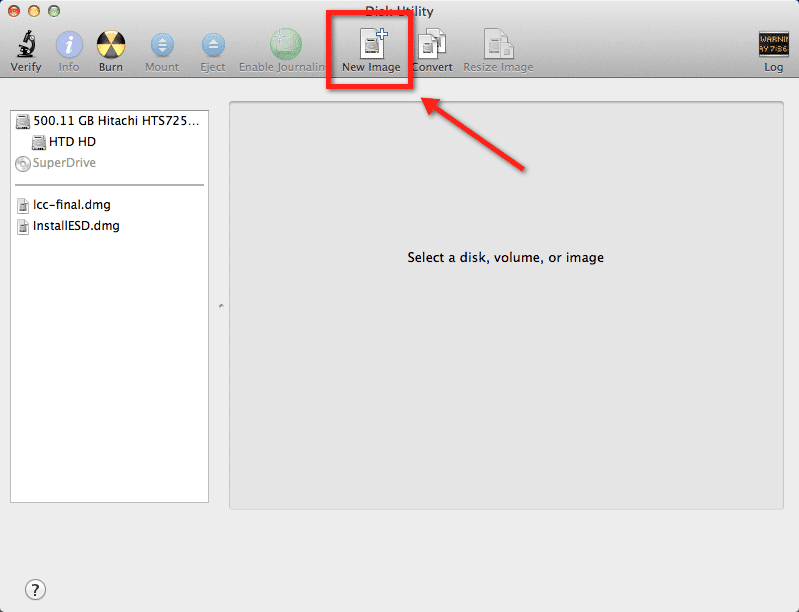
First, you need to create an empty image using Disk Utility. Click on “New Image”.
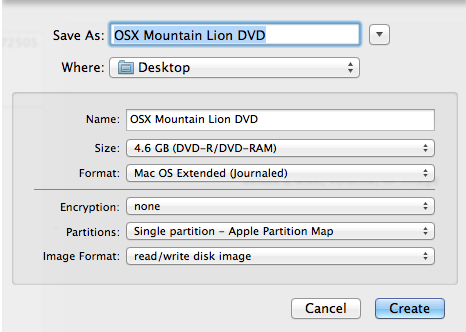
Then fill out the dialog box with:
Save As: “OSX Mountain Lion DVD”
Name: “OSX Mountain Lion DVD”
Size: Select –> “4.6 GB (DVD-R/DVD-RAM)”
Format: “Mac OS Extended (Journaled)”
Encryption: “None”
Partitions: “Single Partition – GUID Partition Map” “Single Partition – Apple Partition Map”
Image Format: “read/write disk image”
See below:
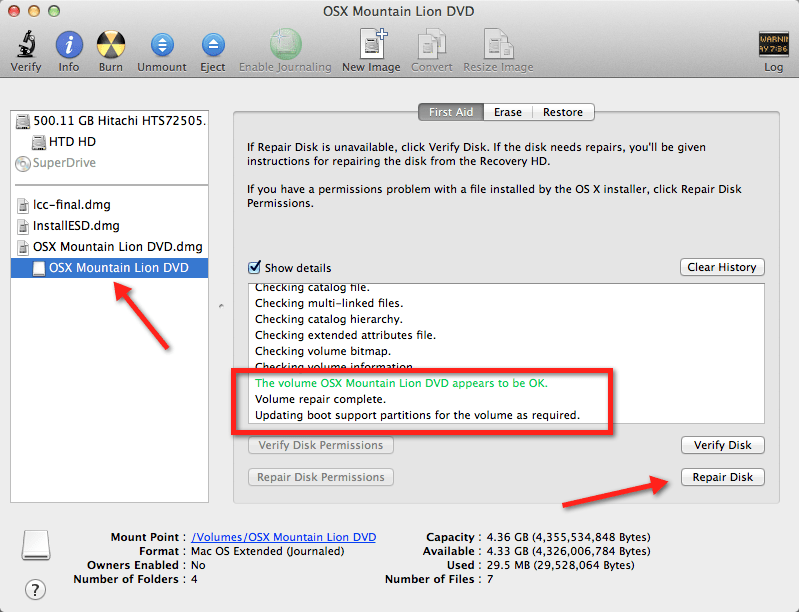
If you new image/partition doesn’t mount, run a “Repair” on it as that will correct the issue and allow you to mount it as well as update it to make it bootable.
Next, create that image and then mount the “InstallESD.dmg” image that you had saved (to your Desktop) previously. When both are mounted, it should look something like this:

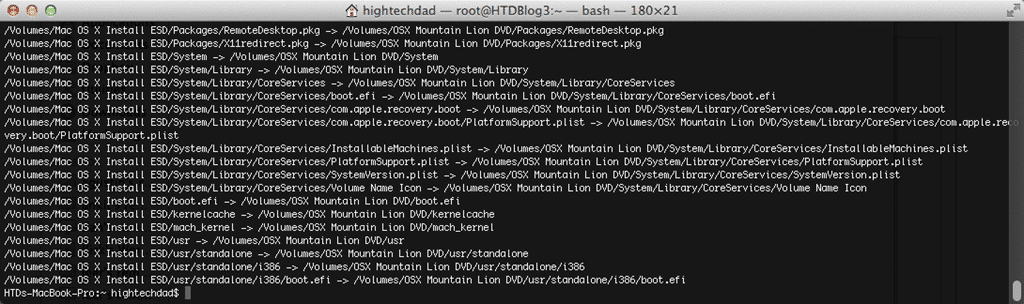
Since the mounted “InstallESD.dmg” image shows a capacity of 4.75 GB, Disk Utility can’t burn it since a single-sided DVD is less than that. So, what you need to do is actually copy the contents of the “installESD.dmg” mounted image into your newly created “OSX Mountain Lion DVD” image. At this point, you need to open your Terminal application to copy the files using the following terminal command (note: if you have spaces in the names, you need to use the “\” to denote that – slightly different than in Benoit’s comments):
cp -Rv /Volumes/Mac\ OS\ X\ Install\ ESD/* /Volumes/OSX\ Mountain\ Lion\ DVD/
(Note: Benoit did say that you can add a -p command to the command line – see the comments – I have not tested this – so it would be “cp -pvR”)
Here’s what it looks like in the Terminal:

The process of copying will take a few minutes but you will see the progress on the Terminal screen. When it it completed, and be sure you don’t have any errors, you should see something similar to this:
At this point, you can “exit” out of the Terminal app.
Now, you can BURN the single-sided DVD based on that new image that you created. Just follow the steps outlined in “Step Four – Burn the DVD” but use the newly created image instead of the “installESD.dmg” one:
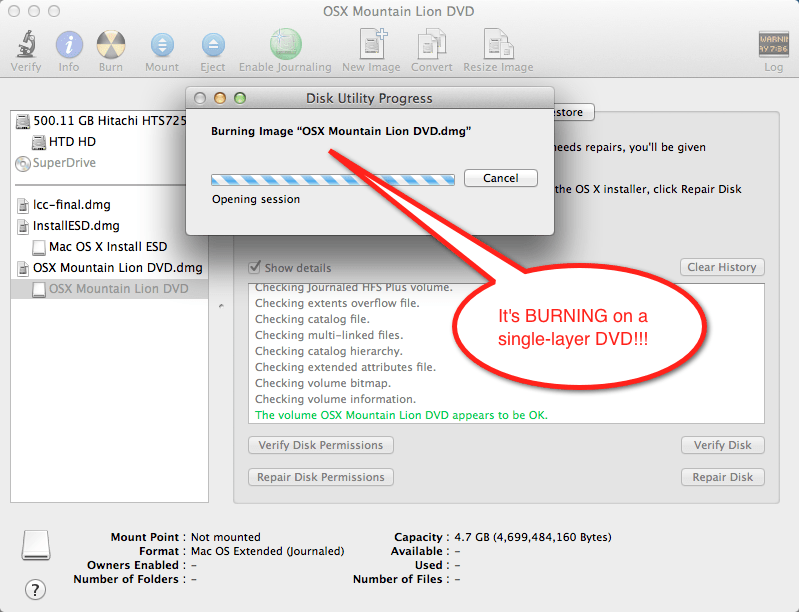
And look! It’s burning on a single-layer DVD:
And it burned the single-layer DVD successfully!
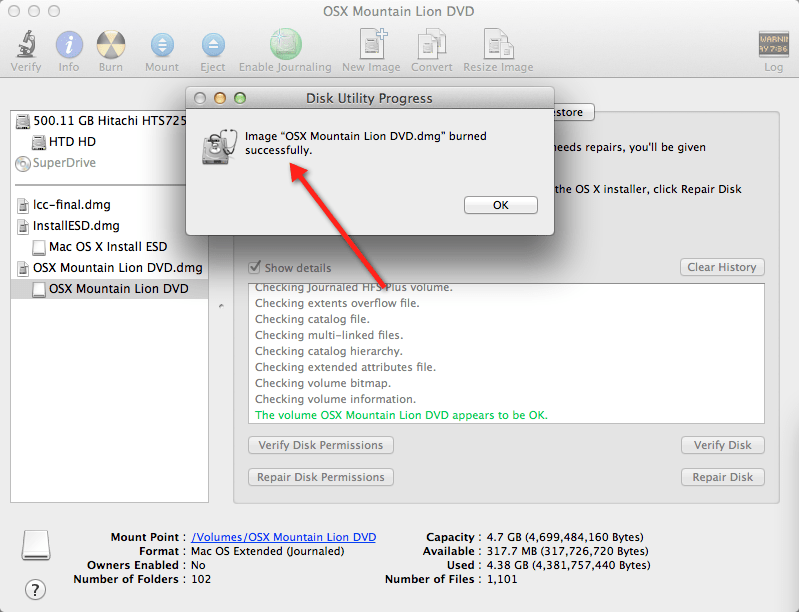
I took this newly created single-layer DVD and booted my MacBook Pro off of it (holding “Option” while rebooting), so it looks like this process works. It DOES take a very long time to boot from the DVD though. Thanks again Benoit!
USB Thumb Drive Installer
If you have an 8 GB USB thumb drive, you can create an installer out of that as well. I have not tested this process but here are the steps.
- First you need to format the USB drive (and note that formatting will completely erase all of the contents of your USB Thumb Drive). Just go over to Disk Utility and choose the “Partition” tab.
- Choose “1 Partition” from the dropdown menu and choose “Mac OS Extended (Journaled)” as the format type.
- Click the “Options” button and select “GUID Partition Table” which will “bless” the new partition and make it bootable.
- Hit “Apply” which will then format (and erase) the USB Thumb Drive.
- Lastly, click the “Restore” tab and select the “InstallESD.dmg” file as your “source” and the USB Thumb Drive as the “destination”. Click “Apply” to put the expanded installer on the Thumb Drive.
So, in the end, you will have either a bootable DVD or USB Thumb Drive complete with that growling Mountain Lion Installer. To use either of these, insert the DVD or USB drive and restart your Mac holding down the “Option” key when you restart. You can then select your new installer from the list of options that appear on start up.
Did these steps work for you? Leave a comment! What do you think of Apple’s new Mountain Lion?
HTD says: Another Big Cat to install on your Mac! Growl!


52 comments
Stephen
No help for people with normal DVDs?
hightechdad
Nope. Probably the best bet is to just get an 8 GB USB Thumb Drive.
kbrown210
hi i tried burning mountain lion to a single layer dvd following benoit’s instructions and i keep getting this message: unable to burn OSX Mountain Lion because the dvd did not respond or failed to recover. i then tried to burn to a double layer dvd, it was successful but could not boot from the dvd. i tried it on my macbook pro and my wife’s macbook pro. any help out there would be appreciated. thanks.
Benoit
If you have a normal DVD, you can create an empty image of a single partion dvd with Disk Utility, name it OSX Lion Mountain DVD. (Size 4.6 Gb)
Then mount the installESD.dmg
You should have 2 drives on your desktop.
The insall DVD img you made (empty)
The Mac OS X install ESD of 4.75Gb
Now, the problem is Apple did a dmg of 4.75gb and the used space in it is only 4.3gb. So Disk Utility see only the total capacity of the dmg (4.75) and tell you you cant burn it to a normal dvd.
to solve that:
open Terminal and type
cp -Rv /Volumes/Mac OS X Install ESD/* /Volumes/OSX Lion Mountain DVD
This will copy all the content of the apple install dmg into your new image.
You can see that everything was able to fit ;-)
Now burn this image to a DVD and voila.
hightechdad
Thank you for sharing this! I’m going to be updating my post with more instructions and pictures on how to do this. I’m working on that now and will test the Install DVD as well.
Benoit
Happy to help!. something important to add after testing this method. You have to add the -p option to the cp command.
So the command would be :
cp -pvR /Volumes/Mac OS X Install ESD/* /Volumes/OSX Lion Mountain DVD
this will create a DVD image that will be visible from the boot menu and will install without problems
hightechdad
Ah yes, I was having some issues figuring out which “1 Partition” to select since my initial burn didn’t show when rebooting my Mac. Testing a different method.
I will test with the new -p flag. Thanks!
Benoit
Should work, my friend just did it and it worked flawlessly. i will personally try it tonight on my Imac at home. I scraped my only dvd i brought to work when i tried without the -p option ;-)
hightechdad
Yeah, I have burned through 1 DVD already. I’m testing a different method now (prior to the -p flag). If it works, I will post as is (as I’m out of DVDs as well – grin).
StevesWeb
I tried the USB thumb drive procedure on my recent model iMac and it worked perfectly.
Thanks!
hightechdad
Thanks for letting me know! Good to hear!
Jon
Trying the single layer copy method, and it seems the size of the single layer image isn’t enough (I get “cp: /Volumes/OS X Mountain Lion DVD/usr/standalone/i386/boot.efi: No space left on device” in Terminal). Any ideas as to what I could be doing wrong?
hightechdad
I ran into that issue once before. I had to recreate the DMG and run the repair disk to make it bootable as well. Be sure that you select the right partition type (GUID one). Or you could read down in the comments where Benoit listed an additional flag. Try going through it again and watch for those errors.
Jon
Very strange! Still not working here. On my InstallESD.dmg I show it as having a capacity of 4.75 GB, with 4.38 GB used. When I make a single-layer disk image to copy to, I see a capacity of 4.36 GB with 4.33 GB available. What could I be missing? Thanks for any help!
hightechdad
So, when you did the cp, you had both the InstallESD.dmg mounted (which I did by double clicking within Disk Utility) and the new DMG (with the proper partition and GUID and you ran Repair disk on that and it mounted successfully?)?
When you created the DMG, you did choose the DVD size, right? Post a screenshot if you want.
dto458
I’m having the same problem as Jon, I did do all the steps correctly. Here is the Terminal. What’s strange is even after selecting 4.6Gb it shows the partition as 4.3. I posted the image of the partition.
hightechdad
I didn’t see a screenshot. But I was able to get it to work. Perhaps if you posted (or wrote down) each step that you do, then you might be able to bring to light the issue.
dto458
Alright well it’s pretty much going to be the same as what you told me to do.
Alright so, I mounted the InstallESD.dmg. Then clicked New Image, used all your instructions on creating the new “OSX Mountain Lion DVD” dmg. Here’s a linked screenshot if you don’t believe me: http://i.imgur.com/vQbeu.png . I repaired the disk again even though I’d done it twice: http://i.imgur.com/satc3.png . Then I copied the command exactly as you had it written down for. Andd this is what has happened every time: http://i.imgur.com/kGORf.png
hightechdad
It’s not that I don’t believe you. I’m just trying to remember how I got around the same issue. Two things that I did do were:1) reboot and try it again and 2) name the image differently the next time (you can see in one of my screenshots, I added “boot” to the name.
Try that. Also, which cp command are you using? I’m doing the one in my post.
dto458
I used the cp command without the p. And I’m going to try using the apple partition
rrm74001
@hightechdad:disqus Look at your screenshots. You used the Apple Partition Map. Not the GUID Partition Map. Use the Apple Partition Map. I can confirm this works.
hightechdad
Ah yes! You are right! I was trying different things. I will update the post. Thanks for catching.
Hightechdad Gandalfthewise
Single layer DVD.
When you follow the above exactly there will not be enough room on the created image for the terminal command to copy everything over and it will fail. I tried by using “single partition – apple partition map” and discovered that this leaves more room on the image, all the files fit, and it will burn successfully to the single layer DVD. Its verifying now, I will post here if it does not work.
rrm74001
This is why @8f8faa7aaf9a2c8f202f5f7a369b0746:disqus and @70c8cf594582e0f26c30092ecdd14bc8:disqus were having problems. The GUID Partition map uses too much space for overhead. The Apple Partition Map will work.
It takes forever to boot, but it works.
rrm74001
This is why Jon and dto458 were having problems. The GUID Partition map uses too much space for overhead. The Apple Partition Map will work.
It takes forever to boot, but it works.
hightechdad
All fixed now! I found the screenshot image of the time I tried the Apple Partition Map. Yes, it does take forever to boot.
Thx for pointing that out.
rrm74001
As far as I can tell, this is the only place on the internets that has a tutorial for burning Mountain Lion to a single layer DVD. I knew there was a workaround out there somewhere. I bet next release, we will have to actually remove some files to get it to fit. Keep up the good work.
Leisy
It’ll still be better than three hours to download the file. :P
dto458
Thanks a lot everyone! The apple partition worked great. Is there any explanation for why it takes so long to boot?/Can anyone give me an estimation so I don’t lose my patience. And also, do I have to perform a factory reset on Lion before I install it or does it give you an option to reset your hard drive during installation?
rrm74001
These are the options available to you when you boot from the DVD. Not sure why it takes so long to boot. The DVD sounds busy the entire time it is booting.
Adam Polgar
The reason it takes so long to boot is because the install image is not optimized for optical media. Before, when Apple shipped OS updates on DVDs, the layout of the files and folders were fine-tuned to work with the way the disc spins and the laser operates in your optical drive. Now, with software distribution being electronic, such optimizations are no longer made, because they are unnecessary.
In other words, it takes so long because you are doing something (booting off a DVD) that Apple never planned for. :)
Niklas Wagemann
Hi, I’m trying to do this via USB. At the end of the process, after I’ve clicked ‘restore’, an error message comes and I’m not really sure what to do about that. Is this normal? When I then continue and push the USB into the designated MBP, and hit the option key, I get the normal HD (of course) one called ‘Backup HD’ or something and one with the firewire symbol. Which one should I select? What option do I press once it has booted to it?
Damien Toth
wish I have seen this earlier, but here is what I think you went through with the experience of the error, and most importantly this is how you resolve it:
https://discussions.apple.com/message/19203926?ac_cid=op123456#19203926
Cost me 2 sleepless nights. LOL
Whoops
So could I use this DVD with ML on it to provide my windows partition with the needed drivers? Avoid having to buy a new start up disk? Or is that wishful thinking? My dad through out my start up disk -_- (sigh)
Nizam Khan
Really informative and useful post. Very detailed and instructional guide and easy to follow steps. Thanks Michael :)
Dániel Darabos
It appears that for the DVD to boot the “Repair” step is critical and you have to make sure you see the “Updating boot support partitions for the volume as required.” message. Older versions of Disk Utility (e.g. from Leopard) don’t do this. Thanks for the useful guide!
2name
Is there a way to do it using an old disk utility? If I have done all the steps, maybe there is a way to make such .dmg bootable?
Tom
Great guide!
If you prefer just using “Terminal” commands, as I do, you can follow this procedure:
1. download “OS X Mountain Lion” from App Store
2. quit OS X installer; in case, eject mounted disk images
3. launch “Terminal” and execute these commands:
> cd Desktop
> hdiutil makehybrid -hfs -hfs-volume-name “Mac OS X Install ESD” -o tmp.dmg /Applications/Install OS X Mountain Lion.app/Contents/SharedSupport/InstallESD.dmg
> hdiutil convert tmp.dmg -format UDZO -o OS X Mountain Lion.dmg
> rm tmp.dmg
4. launch “Disk Utility”
5. drag “OS X Mountain Lion.dmg” from Desktop to the left column of Disk Utility, select it and then click the icon “Burn”
Cheers,
Tom
hightechdad
Thanks Tom. Terminal is a good way to go!
SkippyThorson
Tom, thank you a TON. Among all the options that were just too cumbersome to navigate, the Terminal really is the way to go. This was the easiest option out there. Thanks!!
Jason
Still not enough room on disk
hightechdad
If you follow the steps outlined in the article as well as in the comments, it should work, unless newer versions of Mountain Lion from Apple have bloated the installer. I haven’t tested recently. (And I’m assuming you are using a DVD.)
blurblurb
Next, create that image and then mount the “InstallESD.dmg” image that you had saved (to your Desktop) previously. When both are mounted, it should look something like this:
*** HOW does one ‘Create that image’ ???? ***
hightechdad
The instructions should be in the blog post. Is there something that you don’t understand specifically there?
braddels
im totally lost by this. keep getting an error in terminal and i’m not savvy enough to work out what the hell it means. i’ll just wait until i have a dual layer disc or a big enough flash drive
mac hacker
thnks for this post. i wil really recommend the usb method it works like magic!!!! just get a used usb 8gb and that is it the job is less complex and even install faster
oschrock
Awesome! Thanks for the tip on the single-layer DVD!!!
Kyle
Which (in your honest opinion) would be faster to boot and install from: a USB or DVD?
Adrian Wolfson
could not get this to copy using terminal and kept getting the same message which i don’t understand what the problem is. anyone have any ideas?
cp [-R [-H | -L | -P]] [-fi | -n] [-apvX] source_file target_file
cp [-R [-H | -L | -P]] [-fi | -n] [-apvX] source_file … target_directory
Helper
Before using Terminal, make sure ‘OSX Mountain Lion DVD’ (not the dmg) is mounted. If it is greyed-out it is not. To mount the volume, select it and click the Activate-button (next to the Burn button).
USB Guy
I can confirm the USB Thumb Drive Installer instructions work perfectly.
Albert
Thank you!!!